How to set up proxy auto config on Ubuntu Desktop
Last updated on September 26, 2020 by Dan Nanni
Suppose you are using your Ubuntu Desktop laptop at home and workplace. When you are at your workplace, the corporate network your laptop is connected to is behind proxy. You would then have to turn on/off proxy depending on where you are. Of course you could manually update proxy settings of Ubuntu Desktop every time your network changes, but that'd be quite cumbersome. That's when proxy auto-config can help.
A proxy auto-config (PAC) is a powerful mechanism that allows one to conditionally define proxy settings for web browsers. Using PAC, you can automatically switch proxy settings based on destination URL, IP address of local host, time of day, etc. As you can imagine, PAC is extremely useful for setting up proxy exceptions, proxy load balancing, network-aware conditional proxy, etc.
In the following, I will show you how to set up PAC on Ubuntu Desktop so that you can automatically switch between no-proxy and proxy based on the IP address of local host.
Creating a PAC file for automatic proxy switching is not complicated. In a PAC file, you essentially define FindProxyForURL(url, host) JavaScript function which is supposed to return the proxy to use when fetching a given URL. Create a PAC file as follows.
$ sudo vi /etc/proxy.pac
function FindProxyForURL(url, host)
{
  if (isInNet(myIpAddress(), "1.2.3.0", "255.255.255.0")) {
    if (isInNet(host, "192.168.0.0", "255.255.0.0"))
      return "DIRECT";
    if (shExpMatch(url, "http:*"))
      return "PROXY my.proxy.com:8000" ;
    if (shExpMatch(url, "https:*"))
      return "PROXY my.proxy.com:8000" ;
    if (shExpMatch(url, "ftp:*"))
      return "PROXY my.proxy.com:8000" ;
    return "DIRECT";
  } else {
    return "DIRECT";
  }
}
In this PAC file, if you are connected to 1.2.3.0/24 network (assuming that is the corporate network), you use proxy (my.proxy.com:8000) for all destinations other than 192.168.0.0/24. Otherwise, you do not use proxy at all.
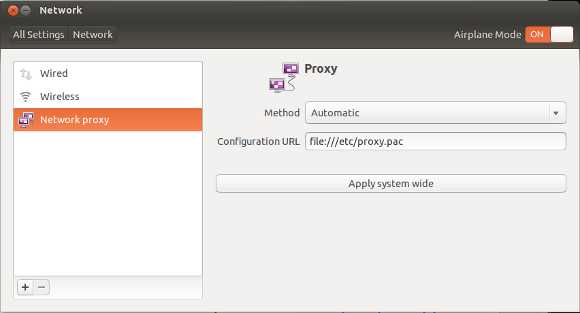
Once you have created this PAC file, go to System Settings → Network → Proxy Settings, and choose Automatic method in network proxy. Then type file:///etc/proxy.pac in configuration url field.

Alternatively, you can also use gsettings tool to enable PAC from the command line.
Configure the IP address of localhost
There is one last important thing to do before finalizing PAC configuration. In the PAC file you created, myIpAddress() is supposed to return the IP address of localhost correctly. As a final step, you should verify that is the case by using hostname command.
$ hostname -i
If the hostname command returns 127.0.0.1, not an actual IP address assigned to your laptop, then myIpAddress() will also return 127.0.0.1, and the above proxy auto configuration will fail. To get around this problem, you need to set up the real IP address of local host somewhere.
In Linux, you can hard code the IP address of local host in /etc/hosts. However, since the IP address of localhost may keep changing depending on where you are, you can write a start-up script which automatically generates /etc/hosts upon boot.
To do that, first rename the original /etc/hosts to something else, which will then be used to generate an actual /etc/hosts to use.
$ sudo mv /etc/hosts /etc/hosts.custom
Now, create the following script which generates /etc/hosts from /etc/hosts.custom.
$ vi hostname.sh
#!/bin/bash

WIRED_IP=`ifconfig eth0 | sed -ne 's/.*inet addr:([^ ]*).*/1/p'`
WIRELESS_IP=`ifconfig wlan0 | sed -ne 's/.*inet addr:([^ ]*).*/1/p'`
HOST_IP=${WIRED_IP:-$WIRELESS_IP}
HOST_NAME="your_host_name"

cat /etc/hosts.custom > /etc/hosts

cat >> /etc/hosts << EOF
# This file is automatically generated by /sbin/hostname.sh
$HOST_IP  $HOST_NAME
EOF

exit 0
The script hostname.sh takes the IP address of either eth0 (for wired) or wlan0 (for wireless), and puts it in /etc/hosts.
The next step is to make the hostname.sh script get called when a network interface gets activated. Assuming that you are using Network Manager on Ubuntu Desktop, this can be achieved by running the following.
$ sudo chmod 755 hostname.sh
$ sudo cp hostname.sh /etc/NetworkManager/dispatcher.d
Now the hostname.sh script will get executed to update /etc/hosts automatically every time any wired or wireless network interface is up.
An alternative way to run the hostname.sh script is to configure your Ubuntu Desktop, so that the script automatically gets executed when you log in to your desktop.
After using either of the above two methods, verify that your hostname can successfully be resolved to IP address after you log in.
$ hostname -i
1.2.3.100
Proxy auto configuration is now set up on Ubuntu Desktop. Your Ubuntu Desktop will automatically turn on or off proxy depending on where you are at home or workplace.
Use proxy auto configuration on Firefox
If you want to use /etc/proxy.pac on Firefox, follow the instruction here.
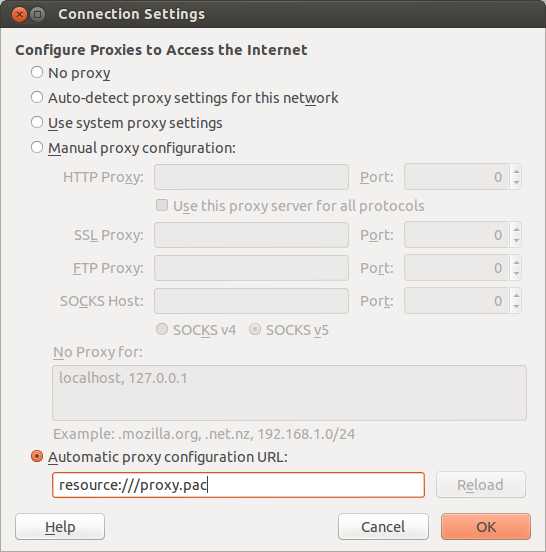
First open up Connection Settings menu in Firefox preferences. Then enter resources:///proxy.pac as the automatic proxy configuration URL.

Then create a symbolic link to /etc/proxy.pac inside the directory where Firefox executable exists (e.g., /usr/bin).
$ sudo ln -s /etc/proxy.pac /usr/bin/proxy.pac
Once you restart Firefox, it will start using the proxy auto configuration.
Support Xmodulo
This website is made possible by minimal ads and your gracious donation via PayPal or credit card
Please note that this article is published by Xmodulo.com under a Creative Commons Attribution-ShareAlike 3.0 Unported License. If you would like to use the whole or any part of this article, you need to cite this web page at Xmodulo.com as the original source.
Xmodulo © 2021 ‒ About ‒ Write for Us ‒ Feed ‒ Powered by DigitalOcean

