How to create multiple networks on VMware Player
Last updated on October 18, 2020 by Dan Nanni
If you have installed VMware Player on Linux, you will notice that VMware Player GUI offers three network options for guest VMs, as shown below: (1) bridged network, (2) NAT network, and (3) host-only network.

What if you want to connect your guest VM to multiple isolated virtual networks, each of which is reachable via different network interfaces attached to the VM? If network choices are limited to the above three options, you won't be able to create many custom virtual networks for your VM.
That is when LAN segments feature can help. You define multiple LAN segments, each of which represents an isolated virtual LAN. You then add to your VM as many LAN segments (and corresponding network adapters) as you want. Both VMware Workstation and VMware Player have this LAN segments feature built-in. For some reason, however, the Linux version of VMware Player has LAN segment configuration GUI hidden magically. You will need to use the following trick to make it appear.
In order to create and assign a LAN segment to your VMware Player VM, first create a new VM instance with two network interfaces (one bridged and the other NAT interfaces), using Virtual Machine Wizard. Do not turn on the VM at this point. Instead, open up .vmx file of the VM, and edit it as follows.
In the .vmx file, search for lines that read ethernet1.xxxxx (as shown below). This is configuration for network interface eth1.
ethernet1.present = "TRUE"
ethernet1.connectionType = "nat"
ethernet1.virtualDev = "e1000"
ethernet1.wakeOnPcktRcv = "FALSE"
ethernet1.addressType = "generated"
Currently eth1 is set to use NAT. I will reconfigure it so that it uses a LAN segment instead. For that, change the above configuration as follows.
ethernet1.present = "TRUE"
ethernet1.connectionType = "pvn"
ethernet1.pvnID = "52 dd bc d5 36 19 1b 6b-0f f1 fb 1c 4c ac 44 f7"
ethernet1.virtualDev = "e1000"
ethernet1.wakeOnPcktRcv = "FALSE"
ethernet1.addressType = "generated"
There are two changes made. First, ethernet1.connectionType was changed to pvn (which stands for "private virtual network"). Also, ethernet1.pvnID was inserted. pvnID identifies the LAN segment that the VM will be attached to. You can fill in any arbitrary pvnID in the same alphanumeric format; it will be regenerated by VMware Player later on. Once changes are saved to .vmx file, open the guest machine's VM settings on VMware Player. Now you will notice that LAN segment configuration menu magically appears on VMware Player GUI, as shown below.
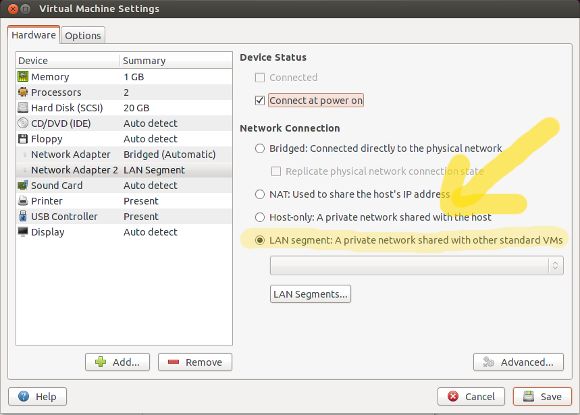
From the drop down menu of LAN segments, you can choose LAN Segment 1 which was created by our manual editing of .vmx file. You can also create as many LAN segments as you want, by clicking on LAN Segments button, which will show you a LAN segment management interface.
All the VMs that are attached to the same LAN segment are physically on the same Layer-2 network. VMs that are assigned to different LAN segments are physically separated.
Note that there is no pre-configured DHCP service running on the LAN segments you create. Therefore, if you want to have your VM assigned a DHCP IP address from a given LAN segment, you will need to run a DHCP server on one of your VMs on the same LAN segment. Alternatively, you could use a static IP address.
Support Xmodulo
This website is made possible by minimal ads and your gracious donation via PayPal or credit card
Please note that this article is published by Xmodulo.com under a Creative Commons Attribution-ShareAlike 3.0 Unported License. If you would like to use the whole or any part of this article, you need to cite this web page at Xmodulo.com as the original source.

Xmodulo © 2021 ‒ About ‒ Write for Us ‒ Feed ‒ Powered by DigitalOcean