How to install and run Android VM on VMware Player
Last updated on September 14, 2020 by Dan Nanni
Android-x86 is a port of the Android OS for x86-based processor architecture. If you want to run Android OS on x86-based PC, netbook or laptop hardware, you can install Android-x86. In this guide, I will show you how to install and run Android-x86 as a VM on VMware Player. The tested version is Android x86 4.0 RC2.
First, download an ISO image of Android-x86 from the official source.
Create a new virtual machine template on VMware Player. Choose Use ISO image option to use the downloaded ISO file. Set disk image size to 2.5GB. Memory will automatically be set to 256MB. Before finalizing the New Virtual Machine Wizard, uncheck Automatically power on this virtual machine after creation since there is one thing to do before powering on the VM.
Open .vmx file of the new virtual machine, and change ethernet0.virtualDev from e1000 to vlance.
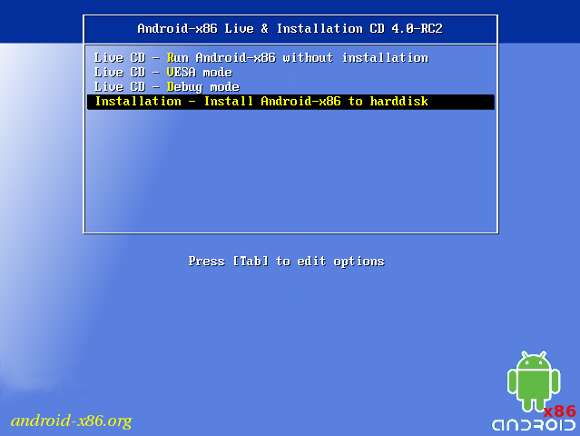
Power on the VM. Once VM boots up, you will see the following screen. Choose Install Android-x86 to harddisk.
Next you will see Choose Partition window. Click on Create/Modify partitions menu. This will lead you to a disk partition editor menu. Use the arrow key to choose [New] to create a new partition.
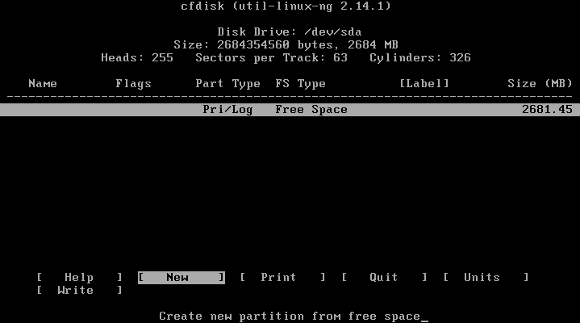
Then choose [Primary] to create a new primary partition. Accept the default to set it to maximum size, and hit Enter. Use the arrow key to choose [Bootable] and add the Boot flag to the partition. Select [Write] to confirm the partitioning, and quite the partition editor menu.
You are back to the Choose Partition window. You should now see an additional option to install Android on sda1 Linux. Choose this option and proceed.

Select ext3 in the Choose filesystem menu. Confirm when asked if you want to format the drive. Confirm again when it asks you to install the GRUB boot loader. When asked whether to install /system as read-write, choose Yes. This is because you will need to modify /system after installation. In general, mounting /system as read-write makes it easier to debug, at the cost of more disk space and longer installation time. If you are asked to create an SD card, go ahead and create one.
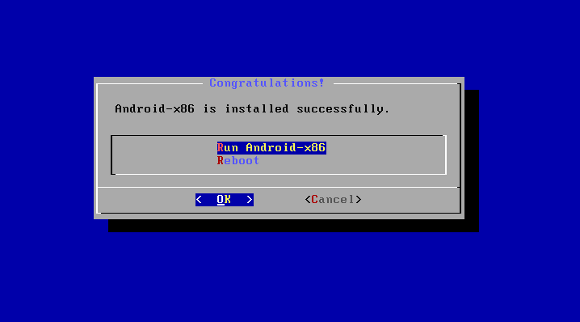
The installation will now proceed. At the end of installation, you will see the following screen. Go ahead and reboot Android VM.
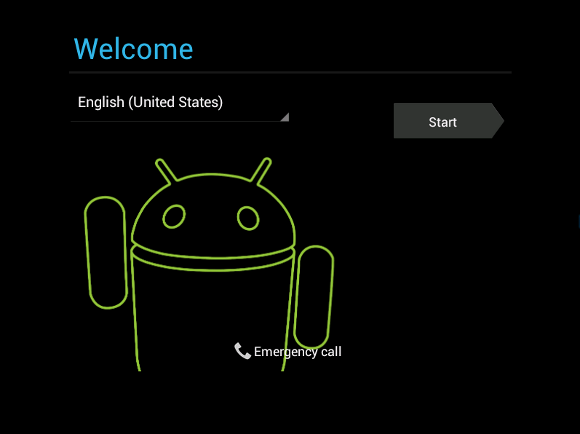
After Android VM finishes booting up, you will see the following screen. At this point, network is not properly set up. So skip Google signup process.
Proceed to open Terminal Emulator app on Android. It will give you a console interface. First, switch to the root, by typing su. Confirm when you are asked to grant superuser permission request.
As the root, verify network settings as follows.
# ifconfig eth0
eth0: ip 192.168.1.10 ask 255.255.255.0 flags [up broadcast running multicast]
# ip route show
192.168.1.0/24 dev eth0 proto kernel scope link src 192.168.1.10 metric 206
default via 192.168.1.1 dev eth0 metric 206
At this point, you will notice that DNS resolution does not work.
# ping google.com
ping: unknown host google.com
You need to configure a DNS server by appending the following line to /etc/init.sh. In this example, I am using Google's public DNS server (8.8.8.8).
# vi /etc/init.sh
setprop net.dns1 8.8.8.8
Finally, reboot the VM again to finalize network settings. Now DNS lookup should work, and you should be able to fully use networking.

Support Xmodulo
This website is made possible by minimal ads and your gracious donation via PayPal or credit card
Please note that this article is published by Xmodulo.com under a Creative Commons Attribution-ShareAlike 3.0 Unported License. If you would like to use the whole or any part of this article, you need to cite this web page at Xmodulo.com as the original source.

Xmodulo © 2021 ‒ About ‒ Write for Us ‒ Feed ‒ Powered by DigitalOcean