How to clone or copy a virtual machine on VirtualBox
Last updated on July 13, 2020 by Dan Nanni
If you need to copy or clone a virtual machine (VM) often, VirtualBox is probably the best free virtualization software for you. VirtualBox has a built-in support for virtual machine cloning, so cloning a VM is just a matter of a few mouse clicks.
In order to clone a VM on Virtual Box, you first need to save the machine state of a given VM, or completely power off the VM. You cannot clone an actively running VM.
Once a VM is powered off or saved, you can clone the VM by following this guide.
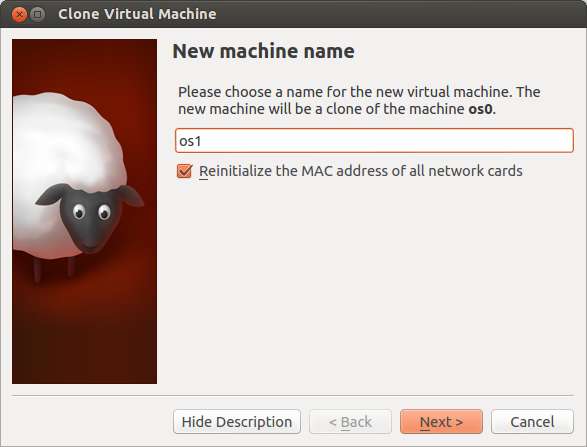
Go to Machine → Clone on VirtualBox GUI menu. It will open up VM clone wizard as follows. Type in a new machine name.
On the next screen, you will get to choose "Clone type". If you want to create an independent copy of your VM, choose "Full clone".
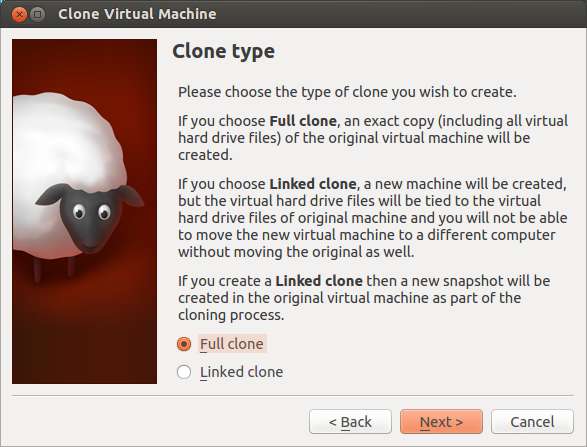
If there is any snapshot of an original VM, you can choose between copying the current machine state only, or copying the current machine state, plus all available snapshots.
Finally, click on "Clone button" to proceed with cloning. Once cloning is done, you can power on the cloned VM.

Solve Networking Problems of Cloned Linux VM
When cloning a Linux VM, additional steps may be necessary to make the networking of its cloned VM work.
For example, for Ubuntu/Debian VM, you may notice that there is no active network interface, upon powering on the cloned VM. The problem is due to the fact that the Linux system of the cloned VM stores the original VM's MAC address(es) for its network interface(s) in its udev configuration file, even though VirtualBox has generated new MAC address(es) for the cloned VM.
Since Linux 2.6 kernel, udev device manager system has been introduced to handle devices including networking devices, hard drives, USB devices, etc. The udev of the original VM assigns device name eth0 to the VM's MAC address, and this (eth0, MAC address) mapping rule is stored in /etc/udev/rules.d/*-persistent-net.rules.
The cloned VM will use the same udev rule to attempt to assign device names. However, since VirtualBox has generated a different MAC address for the cloned VM, it cannot assign eth0 to the cloned VM's primary interface, and ends up assigning a different name (e.g., eth1) to the interface. Of course, because there is no network configuration for eth1, networking cannot work.
You can verify this problem by checking udev rule of the cloned VM as follows.
$ sudo vi /etc/udev/rules.d/*-persistent-net.rules
# PCI device 0x8086:/sys/devices/pci0000:00/0000:00:03.0 (e1000)
SUBSYSTEM=="net", ACTION=="add", DRIVERS=="?*", ATTR{address}=="08:00:27:d9:c8:cc", ATTR{dev_id}=="0x0", ATTR{type}=="1", KERNEL=="eth*", NAME="eth0"

# PCI device 0x8086:/sys/devices/pci0000:00/0000:00:03.0 (e1000)
SUBSYSTEM=="net", ACTION=="add", DRIVERS=="?*", ATTR{address}=="08:00:27:2d:49:3e", ATTR{dev_id}=="0x0", ATTR{type}=="1", KERNEL=="eth*", NAME="eth1"
In this example, the first line is a copy from the original VM, and the second line was appended by the cloned VM. 08:00:27:d9:c8:cc is the MAC address assigned to the original VM's interface, which is named eth0, while 08:00:27:2d:49:3e is the MAC address assigned to the cloned VM's interface, which is assigned eth1.
To fix this problem, remove the first line, and replace eth1 with eth0 in the second line. Thus, a correct udev rule for the cloned VM looks like:
# PCI device 0x8086:/sys/devices/pci0000:00/0000:00:03.0 (e1000)
SUBSYSTEM=="net", ACTION=="add", DRIVERS=="?*", ATTR{address}=="08:00:27:2d:49:3e", ATTR{dev_id}=="0x0", ATTR{type}=="1", KERNEL=="eth*", NAME="eth0"
Finally, reboot the cloned VM.
One more thing: make sure to chance hostname of the cloned VM in /etc/hostname and /etc/hosts, since the cloned VM has the same hostname of the original VM.
Support Xmodulo
This website is made possible by minimal ads and your gracious donation via PayPal or credit card
Please note that this article is published by Xmodulo.com under a Creative Commons Attribution-ShareAlike 3.0 Unported License. If you would like to use the whole or any part of this article, you need to cite this web page at Xmodulo.com as the original source.

Xmodulo © 2021 ‒ About ‒ Write for Us ‒ Feed ‒ Powered by DigitalOcean