How to write Raspberry Pi image to SD card
Last updated on September 23, 2020 by Dan Nanni
Raspberry Pi (RPi) is a cheap and tiny single-board computer powered by ARM processor. While it was mainly developed for children to learn computer programming, it has also become a versatile device for DIY electronic enthusiasts or computer professionals who build many useful tools based on the tiny hardware.
Raspberry Pi comes in several different models with the following specifications.
- RPi 1 Model A: 1x ARM1176JZF-S 700MHz CPU, 256MB RAM, 1 USB 2.0 port, no Ethernet port
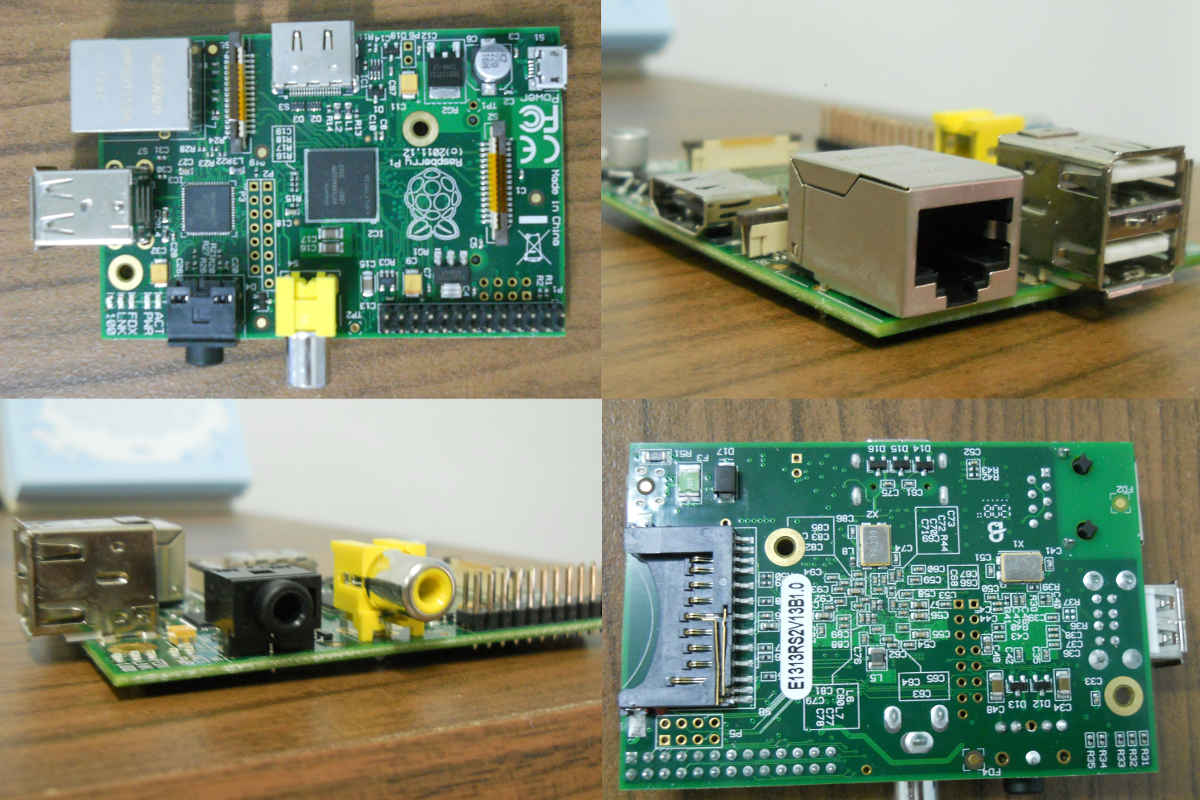
- RPi 1 Model B: 1x ARM1176JZF-S 700MHz CPU, 512MB RAM, 2 USB 2.0 ports, 1 Ethernet port (shown in the picture)
- RPi 2 Model B: 4x Cortex-A7 900MHz CPUs, 1GB RAM, 4 USB 2.0 ports, 1 Ethernet port
- RPi 3 Model B: 4x Cortex-A53 1.2GHz CPUs, 1GB RAM, 4 USB 2.0 ports, 1 Ethernet port
- RPi 4 Model B: 4x Cortex-A72 1.5GHz CPUs, 1/2/4/8GB RAM, 2 USB 2.0 ports, 2 USB 3.0 ports, 1 Ethernet port

Raspberry PI uses an SD card as backing storage for an operating system and other tools. In this tutorial, I will describe how to write a Raspberry PI image to an SD card.
Raspberry Pi Images
There are several flavors of raw Raspberry PI images (e.g., Raspbian, Pidora, Risc OS, RaspBMC, Arch, and OpenElec) which you can download from Raspberry PI's official site. All these images are compatible with both model A and B.
The RaspBMC and OpenElec images are mainly used for multimedia purposes. With either image installed, Raspberry Pi can be turned into a tiny multimedia center. You can play movie files, audio files, watch online TV, etc.
The Raspbian, Pidora and Risc OS images are like regular operating systems for ARM processors. You can install any application or service on these operating systems, such as web server, file server, access point, etc.
The NOOBS image provides the easiest and most convenient way for you to write Raspberry Pi operating systems without worrying about manually flashing an image into an SD Card. It contains more than one Raspberry Pi operating systems. Upon first boot, NOOBS automatically formats an SD card, and asks you to choose an OS to install from a list.
In this article, I am going to use Raspbian image which based on Debian.
Prepare for Burning Raspbian Image to an SD Card
To burn a Raspbian image, it is recommended to use a class 10 SD card with minimum 4 GB storage.
Before starting the process, first download the Raspbian image from the official download page. The image comes as a zip file. Unzip the file to extract the Raspbian image file.
Burn Raspbian Image to an SD Card on Linux
Insert your SD card into the card reader.
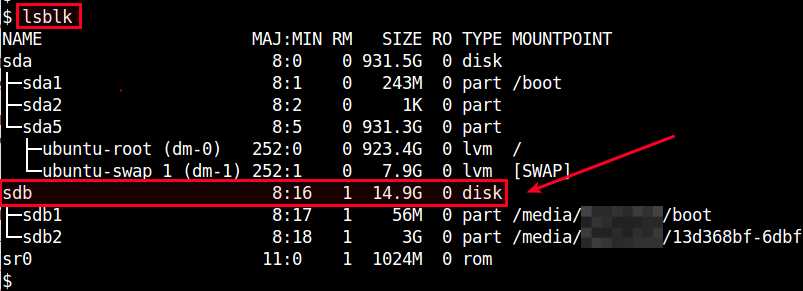
First, you need to identify the device name for the SD card. For that, you can use lsblk command which shows information about available block devices.
$ lsblk
From listed block devices, identify your SD card by checking their sizes. In this example, my SD card is 16GB, which is mapped to sdb device name. Thus the full device name of your SD card is /dev/sdb. Make a note of this device name as you need it later.

You do not need to create or format any partition on the SD card. If there is already a partition or filesystem created on the SD card, it will be overwritten by dd command subsequently anyway.
If the SD card is mounted, make sure to unmount it now.
Now empty the mounted SD card by zeroing out the SD card device:
$ sudo dd bs=4M if=/dev/zero of=/dev/sdb oflag=sync
Finally, write Raspberry Pi image to the SD card with dd command:
$ sudo dd bs=4M if=/path/to/image of=/dev/sdb oflag=sync
The bs parameter sets the block size to 4 MB. Normally the bs parameter will work with 4 MB, but you can change to 1 MB, which will take longer time to write. The if parameter sets the full path to Raspbian image, and the of parameter specifies the device name of the SD card. Here /dev/sdb is the device name you identified with lsblk command earlier. Finally, the oflag=sync option lets the dd utility perform synchronized I/O for all data and metadata writes, which enables you to check for any write errors to the SD card.
Note that the dd command will not give you any feedback during its operation, and it will look like freezing. So be patient until writing is finished.
After the writing process is finished, eject the SD card. Plug in to the Raspberry Pi, and make sure that all the connections are ready (HDMI/TV out, keyboard, mouse, Ethernet cable). Finally, turn on the power.
Besides using dd command, you can also try other image writer applications such as usb-imagerwriter for deb based distributions, and imagewriter for RPM-based distributions. These tools will make the image writing process more user-friendly than dd command.
NOTE: the Raspbian image written to an SD card only occupies less than 4GB of space. Thus, the installed Raspbian will not recognize the rest of an SD card beyond Raspbian image size. To utilize all available SD card space, you will need to "expand" the Raspbian file system. In fact, the file system expansion is one of the first things you need to do after powering up Raspberry Pi.
Burn Raspbian Image to an SD Card on Windows
First, download and install SD Card Formatter from SD Associations.
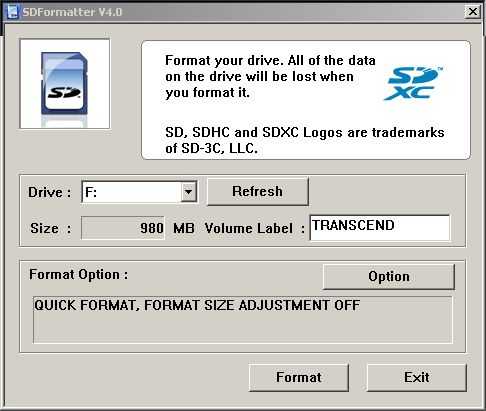
Insert your SD card into the card reader, and then format the SD card with SD Card Formatter. Formatting options do not matter, as the formatted filesystem will be overwritten during the subsequent image writing step. The reason why we format the SD card is to make the card recognized by the operating system.

Next, download and install win32diskimager application which can flash an SD Card.
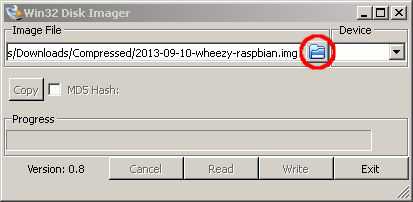
Launch win32diskimager. After locating the extracted Raspbian raw image via a built-in file dialog box, write the image to an SD card. It will take some times to finish writing the image into the SD card.

After the writing process is finished, eject the SD card and plug in to the Raspberry Pi.
Support Xmodulo
This website is made possible by minimal ads and your gracious donation via PayPal or credit card
Please note that this article is published by Xmodulo.com under a Creative Commons Attribution-ShareAlike 3.0 Unported License. If you would like to use the whole or any part of this article, you need to cite this web page at Xmodulo.com as the original source.
Xmodulo © 2021 ‒ About ‒ Write for Us ‒ Feed ‒ Powered by DigitalOcean

