How to use KVM from the command line on Debian or Ubuntu
Last updated on November 30, 2020 by Dan Nanni
There are different ways to manage virtual machines (VMs) running on KVM hypervisor. For example, virt-manager is a popular GUI-based front-end for VM management. However, if you would like to use KVM on a headless server, GUI-based solutions will not be ideal. In fact, you can create and manage KVM VMs purely from the command line using kvm command-line wrapper script. Alternatively, you can use virsh which is an easier-to-use command-line user interface for managing guest VMs. Underneath virsh, it communicates wtih libvirtd service which can control several different hypervisors including KVM, Xen, QEMU, LXC and OpenVZ.
A command-line management interface such as virsh is also useful when you would like to automate the provisioning and management of VMs. Also, the fact that virsh supports multiple hypervisors means you can manage different hypervisors via the same virsh interface.
In this tutorial, I will demonstrate how to run KVM from the command line by using virsh on Debian or Ubuntu.
Step One: Verify Hardware Virtualization Support
As a first step, verify that the host CPU is equipped with hardware virtualization extensions (e.g., Intel VT or AMD-V), which are required for KVM. The following command will do.
$ egrep '(vmx|svm)' --color /proc/cpuinfo

If the output does not contain vmx or svm flag, it means the host CPU does not have hardware virtualization support. Thus you cannot use KVM on the host. After verifying that the host CPU comes with vmx or svm, proceed to install KVM next.
For KVM, it is not required to run a 64-bit kernel on the KVM host, but generally it is recommended.
Step Two: Install KVM
Using apt-get, install KVM and related user-space tools.
$ sudo apt-get install qemu-kvm libvirt-bin
During installation, libvirtd group (or libvirt-qemu on Debian) will be created, and your userID will be automatically added to the group. This will allows you to manage VMs as a non-root regular user. You can verify that by using id command, which will show your group IDs:
$ id <your-userID>

If for some reason, libvirtd (or libvirt-qemu) is not found in your groupID list, you can manually add yourself to the group as follows.
On Ubuntu:
$ sudo adduser [youruserID] libvirtd
On Debian:
$ sudo adduser [youruserID] libvirt-qemu
Reload updated group membership info as follows. Upon asked for a password, enter your login password. Alternatively, you can log out and log back in.
$ exec su -l $USER
At this point, you should be able to run virsh as a regular user. As a test, try the command below, which will show a list of available VMs (currently none). If you do not encounter a permission error, it means everything is okay so far.
$ virsh list
 Id    Name                           State
----------------------------------------------------
Step Three: Configure Bridged Networking
One way to enable KVM VMs to access external networks is via a Linux bridge created on a KVM host. The bridge interconnects the virtual interfaces of VMs with the physical interface of the host, so that the VMs can send or receive traffic via the physical interface. This is called bridged networking.
Here is how to create and configure a Linux bridge br0 for bridged networking with KVM.
First, install a necessary package, and create a Linux bridge from the command line.
$ sudo apt-get install bridge-utils
$ sudo brctl addbr br0
The next step is to configure Linux bridge in /etc/network/interfaces, so that the bridge is configured automatically upon boot. To use /etc/network/interfaces, you need to disable Network Manager on your system (if you are using it).
After disabling Network Manager, go ahead and configure Linux bridge br0 in /etc/network/interfaces as follows.
#auto eth0
#iface eth0 inet dhcp

auto br0
iface br0 inet dhcp
        bridge_ports eth0
        bridge_stp off
        bridge_fd 0
        bridge_maxwait 0
In the above I assume that eth0 is the primary network interface that is connected to external networks. Also, I assume that eth0 is getting its IP address via DHCP. Note that there is no IP configuration for eth0 in /etc/network/interfaces. The Linux bridge br0 takes up the configuration of eth0 as eth0 is enslaved to the bridge br0.
Restart network service, and verify that Linux bridge is configured successfully. If successful, br0 should be assigned the eth0's DHCP IP address, and eth0 should not have any IP address assigned.
$ sudo /etc/init.d/networking restart
$ ifconfig
If for any reason eth0 still retains the IP address which is assigned to br0, you may have to explicitly remove the IP address from eth0.

Besides bridged networking, there are many other ways to interconnect VMs. Another interconnection solution is to use Open vSwitch, which allows one to define more flexible forwarding and filtering policies for VMs. Configuring Open vSwitch is beyond the scope of this tutorial.
Step Four: Create a VM from the Command Line
With KVM, the configuration of a VM is stored in a domain XML file. Thus, the first step to create a VM is to prepare its domain XML file.
The following is a sample domain XML file of a VM. You can customize it as needed.
<domain type='kvm'>
  <name>alice</name>
  <uuid>f5b8c05b-9c7a-3211-49b9-2bd635f7e2aa</uuid>
  <memory>1048576</memory>
  <currentMemory>1048576</currentMemory>
  <vcpu>1</vcpu>
  <os>
    <type>hvm</type>
    <boot dev='cdrom'/>
  </os>
  <features>
    <acpi/>
  </features>
  <clock offset='utc'/>
  <on_poweroff>destroy</on_poweroff>
  <on_reboot>restart</on_reboot>
  <on_crash>destroy</on_crash>
  <devices>
    <emulator>/usr/bin/kvm</emulator>
    <disk type="file" device="disk">
      <driver name="qemu" type="raw"/>
      <source file="/home/dev/images/alice.img"/>
      <target dev="vda" bus="virtio"/>
      <address type="pci" domain="0x0000" bus="0x00" slot="0x04" function="0x0"/>
    </disk>
    <disk type="file" device="cdrom">
      <driver name="qemu" type="raw"/>
      <source file="/home/dev/iso/CentOS-6.5-x86_64-minimal.iso"/>
      <target dev="hdc" bus="ide"/>
      <readonly/>
      <address type="drive" controller="0" bus="1" target="0" unit="0"/>
    </disk>
    <interface type='bridge'>
      <source bridge='br0'/>
      <mac address="00:00:A3:B0:56:10"/>
    </interface>
    <controller type="ide" index="0">
      <address type="pci" domain="0x0000" bus="0x00" slot="0x01" function="0x1"/>
    </controller>
    <input type='mouse' bus='ps2'/>
    <graphics type='vnc' port='-1' autoport="yes" listen='0.0.0.0'/>
    <console type='pty'>
      <target port='0'/>
    </console>
  </devices>
</domain>
The above domain XML file defines the following VM.
- 1GB memory, one vCPU and one hard drive.
- Disk image:
/home/dev/images/alice.img. - Boot from CD-ROM (
/home/dev/iso/CentOS-6.5-x86_64-minimal.iso). - Networking: one network interface bridged to
br0 - Remote access via VNC.
The UUID string inside <uuid></uuid> can be randomly generated. To get a random UUID, you can use uuid command-line tool.
$ sudo apt-get install uuid
$ uuid
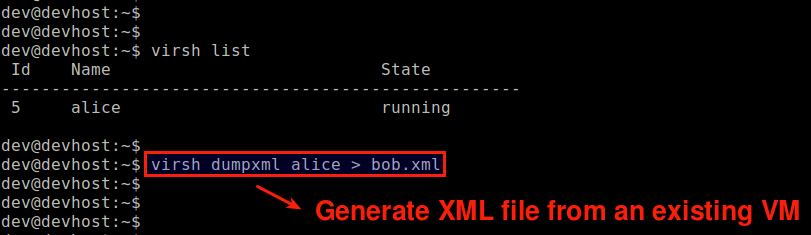
Another way to create a domain XML file is to dump the domain information of an existing VM as follows.
$ virsh dumpxml alice > bob.xml
Step Five: Start VM from the Command Line
Before starting a VM, you need to create its initial disk image. For that, you can use qemu-img command, which comes with qemu-kvm package you installed. The following command creates 10GB size empty disk image of QCOW2 type:
$ qemu-img create -f qcow2 /home/dev/images/alice.img 10G
The advantage of using QCOW2 (as opposed to RAW) as a disk image format is that a QCOW2-type disk image is not created as a full size (10GB) initially, but grows as the disk gets populated. So it is more space-efficient.
Now you are ready to start a VM using the domain XML file you created earlier. The following command will create a VM, and automatically start it.
$ virsh create alice.xml
Domain alice created from alice.xml
NOTE: If you run the above command with an already created VM, it will wipe out the VM without warning. If you already created a VM, you can instead use the following command to just start the VM.
$ virsh start alice.xml
Verify that a new domain has been created and started successfully with:
$ virsh list
 Id    Name                           State
----------------------------------------------------
 3     alice                          running
Also, verify that the virtual interface for the VM (e.g., vnet0) is successfully added to the Linux bridge br0 that you created earlier.
$ sudo brctl show

Step Six: Remote Access a VM
To access the console of a running VM remotely, you can use any VNC client.
First, find out the VNC port number for the VM as follows.
$ sudo netstat -nap | egrep '(kvm|qemu)'

In this example, the VNC port number for alice VM is 5900.
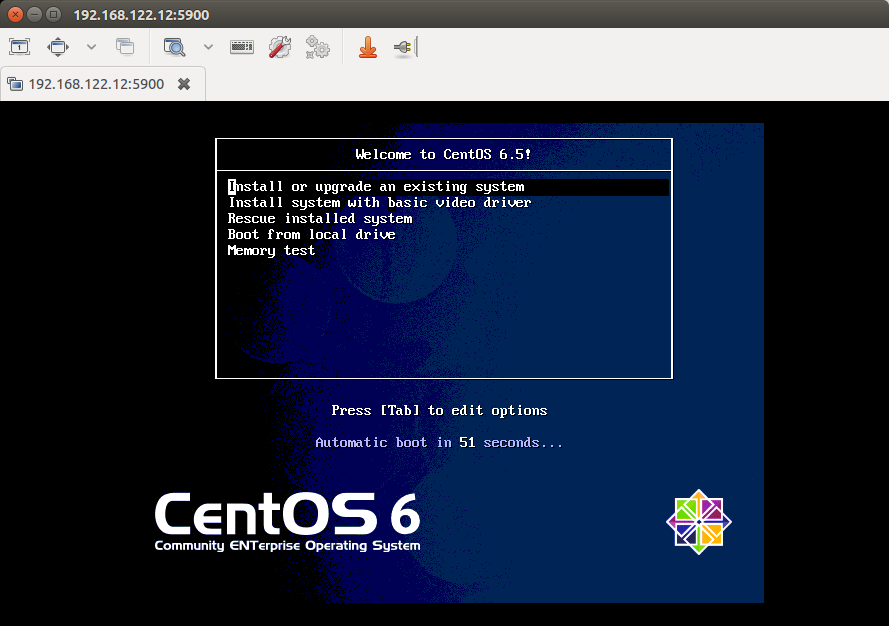
Then launch a VNC client, and connect to a VNC server running at <KVM-host-IP>:5900. In our example, the VM is supposed to boot into CentOS CD-ROM.
Manage VMs with virsh
The following lists common usages of virsh command.
To create a new guest domain and start a VM:
$ virsh create alice.xml
To stop a VM and destroy a guest domain:
$ virsh destroy alice
To shutdown a VM (without destroying a domain):
$ virsh shutdown alice
To suspend a VM:
$ virsh suspend alice
To resume a suspended VM:
$ virsh resume alice
To access login console of a running VM:
$ virsh console alice
To autostart a VM upon host booting:
$ virsh autostart alice
To get domain information of a VM:
$ virsh dominfo alice
To edit domain XML of a VM:
$ virsh edit alice
The above will invoke the domain XML file of the VM with a default text editor. Any change in the XML will automatically be validated by libvirt for correctness.
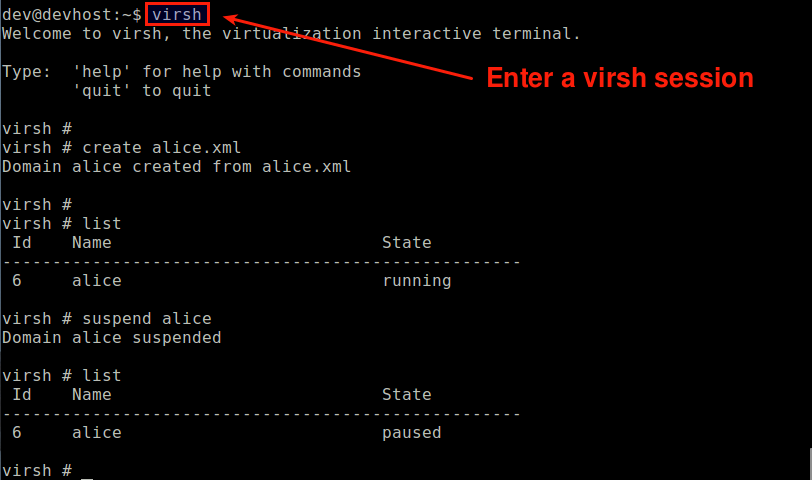
You can also manage VMs from within a virsh session. To create and enter a new virsh session, simply run:
$ virsh
At the virsh prompt, you can use any virsh commands.
Troubleshooting
1. I am getting the error while trying to create a VM:
error: internal error: no supported architecture for os type 'hvm'
You can get this error if your hardware does not have hardware virtualization support (e.g., Intel VT or AMD-V), which is required to run KVM. If you are getting this error even when your CPU comes with Intel VT or AMD-V, here are possible solutions:
First, check if kvm kernel module is missing.
$ lsmod | grep kvm
If kvm kernel module is not loaded, you must load it as follows.
$ sudo modprobe kvm_intel (for Intel processor)
$ sudo modprobe kvm_amd (for AMD processor)
The second solution is adding --connect qemu:///system argument to virsh command as follows. This argument may be needed when you are using more than one hypervisor (e.g., VMware, VirtualBox) on the server hardware.
$ virsh --connect qemu:///system create alice.xml
2. I am getting the error while trying to access login console of my VM:
$ virsh console alice
error: internal error: cannot find character device <null>
This error occurs because you did not define a console device in the VM's XML file. Add the following inside the device section of the XML file.
    <console type='pty'>
      <target port='0'/>
    </console>
Support Xmodulo
This website is made possible by minimal ads and your gracious donation via PayPal or credit card
Please note that this article is published by Xmodulo.com under a Creative Commons Attribution-ShareAlike 3.0 Unported License. If you would like to use the whole or any part of this article, you need to cite this web page at Xmodulo.com as the original source.

Xmodulo © 2021 ‒ About ‒ Write for Us ‒ Feed ‒ Powered by DigitalOcean