How to manage passwords from the command line on Linux
Last updated on October 14, 2020 by Dan Nanni
With password-based authentication so prevalent online these days, you may need or already use some sort of password management tool to keep track of all the passwords you are using. There are various online or offline services or software tools for that matter, and they vary in terms of their sophistication, user interface or target environments (e.g., enterprises or end users). For example, there are a few GUI-based password managers for end users, such as KeePass(X).
For those of you who do not want any kind of GUI dependency for password management, I will describe how to manage passwords from the command line by using pass, a simple command-line utility for password management.
The pass utility is in fact a shell script frontend which uses several other tools (e.g., gpg, pwgen, git, xsel) to manage user's password info using OpenPGP. Each password is encrypted with gpg utility, and stored in a local password store. Password info can be retrieved either via terminal or self-clearing clipboard interface.
The pass utility is quite flexible and extremely simple to use. You can store each password info in an OpenPGP-protected plain text file, and group different password files into multiple categories. It supports bash auto completion feature, so it is very convenient to fill in commands or long password names using TAB key.
Install pass on Linux
For Ubuntu, Debian or Linux Mint:
$ sudo apt-get install pass
$ echo "source /etc/bash_completion.d/password-store" >> ~/.bashrc
For Fedora:
$ sudo yum install pass
$ echo "source /etc/bash_completion.d/password-store" >> ~/.bashrc
For CentOS/RHEL:
First enable EPEL repository and then run:
$ sudo yum install pass
$ echo "source /etc/bash_completion.d/password-store" >> ~/.bashrc
For Arch Linux:
$ sudo pac -S pass
$ echo "source /etc/bash_completion.d/password-store" >> ~/.bashrc
Initialize Local Password Store
Before using pass utility, you need to do one-time initialization step which involves creating a GPG key pair (if you don't have one) and a local password store.
First, create a GPG key pair (i.e., public/private keys) as follows. If you already have your own GPG key pair, you can skip this step.
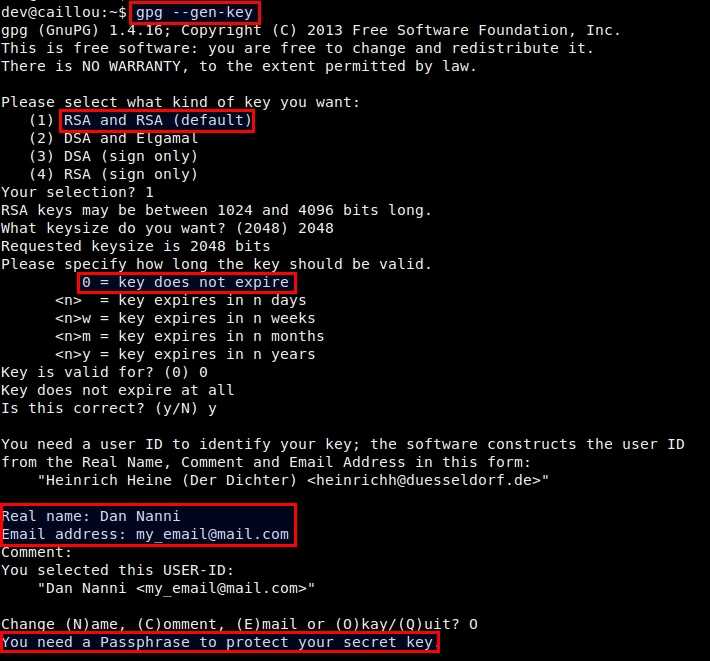
$ gpg --gen-key
It will ask you a series of questions as shown below. If you are not sure, you can accept default answers. As part of key generation, you will set a passphrase for your secret key, which is essentially the master password required to access any password info stored in local password store. A successfully generated key pair will be stored in ~/.gnupg
Next, initialize the local password store by running the following command. For <gpg-id>, enter the email address associated your GPG key created above.
$ pass init <gpg-id>
This command will create a password store under ~/.password-store directory.
Manage Passwords from a Terminal with pass
1. Insert new password info
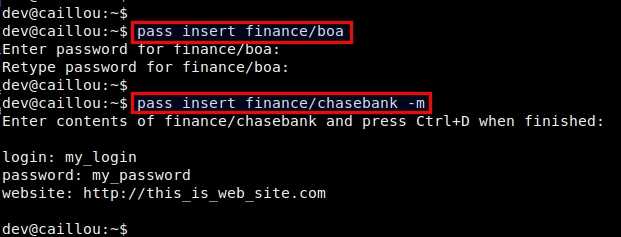
To insert new password info into local password store, use the following format.
$ pass insert <password-name>
<password-name> is an arbitrary name you define, and can be hierarchical (e.g., finance/tdbank, online/gmail.com), in which case the password info will be created in corresponding sub-directories under ~/.password-store.
If you want to insert password info as multi-lines, use -m option as follows. Type in password info in any format as you like, and press Ctrl+D to finish.
$ pass insert <password-name> -m
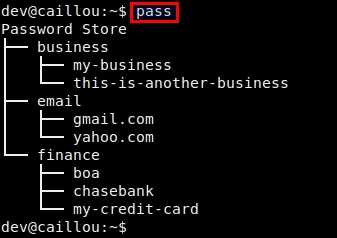
2. View a list of all password names
To view the list of all stored password names, simply type pass:
$ pass
3. Retrieve password info from password store
To access the content of a particular password listing, simply use the command below:
$ pass <password-name>
For example:
$ pass email/gmail.com
You will be asked to enter the passphrase to unlock the secret key.
If you want the password to be copied to the clipboard, instead of appearing in the terminal screen, use this command instead:
$ pass -c email/gmail.com
Once copied to the clipboard, the password will automatically be cleared from the clipboard after 45 seconds.
4. Generate and store a new password in password store
With pass, you can also generate a new random password which you can use for any purpose. pass will use pwgen utility to generate a good random password. You can specify the length of a password, or generate a password with or without symbols.
For example, to generate a 10-character password with no symbol, and store it under email/new_service.com listing:
$ pass generate email/new_service.com 10 -n
5. Remove password info
Removing existing password info is easy:
$ pass rm email/gmail.com
To summarize, pass is extremely flexible, portable, and more importantly, easy to use. I highly recommend pass to anyone looking for a simple means to organize any kind of private info in a secure fashion, without relying on GUI dependency.
Support Xmodulo
This website is made possible by minimal ads and your gracious donation via PayPal or credit card
Please note that this article is published by Xmodulo.com under a Creative Commons Attribution-ShareAlike 3.0 Unported License. If you would like to use the whole or any part of this article, you need to cite this web page at Xmodulo.com as the original source.

Xmodulo © 2021 ‒ About ‒ Write for Us ‒ Feed ‒ Powered by DigitalOcean