How to apply image effects to pictures on Raspberry Pi
Last updated on September 19, 2020 by Dan Nanni
Like a common pocket camera which has a built-in function to add various effects on captured photos, Raspberry Pi camera board ("Pi Cam" module) can actually do the same. With the help of raspistill camera control options, we can add the image effects function like we have in a pocket camera.
There are three comman-line applications which can be utilized for taking videos or pictures with Pi Cam module, and one of them is the raspistill application. The raspistill tool offers various camera control options such as sharpness, contrast, brightness, saturation, ISO, exposure, automatic white balance (AWB), image effects.
In this article I will show how to apply exposure, AWB, and other image effects with raspistill while capturing pictures using raspi cam. To automate the process, I wrote a simple Python script which takes pictures and automatically applies a series of image effects to the pictures. The raspi cam documentation describes available types of the exposure, AWB, and image effects. In total, the raspi cam offers 16 types of image effects, 12 types of exposure, and 10 types of AWB values.
The simple Python script looks like the following.
#!/usb/bin/python
import os
import time
import subprocess
list_ex=['auto','night']
list_awb=['auto','cloud',flash']
list_ifx=['blur','cartoon','colourswap','emboss','film','gpen','hatch','negative','oilpaint','posterise','sketch','solarise','watercolour']
x=0
for ex in list_ex:
    for awb in list_awb:
        for ifx in list_ifx:
            x=x+1
            filename='img_'+ex+'_'+awb+'_'+ifx+'.jpg'
            cmd='raspistill -o '+filename+' -n -t 1000 -ex '+ex+' -awb '+awb+' -ifx '+ifx+' -w 640 -h 480'
            pid=subprocess.call(cmd,shell=True)
            print "["+str(x)+"]-"+ex+"_"+awb+"_"+ifx+".jpg"
            time.sleep(0.25)
print "End of image capture"
The Python script operates as follows. First, create three array/list variable for the exposure, AWB and image effects. In the example, we use 2 types of exposure, 3 types of AWB, and 13 types of image effects values. Then make nested loops for applying the value of the three variables that we have. Inside the nested loop, execute the raspistill application. We specify (1) the output filename; (2) exposure value; (3) AWB value; (4) image effect value; (5) the time to take a photo, which is set to 1 second; and (6) the size of the photo, which is set to 640x480px. This Python script will create 78 different versions of a captured photo with a combination of 2 types of exposure, 3 types of AWB, and 13 types of image effects.
To execute the Python script, simply type:
$ python name_of_this_script.py
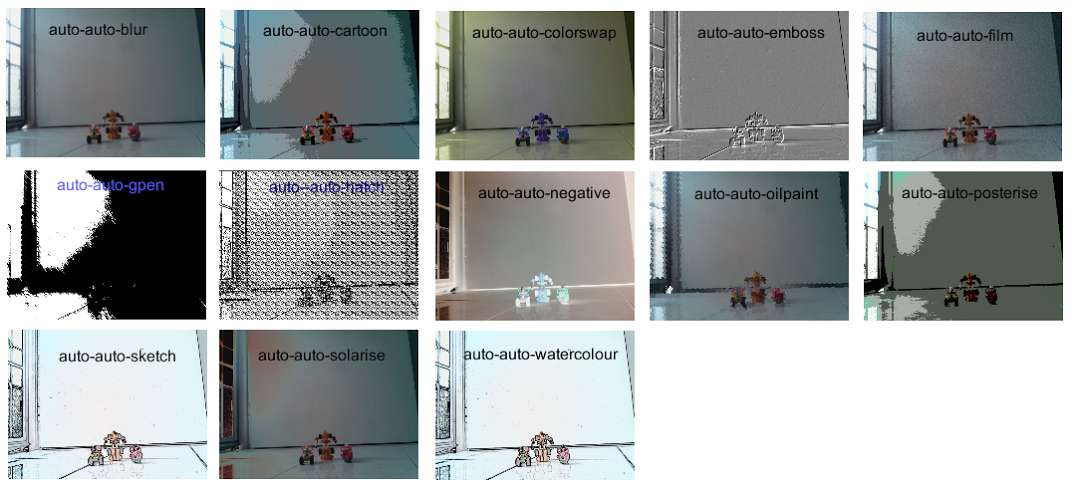
Here is the first round of the sample result.

Bonus
For those who are more interested, there is another way to access and control the raspi cam besides raspistill. picamera a pure Python interface which provides APIs for accessing and controlling raspi cam, so that one can build a complex program for utilizing raspi cam according to their needs. If you are skilled at Python, picamera is a good feature-complete interface for implementing your raspi cam project. The picamera interface is included by default in the recent image of Raspbian. If your Raspberry Pi operating system is not new or not Raspbian, you can install it on your system as follows.
First, install pip on your system by following this guideline.
Then, install picamera as follows.
$ sudo pip install picamera
Refer to the official documentation on how to use picamera.
Support Xmodulo
This website is made possible by minimal ads and your gracious donation via PayPal or credit card
Please note that this article is published by Xmodulo.com under a Creative Commons Attribution-ShareAlike 3.0 Unported License. If you would like to use the whole or any part of this article, you need to cite this web page at Xmodulo.com as the original source.
Xmodulo © 2021 ‒ About ‒ Write for Us ‒ Feed ‒ Powered by DigitalOcean

