How to back up a Debian system using Backupninja
Last updated on September 19, 2020 by Gabriel Cánepa
Prudence or experience by disaster can teach every sysadmin the importance of taking frequent system backups. You can do so by writing good old shell scripts, or using one (or more) of the many backup tools available for the job (e.g., Clonezilla, Duplicity). Thus the more tools you become acquainted with, the better informed decisions you will make when implementing a backup solution.
In this article we will present Backupninja, a lightweight and easy-to-configure system backup tool. With the help of programs like rdiff-backup, duplicity, mysqlhotcopy and mysqldump, Backupninja offers common backup features such as remote, secure and incremental file system backups, encrypted backup, and MySQL/MariaDB database backup. You can selectively enable status email reports, and can back up general hardware and system information as well. One key strength of Backupninja is a built-in console-based wizard (called ninjahelper) that allows you to easily create configuration files for various backup scenarios.
The downside, so to speak, is that Backupninja requires other helper programs to be installed in order to take full advantage of all its features. While Backupninja's RPM package is available for Red Hat-based distributions, Backupninja's dependencies are optimized for Debian and its derivatives. Thus it is not recommended to try Backupninja for Red Hat based systems.
In this tutorial, we will cover the Backupninja installation for Debian-based distributions.
Installing Backupninja
Run the following command as root:
# aptitude install backupninja
During installation, several files and directories will be created:
/usr/sbin/backupninjais the main bash shell script./etc/cron.d/backupninja, by default, instructscronto run the main script once per hour./etc/logrotate.d/backupninjarotates the logs created by the program./etc/backup.d/is the directory where the configuration files for backup actions reside./etc/backupninja.confis the main configuration file that includes general options. It is well commented and explains each option in detail./usr/share/backupninjais the directory where the scripts used by Backupninja are located (aka handlers). These are the scripts which are in charge of doing the actual work. In this directory you will also find.helperfiles, which are used to configure and set upninjahelpermenus./usr/share/doc/backupninja/examplescontains templates for action configuration files (the kind of files that are created throughninjahelper).
Running ninjahelper for the First Time
When we try to launch ninjahelper, we can see that an internal dependency may be required. If prompted, enter yes and press the ENTER key to install dialog (a tool that displays user-friendly dialog boxes from shell scripts).

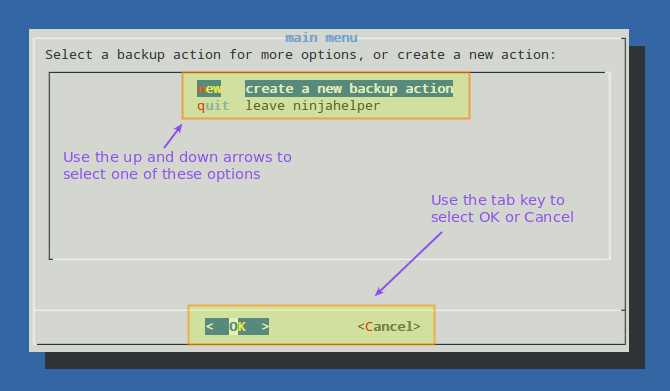
When you press Enter after typing yes, Backupninja will install dialog and present the following screen once it's done.
Example 1: Back up Hardware and System Info
After launching ninjahelper, we will create a new backup action:
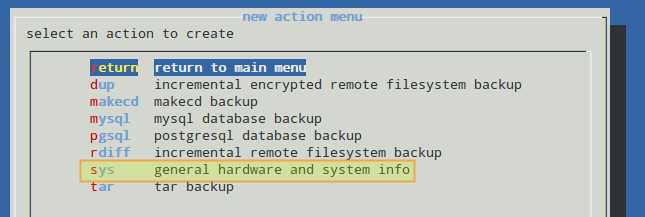
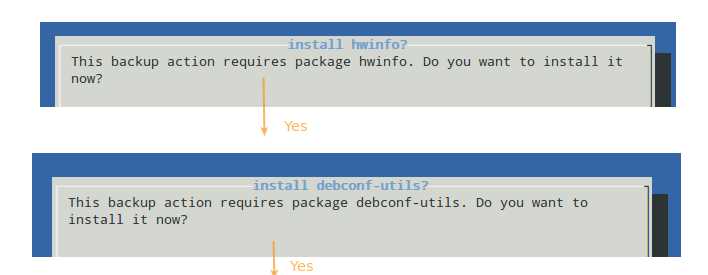
If necessary helper programs are not installed, we will be presented with the following screens. Disregard this step if these packages have already been installed on your system.
The next step consists of selecting the items that you want to be a part of this backup. The first four are selected by default, but you can deselect them by pressing the spacebar.
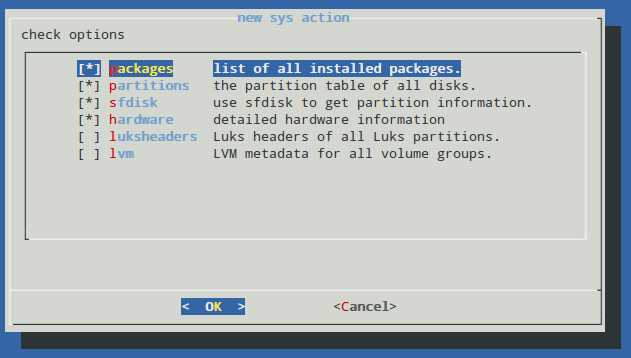
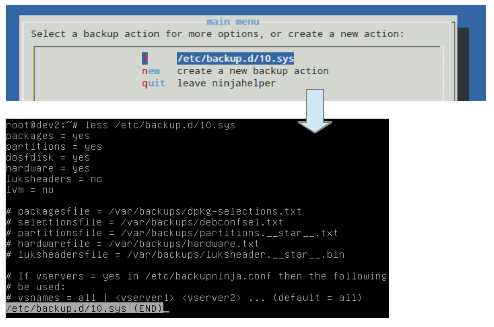
Once you are done, press OK to continue. You will be able to choose whether you want to use the default configuration file for this backup action (/etc/backup.d/10.sys), or if you want to create a new one. In the latter case, a new file with the same contents as the default one will be created under the same directory but named 11.sys, and so on for future system backup actions. Note that you can edit the configuration file once it's created with your preferred text editor.
Example 2: Incremental Rsync Pull Backup of a Remote Directory
As you most likely know, rsync is widely used to synchronize files and folders over a network. In the following example we will discuss an approach to take incremental pull backups of a remote directory with hardlinking to save historical data and store them in our local file server. This approach will help us save space and increase security on the server side.
Step 1: Write a custom script in the /etc/backup.d directory with the following contents and chmod it to 600. Note that this directory may contain, besides plain configuration files, scripts that you want to run when Backupninja is executed, with the advantage of using variables present in the main configuration file.
# REMOTE USER
user=root
# REMOTE HOST
host=dev1
# REMOTE DIRECTORY
remotedir=/home/gacanepa/
# LOCAL DIRECTORY
localdir=/home/gacanepa/backup.0
# LOCAL DIRECTORY WHERE PREVIOUS BACKUP WAS STORED
localdirold=/home/gacanepa/backup.1
mv $localdir $localdirold
# RSYNC
rsync -av --delete --recursive --link-dest=$localdirold $user@$host:$remotedir $localdir
In the above configuration, the --link-dest option of rsync is use to hardlink unchanged files (in all attributes) from $localdir-old to the destination directory ($localdir).
Step 2: Before Backupninja is run for the first time, the parent directory (/home/gacanepa in this case) is empty. The first time we execute:
# backupninja -n
The backup.0 directory is created, and later in the process its name is changed to backup.1.
The second time we run Backupninja, backup.0 is re-created and backup.1 is kept.

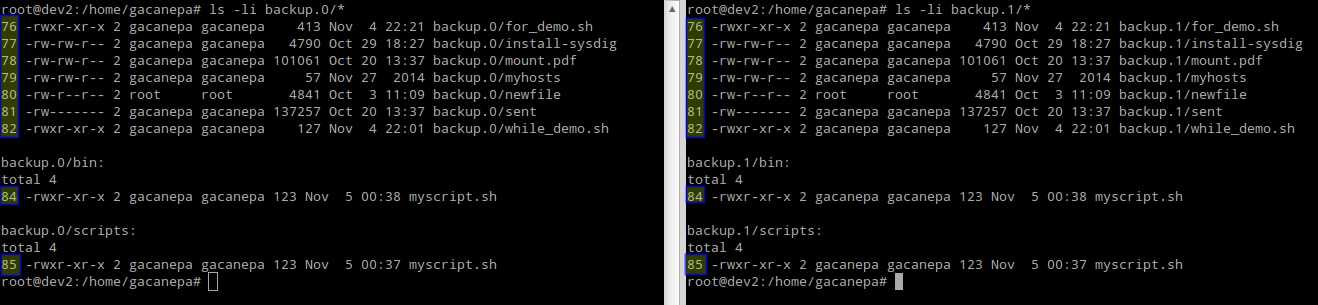
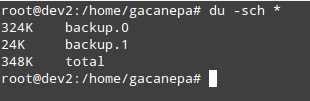
Step 3: Verify that the contents of backup.1 are hard links to the files in backup.0 by comparing the respective inode numbers and directory sizes.
Conclusion
Backupninja is not only a classic backup tool, but also an easy-to-configure utility. You can write your own handlers to run Backupninja as per the individual configuration files located in /etc/backup.d, and you can even write helpers for ninjahelper in order to include them in its main interface.
For example, if you create a handler named xmodulo in /usr/share/backupninja, it will run by default every file with the .xmodulo extension in /etc/backup.d. If you decide you want to add your xmodulo handler to ninjahelper, you can write the corresponding helper as xmodulo.helper. In addition, if you want Backupninja to run an arbitrary script, just add it to /etc/backup.d and you are good to go. Refer to this Backupninja tutorial for details on creating a custom backup plan.
Feel free to leave your comments, questions, or suggestions, using the form below. we will be more than glad to hear from you.
Support Xmodulo
This website is made possible by minimal ads and your gracious donation via PayPal or credit card
Please note that this article is published by Xmodulo.com under a Creative Commons Attribution-ShareAlike 3.0 Unported License. If you would like to use the whole or any part of this article, you need to cite this web page at Xmodulo.com as the original source.

Xmodulo © 2021 ‒ About ‒ Write for Us ‒ Feed ‒ Powered by DigitalOcean