How to perform BGP traffic engineering using Quagga on Linux
Last updated on August 11, 2020 by Sarmed Rahman
The previous tutorials demonstrated how we can turn a CentOS box into a BGP router and filter BGP prefixes using Quagga. Now that we understand basic BGP configuration, we will examine in this tutorial how to perform more advanced traffic engineering on Quagga. More specifically, we will show how we can influence the routing path of existing traffic by tuning BGP attributes (e.g., local preference).
Routing and Path Selection
In a typical Internet environment where multiple routing paths exist from a source to a destination, the actual path taken by traffic is the result of diligent traffic engineering which involves multiple factors, including the number of router/AS hops in the path, bandwidth capacity, path reliability, congestion in the path, and so on.
To be more specific, a routing path chosen by traffic is shaped by individual routing decisions made by each intermediate router based on its local routing table. The routes stored in the routing table may be statically configured, learnt by IGP like OSPF or EIGRP, or learnt by BGP. A single route can be learnt by more than one protocol. In such a case, the preferred route depends generally on some protocol-specific attribute, for example, prefix length and administrative distance. In BGP world, we can influence path decision process by tuning BGP attributes such as local preference in BGP routers.
Please note that routing decisions influence forward traffic, i.e., outbound traffic that is originated by the router or transit traffic that is forwarded by the router.
Path Selection in BGP
In BGP, IPv4 and IPv6 prefixes are propagated globally over the Internet through prefix advertisements sent to and received from BGP neighbors. When multiple routes are received for a particular prefix, your local BGP router will make a decision to forward traffic destinted to that prefix via one of the routes. Similarly, a remote router will make its own routing decisions based on the prefixes that it learns from others, and some of those prefixes may be advertised by yourself. The remote router will send traffic to you if it chooses the route you advertised, as the best route for a given prefix.
If you notice closely, the relationship between prefix advertisements and traffic can be represented using the following diagram. You can see that the traffic flows in the opposite direction of the prefix advertisements.

BGP is one of the most highly customizable routing protocols. In case the same prefix is received from more than one neighbor (with distinct routes/paths), many BGP attributes are considered in selecting the best path for that prefix, as documented here.
In the following sections, we will discuss how we can tune some of these attributes to influence BGP path selection process.
BGP Topology
For this tutorial, we will consider the following topology.

Rotuer-A exchanges prefixes with two eBGP neighbors, Router-B and Router-C. Router-D also has eBGP peering with Router-B and Router-C, and exchange prefixes with them. For traffic between Router-A and Router-D, we will consider the following requirements.
- We can modify the configuration of Router-
Aonly, and none of the other routers is under our control. - For outgoing traffic towards Router-
D, Router-Ashould prefer the path through Router-C. In case this path is unavailable, the path through Router-Bwill be used. - For incoming traffic from Router-
D, Router-Awants to load balance the traffic between both paths. In case one path fails, all traffic will be carried by the other link.
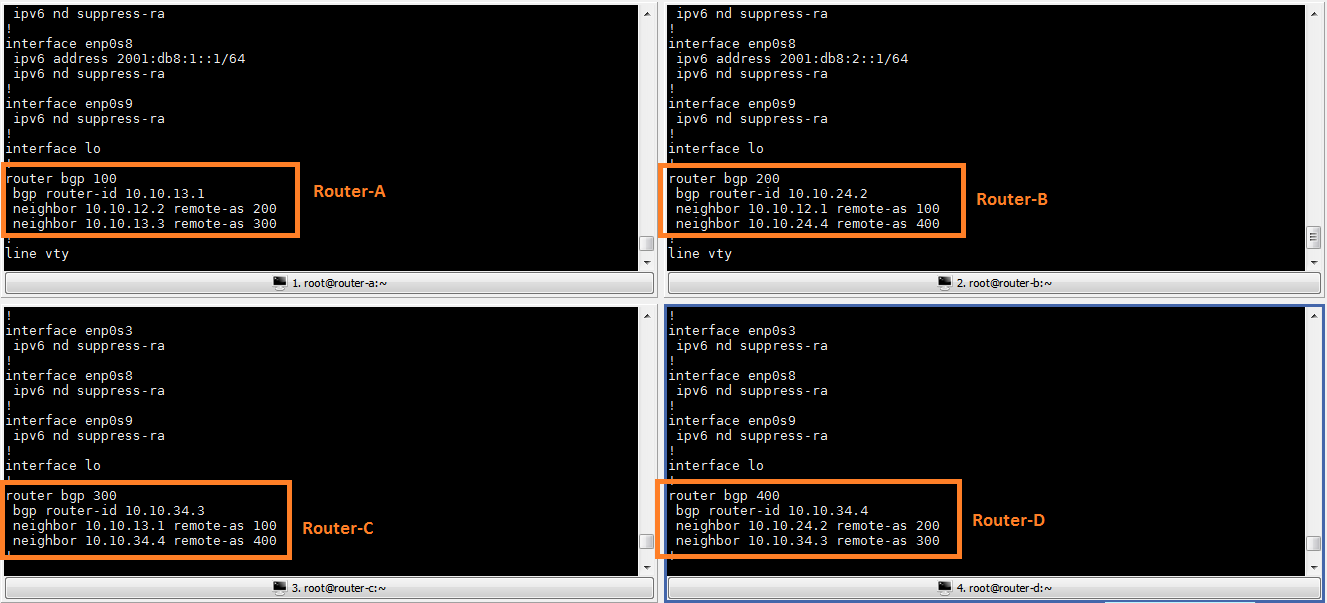
To keep this tutorial simple, we will not be going into the details of BGP configuration. I am providing the summary of the configuration for reference.
Influencing Outgoing Traffic with Local Preference
The route taken by outbound traffic from Router-A will depend on the prefixes it receives from Router-B and Router-C. While we assume that we are allowed to configure Router-A only, we need to have Router-D advertise prefixes to Router-A for the purpose of demonstration. We will start by configuring Router-D to advertise its own prefixes.
router-d# conf t
router-d(config)# router bgp 400
router-d(config-router)# network  172.16.1.0 mask  255.255.255.0
Please note that AS-200 and AS-300 are transit networks. Since there is no active prefix filter defined, these networks will forward all prefixes that they learn to their neighbors.
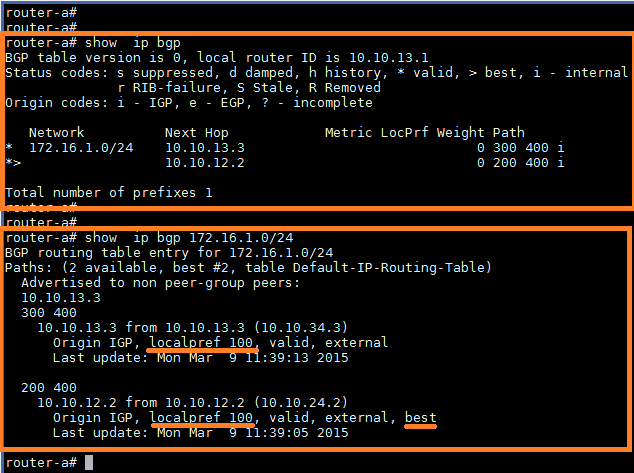
Now from Router-A's perspective, it receives a prefix 172.16.1.0/24 via both neighbors AS 200 and AS 300. The *> in the output indicates that the preferred path, which is through AS 200, Router-B.
Local preference is a BGP attribute that can be used to influence outbound traffic path. It is also one of the first attributes that is checked during path selection. By design the route with the highest local preference value is the most preferred route. The default local preference is 100.
Be aware that local preference is local to each Autonomous System. That is, local preference values are shared only among routers in the same AS, and never exposed to other neighboring Autonomous Systems.
Now we will increase local preference to 200 for the routes received from Router-C. We will create a route-map in Router-A and use it to modify local preference.
router-a# conf t
router-a(config)# route-map SET-LP permit 10
router-a(config-route-map)# set local-preference 200
router-a(config-route-map)# exit
router-a(config)# router bgp 100
router-a(config-router)# neighbor  10.10.13.3 route-map  SET-LP in
The above commands create a route-map named SET-LP. The sequence 10 of the route-map is a permit statement. As there is no specific match clause, the statement will match all prefixes. The set clause will set the local prefix of all prefixes to 200, which is higher than the default value. We then call this route-map within BGP configuration and apply it in the inbound direction for neighbor 10.10.13.3, Router-C.
Let's verify that the changes have taken effect.

We can interpret the above output as follows.
- The path through Router-
C(AS300) is the preferred path due to higher local preference value. - The route through Router-
B(AS200) is still being learnt, has the default local preference of100. - If, for some reason, Router-
Cgoes down, the path through Route-Bwill be used as a backup.
This confirms that we have successfully configured outbound traffic policy to match the requirement. traceroute probing should confirm the same.

Note: If your ping/traceroute is not working, make sure that you have enabled packet forwarding in all four routers.
Load Balancing Incoming Traffic with Selective Prefix Advertisements
As far as inbound traffic is concerned, of course we cannot directly manipulate remote routers outside the local AS to influence inbound traffic sent by them. Instead, incoming traffic to an AS can be indirectly influenced by the prefixes that the AS advertise to the world. Remember that the routing tables of remote routers are populated with the prefix advertisements they receive. Thus by selectivey advertising prefixes from our local Router-A, we can influence the routing decision of the neighboring Router-D.
One key factor during route selection in any routing protocol (RIP, OSPF, BGP, IS-IS) is the prefix length. The route with the longest prefix is always the best route, regardless of any protocol-specific administrative distance, attribute, or metric. For example, a prefix with /27 mask is always preferred over /24 mask as it has a longer prefix length.
We will utilize this characteristic of route selection to load balance Router-A's incoming traffic through Router-B and Router-C. Let us look at the prefix that AS 100 owns, and see how we can break it up.
| Actual Prefix | Prefix Broken Down | |
| /22 | /23 | /24 |
| 192.168.0.0/22 | 192.168.0.0/23 | 192.168.0.0/24 |
| 192.168.1.0/24 | ||
| 192.168.2.0/23 | 192.168.2.0/24 | |
| 192.168.3.0/24 | ||
In a lab environment, you can use any prefix length that you want including /32. However, in production environments like publicly routable prefixes, the maximum length of prefix that is allowed is up to /24. For this simulation, we will advertise the /24 and /22 prefixes using the following policy.
- Advertise first two
/24to AS200 - Advertise the other two
/24to AS300 - Advertise entire
/22to both AS200and AS300
1. Load Balancing and Fall Back Selection
The following is the prefix selection process on Router-A, which leads to load balancing its incoming traffic.
- The
/24prefixes are the most specific routes as they have the maximum subnet mask length. So the preferred path to the first two/24prefixes would be through AS200, and for the latter two/24prefixes it would be through AS300. - The
/24prefixes are part of the entire/22prefix. If, for some reason, Router-Ddoes not receive/24advertisements from either neighbor, it will remove the route from its routing table. In that case, the only available reference to that particular/24would be through/22. For example, if Router-Dstops receiving the prefix192.168.3.0/24, the route will be removed from its routing table. If the router has some traffic for this network, the closest available match is192.168.0.0/22, which it is receiving from both neighbors. So traffic can still be routed to the destination network.
2. Creating Prefix Lists
router-a(config)# ip prefix-list  AS200_PRFX_OUT deny  192.168.2.0/23
router-a(config)# ip prefix-list  AS200_PRFX_OUT deny  192.168.2.0/24
router-a(config)# ip prefix-list  AS200_PRFX_OUT deny  192.168.3.0/24
router-a(config)# ip prefix-list  AS200_PRFX_OUT permit  192.168.0.0/22 le 24
The above commands will create a prefix-list called AS200_PRFX_OUT that will deny the specific /23 and /24 prefixes, while allowing all other prefixes within the 192.168.0.0/22 subnet as long as the prefix length is up to /24. We will create a similar prefix-list for the other /24 prefixes.
router-a(config)# ip prefix-list AS300_PRFX_OUT deny 192.168.0.0/23
router-a(config)# ip prefix-list AS300_PRFX_OUT deny 192.168.0.0/24
router-a(config)# ip prefix-list AS300_PRFX_OUT deny 192.168.1.0/24
router-a(config)# ip prefix-list AS300_PRFX_OUT permit 192.168.0.0/22 le 24
3. Creating Route-Maps
We will call upon the prefix-lists within route-maps and apply them in the BGP configuration.
router-a(config)# route-map  AS200_RMAP_OUT permit  10
router-a(config-route-map)# match  ip address  prefix-list  AS200_PRFX_OUT
router-a(config-route-map)# exit
router-a(config)# route-map  AS300_RMAP_OUT permit  10
router-a(config-route-map)# match  ip address  prefix-list  AS300_PRFX_OUT
router-a(config-route-map)# exit
The above commands create two route-maps that allow prefixes that are matched by the prefix-lists that we created earlier.
router-a(config)# router bgp 100
router-a(config-router)# neighbor  10.10.12.2 route-map  AS200_RMAP_OUT out
router-a(config-router)# neighbor  10.10.13.3 route-map  AS300_RMAP_OUT out
In the above BGP configuration, we specify that the outbound prefixes advertised towards the neighbors in AS 200 and AS 300 must be filtered through the route-maps that we have just created.
4. Advertising the Prefixes
Now we will advertise the prefixes within BGP configuration.
router-a(config-router)# router bgp 100
router-a(config-router)# network 192.168.0.0 mask  255.255.255.0
router-a(config-router)# network 192.168.1.0 mask  255.255.255.0
router-a(config-router)# network 192.168.2.0 mask  255.255.255.0
router-a(config-router)# network 192.168.3.0 mask  255.255.255.0
router-a(config-router)# network 192.168.0.0 mask  255.255.252.0
5. Verifying the Advertisements
We will verify whether the prefixes are advertised as well as received properly by using the following commands.
For advertised routes:
# show ip bgp <neighbor-IP-address> <advertised-routes>
For received routes:
# show ip bgp <neighbor-IP-address> routes
# show ip bgp
The following screenshot confirms that the routes are being advertised and received properly.

6. Testing BGP Fallback
To test whether fallback mechanism works, we will shut down the BGP peering within Route-A and Router-C.
router-a(config)# router bgp 100
router-a(config-router)# neighbor  10.10.13.3 shutdown

As we can see, the route /22 is still being learnt through AS 200. We can use traceroute to verify that the traffic is taking a backup path.
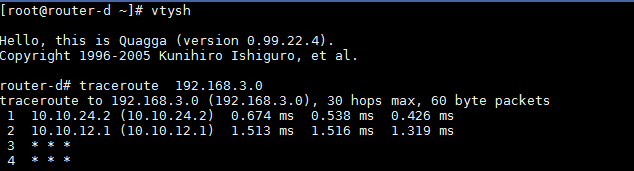
Note: If your ping/traceroute is not working, make sure you have enabled packet forwarding in all four routers.
7. Summary Configuration
For your reference, here is the final configuration of all four routers.
Router-A:
router bgp 100
 network 192.168.0.0/22
 network 192.168.0.0/24
 network 192.168.1.0/24
 network 192.168.2.0/24
 network 192.168.3.0/24
 neighbor 10.10.12.2 remote-as 200
 neighbor 10.10.12.2 route-map AS200_RMAP_OUT out
 neighbor 10.10.13.3 remote-as 300
 neighbor 10.10.13.3 route-map SET-LP in
 neighbor 10.10.13.3 route-map AS300_RMAP_OUT out
!
ip prefix-list AS200_PRFX_OUT seq 5 deny 192.168.2.0/23
ip prefix-list AS200_PRFX_OUT seq 10 deny 192.168.2.0/24
ip prefix-list AS200_PRFX_OUT seq 15 deny 192.168.3.0/24
ip prefix-list AS200_PRFX_OUT seq 20 permit 192.168.0.0/22 le 24

ip prefix-list AS300_PRFX_OUT seq 5 deny 192.168.0.0/23
ip prefix-list AS300_PRFX_OUT seq 10 deny 192.168.0.0/24
ip prefix-list AS300_PRFX_OUT seq 15 deny 192.168.1.0/24
ip prefix-list AS300_PRFX_OUT seq 20 permit 192.168.0.0/22 le 24
!
route-map SET-LP permit 10
 set local-preference 200
!
route-map AS200_RMAP_OUT permit 10
 match ip address prefix-list AS200_PRFX_OUT
!
route-map AS300_RMAP_OUT permit 10
 match ip address prefix-list AS300_PRFX_OUT
Router-B:
router bgp 200
 neighbor 10.10.12.1 remote-as 100
 neighbor 10.10.24.4 remote-as 400
Router-C:
router bgp 300
 bgp router-id 10.10.34.3
 neighbor 10.10.13.1 remote-as 100
 neighbor 10.10.34.4 remote-as 400
Router-D:
router bgp 400
 network 172.16.1.0/24
 neighbor 10.10.24.2 remote-as 200
 neighbor 10.10.34.3 remote-as 300
Conclusion
To sum up, we have demonstrated some techniques of BGP traffic engineering to influence inbound and outbound traffic. If we know how we want to route traffic or prepare backup routes for redundancies, there are a lot of options to make it work using BGP, e.g., weight, local preference, AS-path prepend, communities, MED, etc. Traffic engineering can be done using other protocols as well. Remember that the core of proper traffic engineering is planning. At the end of the day, it is planning that is the most important phase. Executing the plan (as demonstrated in this tutorial) is what comes next.
Hope this helps.
Support Xmodulo
This website is made possible by minimal ads and your gracious donation via PayPal or credit card
Please note that this article is published by Xmodulo.com under a Creative Commons Attribution-ShareAlike 3.0 Unported License. If you would like to use the whole or any part of this article, you need to cite this web page at Xmodulo.com as the original source.

Xmodulo © 2021 ‒ About ‒ Write for Us ‒ Feed ‒ Powered by DigitalOcean