How to check hard disk health on Linux using smartmontools
Last updated on September 12, 2020 by Gabriel Cánepa
If there is something that you never want to happen on your Linux system, that is having hard drives die on you without any warning. Backups and storage technologies such as RAID can get you back on your feet in no time, but the cost associated with a sudden loss of a hardware device can take a considerable toll on your budget, especially if you haven't planned ahead of time what to do in such circumstances.
To avoid running into this kind of setbacks, you can try smartmontools which is a software package that manages and monitors storage hardware by using Self-Monitoring, Analysis and Reporting Technology (S.M.A.R.T. or just SMART). Most modern ATA/SATA, SCSI/SAS, and solid-state hard disks nowadays come with the SMART system built-in. The purpose of SMART is to monitor the reliability of the hard drive, to predict drive failures, and to carry out different types of drive self-tests. The smartmontools consists of two utility programs called smartctl and smartd. Together, they will provide advanced warnings of disk degradation and failure on Linux platforms.
This tutorial will provide installation and configuration guide for smartmontools on Linux.
Installing Smartmontools
Installation of smartmontools is straightforward as it available in base repositories of most Linux distros.
For Ubuntu, Debian and Derivatives:
# aptitude install smartmontools
For CentOS, RHEL or Fedora:
# yum install smartmontools
Checking Hard Drive Health with smartctl
First off, list the hard drives connected to your system with the following command:
# ls -l /dev | grep -E 'sd|hd'
The output should be similar to:
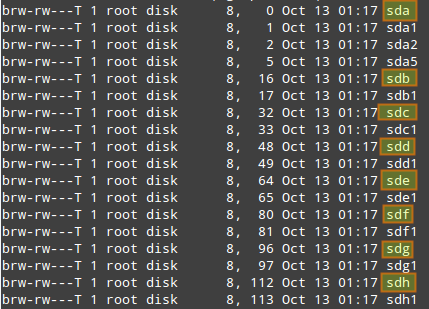
where sdx indicate device names assigned to the hard drives installed on your machine.
To display information about a particular hard disk (e.g., device model, S/N, firmware version, size, ATA version/revision, availability and status of SMART capability), run smartctl with --info flag, and specify the hard drive's device name as follows.
In this example, we will choose /dev/sda.
# smartctl --info /dev/sda
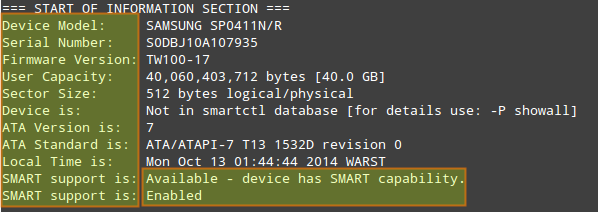
Although the ATA version information may seem to go unnoticed at first, it is one of the most important factors when looking for a replacement part. Each ATA version is backward compatible with the previous versions. For example, older ATA-1 or ATA-2 devices work fine on ATA-6 and ATA-7 interfaces, but unfortunately, that is not true for the other way around. In cases where the device version and interface version don't match, they work together at the capabilities of the lesser of the two. That being said, an ATA-7 hard drive is the safest choice for a replacement part in this case.
You can examine the health status of a particular hard drive with:
# smartctl -s on -a /dev/sda
In this command, -s on flag enables SMART on the specified device. You can ommit it if SMART support is already enabled for /dev/sda.
The SMART information for a disk consists of several sections. Among other things, READ SMART DATA section shows the overall health status of the drive.
=== START OF READ SMART DATA SECTION ===
SMART overall-health self-assessment rest result: PASSED
The result of this test can be either PASSED or FAILED. In the latter case, a hardware failure is imminent, so you may want to start backing up your important data from that drive!
The next thing you will want to look at is the SMART attribute table, as shown below.
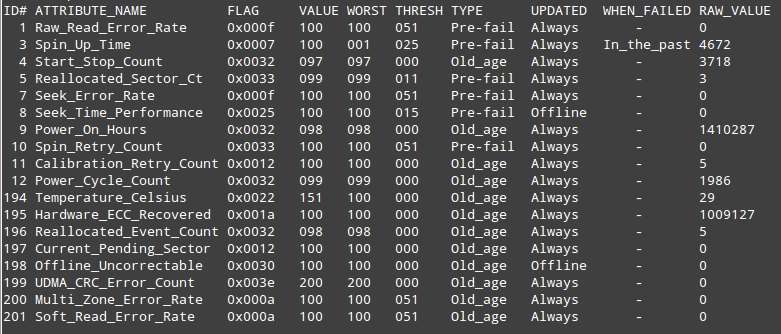
Basically, SMART attribute table lists values of a number of attributes defined for a particular drive by its manufacturer, as well as failure threshold for these attributes. This table is automatically populated and updated by drive firmware.
- ID#: attribute ID, usually a decimal (or hex) number between
1and255. - ATTRIBUTE_NAME: attribute names defined by a drive manufacturer.
- FLAG: attribute handling flag (we can ignore it).
- VALUE: this is one of the most important information in the table, indicating a normalized value of a given attribute, whose range is between
1and253.253means the best condition, while1means the worse condition. Depending on attributes and manufacturers, an initial VALUE can be set to either100or200. - WORST: the lowest VALUE ever recorded.
- THRESH: the lowest value that WORST should ever be allowed to fall to, before reporting a given hard drive as
FAILED. - TYPE: the type of attribute (either Pre-fail or Old_age). A Pre-fail attribute is considered a critical attribute; one that participates in the overall SMART health assessment (
PASSED/FAILED) of the drive. If any Pre-fail attribute fails, then the drive is considered about to fail. On the other hand, an Old_age attribute is considered (for SMART purposes) a non-critical attribute (e.g., normal wear and tear); one that does not fail the drive per se. - UPDATED: indicates how often an attribute is updated. Offline represents the case when offline tests are being performed on the drive.
- WHEN_FAILED: this will be set to
FAILING_NOW(if VALUE is less than or equal toTHRESH), orIn_the_past(if WORST is less than equal toTHRESH), or-(if none of the above). In case ofFAILING_NOW, back up your important files ASAP, especially if the attribute is of TYPE Pre-fail.In_the_pastmeans that the attribute has failed before, but that it's OK at the time of running the test.-indicates that this attribute has never failed. - RAW_VALUE: a manufacturer-defined raw value, from which VALUE is derived.
At this point you may be thinking, "Yes, smartctl seems like a nice tool. but I would like to avoid the hassle of having to run it manually." Wouldn't it be nice if it could be run at specified intervals, and at the same time inform me of the testsresults?
Fortunately, the answer is yes. And that's when smartd comes in.
Configuring Smartctl and Smartd for Live Monitoring
First, edit smartctl's configuration file (/etc/default/smartmontools) to tell it to start smartd at system startup, and to specify check intervals in seconds (e.g., 7200 = 2 hours).
start_smartd=yes
smartd_opts="--interval=7200"
Next, edit smartd's configuration file (/etc/smartd.conf) to add the followign line.
/dev/sda -m [email protected] -M test
-m <email-address>: specifies an email address to send test reports to. This can be a system user such as root, or an email address such as[email protected]if the server is configured to relay emails to the outside of your system.-M <delivery-type>: specifies the desired type of delivery for an email report.once: sends only one warning email for each type of disk problem detected.daily: sends additional warning reminder emails, once per day, for each type of disk problem detected.diminishing: sends additional warning reminder emails, after a one-day interval, then a two-day interval, then a four-day interval, and so on for each type of disk problem detected. Each interval is twice as long as the previous interval.test: sends a single test email immediately uponsmartdstartup.exec PATH: runs the executable PATH instead of the default mail command. PATH must point to an executable binary file or script. This allows to specify a desired action (beep the console, shutdown the system, and so on) when a problem is detected.
Save the changes and restart smartd.
You should expect this kind of email sent by smartd.
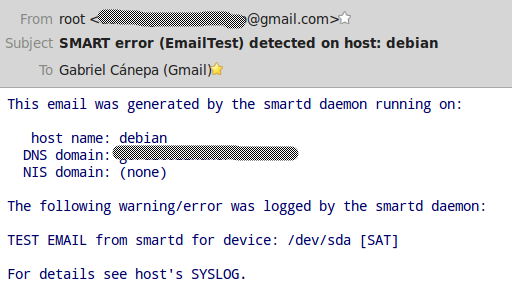
Luckily for us, no error was detected. Had it not been so, the errors would have appeared below the line "The following warning/error was logged by the smartd daemon."
Finally, you can schedule tests at your preferred schedule using the -s flag and the regular expression in the form of T/MM/DD/d/HH, where:
T in the regular expression indicates the kind of test:
L: long testS: short testC: Conveyance test (ATA only)O: Offline (ATA only)
and the remaining characters represent the date and time when the test should be performed:
MMis the month of the year.DDis the day of the month.HHis the hour of day.dis the day of the week (ranging from1=Monday through7=Sunday).MM,DD, andHHare expressed with two decimal digits.
A dot in any of these places indicates all possible values. An expression inside parentheses such as (A|B|C) denotes any one of the three possibilities A, B, or C. An expression inside square brackets such as [1-5] denotes a range (1 through 5 inclusive).
For example, to perform a long test every business day at 1 pm for all disks, add the following line to /etc/smartd.conf. Make sure to restart smartd.
DEVICESCAN -s (L/../../[1-5]/13)
Conclusion
Whether you want to quickly check the electrical and mechanical performance of a disk, or perform a longer and more thorough test scans the entire disk surface, do not let yourself get so caught up in your day-to-day responsibilities as to forget to regularly check on the health of your disks. You will thank yourself later!
Support Xmodulo
This website is made possible by minimal ads and your gracious donation via PayPal or credit card
Please note that this article is published by Xmodulo.com under a Creative Commons Attribution-ShareAlike 3.0 Unported License. If you would like to use the whole or any part of this article, you need to cite this web page at Xmodulo.com as the original source.

Xmodulo © 2021 ‒ About ‒ Write for Us ‒ Feed ‒ Powered by DigitalOcean