How to create a software RAID-1 array with mdadm on Linux
Last updated on October 6, 2020 by Gabriel Cánepa
Redundant Array of Independent Disks (RAID) is a storage technology that combines multiple hard disks into a single logical unit to provide fault-tolerance and/or improve disk I/O performance. Depending on how data is stored in an array of disks (e.g., with striping, mirroring, parity, or any combination thereof), different RAID levels are defined (e.g., RAID-0, RAID-1, RAID-5, etc). RAID can be implemented either in software or with a hardware RAID card. On modern Linux, basic software RAID functionality is available by default.
In this post, we'll discuss the software setup of a RAID-1 array (also known as a mirroring array), where identical data is written to the two devices that form the array. While it is possible to implement RAID-1 with partitions on a single physical hard drive (as with other RAID levels), it won't be of much use if that single hard drive fails. In fact, that's why most RAID levels normally use multiple physical drives to provide redundancy. In the event of any single drive failure, the virtual RAID block device should continue functioning without issues, and allow us to replace the faulty drive without significant production downtime and, more importantly, with no data loss. However, it does not replace the need to save periodic system backups in external storage.
Since the actual storage capacity (size) of a RAID-1 array is the size of the smallest drive, normally (if not always) you will find two identical physical drives in RAID-1 setup.
Installing mdadm on Linux
The tool that we are going to use to create, assemble, manage, and monitor our software RAID-1 is called mdadm (short for multiple disks admin). On Linux distros such as Fedora, CentOS, RHEL or Arch Linux, mdadm is available by default. On Debian-based distros, mdadm can be installed with aptitude or apt-get.
Fedora, CentOS or RHEL:
As mdadm comes pre-installed, all you have to do is to start RAID monitoring service, and configure it to auto-start upon boot:
# systemctl start mdmonitor
# systemctl enable mdmonitor
For CentOS/RHEL 6 or earlier, use these commands instead:
# service mdmonitor start
# chkconfig mdmonitor on
Debian, Ubuntu or Linux Mint:
On Debian and its derivatives, mdadm can be installed with aptitude or apt-get:
# aptitude install mdadm
On Ubuntu, you will be asked to configure postfix MTA for sending out email notifications (as part of RAID monitoring). You can skip it for now.
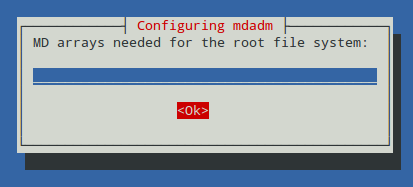
On Debian, the installation will start with the following explanatory message to help us decide whether or not we are going to install the root filesystem on a RAID array. What we need to enter on the next screen will depend on this decision. Read it carefully:

Since we will not use our RAID-1 for the root filesystem, we will leave the answer blank:
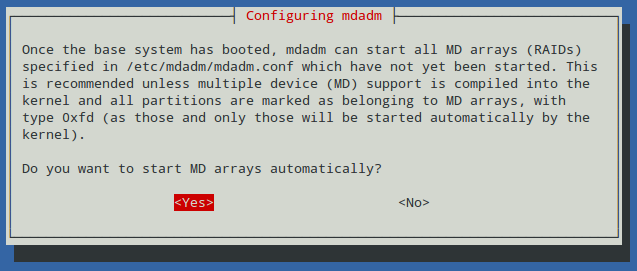
When asked whether we want to start (reassemble) our array automatically during each boot, choose Yes. Note that we will need to add an entry to the /etc/fstab file later in order for the array to be properly mounted during the boot process as well.
Partitioning Hard Drives
Now it's time to prepare the physical devices that will be used in our array. For this setup, I have plugged in two 8 GB USB drives that have been identified as /dev/sdb and /dev/sdc from dmesg output:
# dmesg | less
[   60.014863] sd 3:0:0:0: [sdb] 15826944 512-byte logical blocks: (8.10 GB/7.54 GiB)
[   75.066466] sd 4:0:0:0: [sdc] 15826944 512-byte logical blocks: (8.10 GB/7.54 GiB)
We will use fdisk to create a primary partition on each disk that will occupy its entire size. The following steps show how to perform this task on /dev/sdb, and assume that this drive hasn't been partitioned yet (otherwise, we can delete the existing partition(s) to start off with a clean disk):
# fdisk /dev/sdb
Press p to print the current partition table:
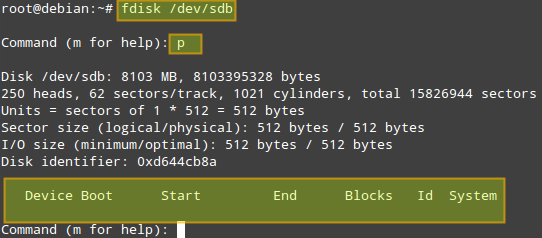
(if one or more partitions are found, they can be deleted with d option. Then w option is used to apply the changes).
Since no partitions are found, we will create a new primary partition [n] as a primary partition [p], assign the partition number = [1] to it, and then indicate its size. You can press Enter key to accept the proposed default values, or enter a value of your choosing, as shown in the image below.
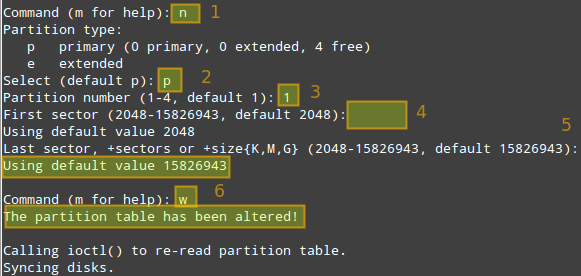
Now repeat the same process for /dev/sdc.
If we have two drives of different sizes, say 750 GB and 1 TB for example, we should create a primary partition of 750 GB on each of them, and use the remaining space on the bigger drive for another purpose, independent of the RAID array.
Create a RAID-1 Array
Once you are done with creating the primary partition on each drive, use the following command to create a RAID-1 array:
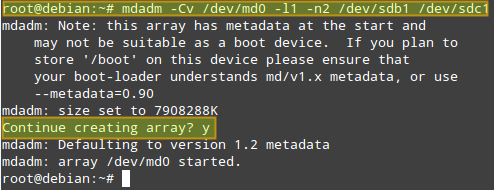
# mdadm -Cv /dev/md0 -l1 -n2 /dev/sdb1 /dev/sdc1
Where:
- -Cv: creates an array and produce verbose output.
- /dev/md0: is the name of the array.
- -l1 (l as in "level"): indicates that this will be a RAID-1 array.
- -n2: indicates that we will add two partitions to the array, namely /dev/sdb1 and /dev/sdc1.
The above command is equivalent to:
# mdadm --create --verbose /dev/md0 --level=1 --raid-devices=2 /dev/sdb1 /dev/sdc1
If alternatively you want to add a spare device in order to replace a faulty disk in the future, you can add --spare-devices=1 /dev/sdd1 to the above command.
Answer y when prompted if you want to continue creating an array, then press Enter:
You can check the progress with the following command:
# cat /proc/mdstat

Another way to obtain more information about a RAID array (both while it's being assembled and after the process is finished) is:
# mdadm --query /dev/md0
# mdadm --detail /dev/md0 (or mdadm -D /dev/md0)
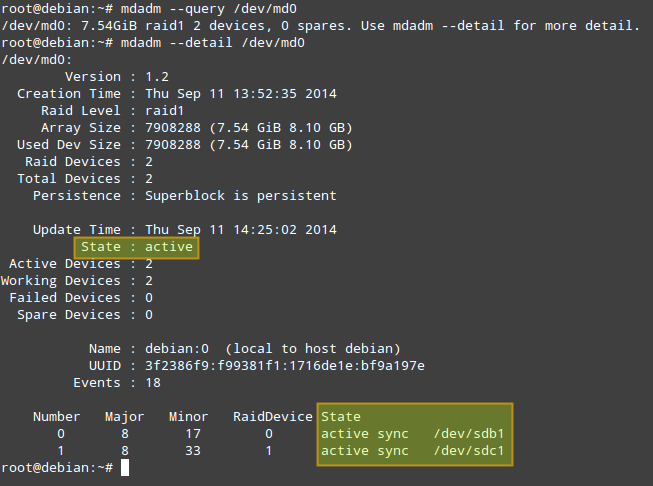
Of the information provided by 'mdadm -D', perhaps the most useful is that which shows the state of the array. The active state means that there is currently I/O activity happening. Other possible states are clean (all I/O activity has been completed), degraded (one of the devices is faulty or missing), resyncing (the system is recovering from an unclean shutdown such as a power outage), or recovering (a new drive has been added to the array, and data is being copied from the other drive onto it), to name the most common states.
Formatting and Mounting a RAID Array
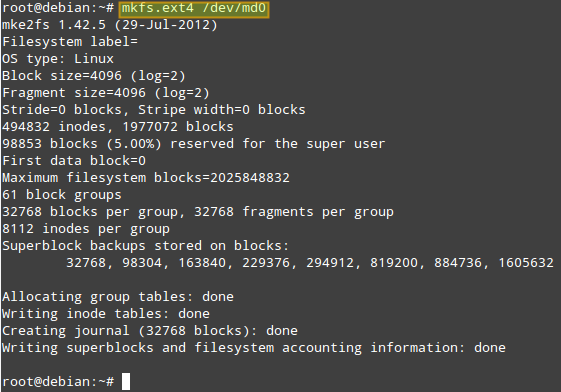
The next step is formatting (with ext4 in this example) the array:
# mkfs.ext4 /dev/md0
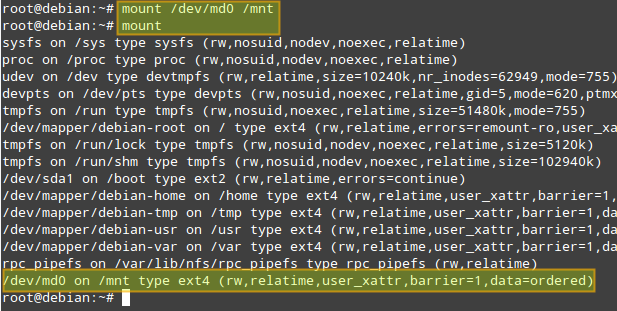
Now let's mount the array, and verify that it was mounted correctly:
# mount /dev/md0 /mnt
# mount
Monitor a RAID Array
The mdadm tool comes with RAID monitoring capability built in. When mdadm is set to run as a daemon (which is the case with our RAID setup), it periodically polls existing RAID arrays, and reports on any detected events via email notification or syslog logging. Optionally, it can also be configured to invoke contingency commands (e.g., retrying or removing a disk) upon detecting any critical errors.
By default, mdadm scans all existing partitions and MD arrays, and logs any detected event to /var/log/syslog. Alternatively, you can specify devices and RAID arrays to scan in mdadm.conf located in /etc/mdadm/mdadm.conf (Debian-based) or /etc/mdadm.conf (Red Hat-based), in the following format. If mdadm.conf does not exist, create one.
DEVICE /dev/sd[bcde]1 /dev/sd[ab]1

ARRAY /dev/md0 devices=/dev/sdb1,/dev/sdc1
ARRAY /dev/md1 devices=/dev/sdd1,/dev/sde1
.....

# optional email address to notify events
MAILADDR [email protected]
After modifying mdadm configuration, restart mdadm daemon:
On Debian, Ubuntu or Linux Mint:
# service mdadm restart
On Fedora 15 or CentOS/RHEL 7 and later:
# systemctl restart mdmonitor
On Fedora 14 or CentOS/RHEL 6 and earlier:
# service mdmonitor restart
Auto-mount a RAID Array
Now we will add an entry in the /etc/fstab to mount the array in /mnt automatically during boot (you can specify any other mount point):
# echo "/dev/md0 /mnt ext4 defaults 0 2" >> /etc/fstab
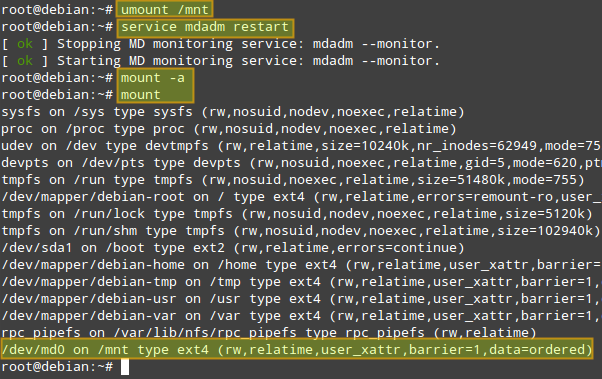
To verify that mount works okay, we now unmount the array, restart mdadm, and remount. We can see that /dev/md0 has been mounted as per the entry we just added to /etc/fstab:
# umount /mnt
# service mdadm restart  (on Debian, Ubuntu or Linux Mint)
or systemctl restart mdmonitor (on Fedora, CentOS/RHEL7)
or service mdmonitor restart (on CentOS/RHEL6)
# mount -a
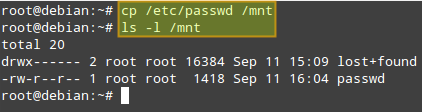
Now we are ready to access the RAID array via /mnt mount point. To test the array, we'll copy the /etc/passwd file (any other file will do) into /mnt:
On Debian, we need to tell the mdadm daemon to automatically start the RAID array during boot by setting the AUTOSTART variable to true in the /etc/default/mdadm file:
AUTOSTART=true
Simulating Drive Failures
We will simulate a faulty drive and remove it with the following commands. Note that in a real life scenario, it is not necessary to mark a device as faulty first, as it will already be in that state in case of a failure.
First, unmount the array:
# umount /mnt
Now, notice how the output of mdadm -D /dev/md0 indicates the changes after performing each command below.
# mdadm /dev/md0 --fail /dev/sdb1 #Marks /dev/sdb1 as faulty
# mdadm --remove /dev/md0 /dev/sdb1 #Removes /dev/sdb1 from the array
Afterwards, when you have a new drive for replacement, re-add the drive again:
# mdadm /dev/md0 --add /dev/sdb1
The data is then immediately started to be rebuilt onto /dev/sdb1:

Note that the steps detailed above apply for systems with hot-swappable disks. If you do not have such technology, you will also have to stop a current array, and shutdown your system first in order to replace the part:
# mdadm --stop /dev/md0
# shutdown -h now
Then add the new drive and re-assemble the array:
# mdadm /dev/md0 --add /dev/sdb1
# mdadm --assemble /dev/md0 /dev/sdb1 /dev/sdc1
Hope this helps.
Support Xmodulo
This website is made possible by minimal ads and your gracious donation via PayPal or credit card
Please note that this article is published by Xmodulo.com under a Creative Commons Attribution-ShareAlike 3.0 Unported License. If you would like to use the whole or any part of this article, you need to cite this web page at Xmodulo.com as the original source.

Xmodulo © 2021 ‒ About ‒ Write for Us ‒ Feed ‒ Powered by DigitalOcean