How to filter BGP routes in Quagga BGP router
Last updated on August 27, 2020 by Sarmed Rahman
In the previous tutorial, we demonstrated how to turn a CentOS box into a BGP router using Quagga. We also covered basic BGP peering and prefix exchange setup. In this tutorial, we will focus on how we can control incoming and outgoing BGP prefixes by using prefix-list and route-map.
As described in earlier tutorials, BGP routing decisions are made based on the prefixes received/advertised. To ensure error-free routing, it is recommended that you use some sort of filtering mechanism to control these incoming and outgoing prefixes. For example, if one of your BGP neighbors starts advertising prefixes which do not belong to them, and you accept such bogus prefixes by mistake, your traffic can be sent to that wrong neighbor, and end up going nowhere (so-called "getting blackholed"). To make sure that such prefixes are not received or advertised to any neighbor, you can use prefix-list and route-map. The former is a prefix-based filtering mechanism, while the latter is a more general prefix-based policy mechanism used to fine-tune actions.
We will show you how to use prefix-list and route-map in Quagga.
Topology and Requirement
In this tutorial, we assume the following topology.
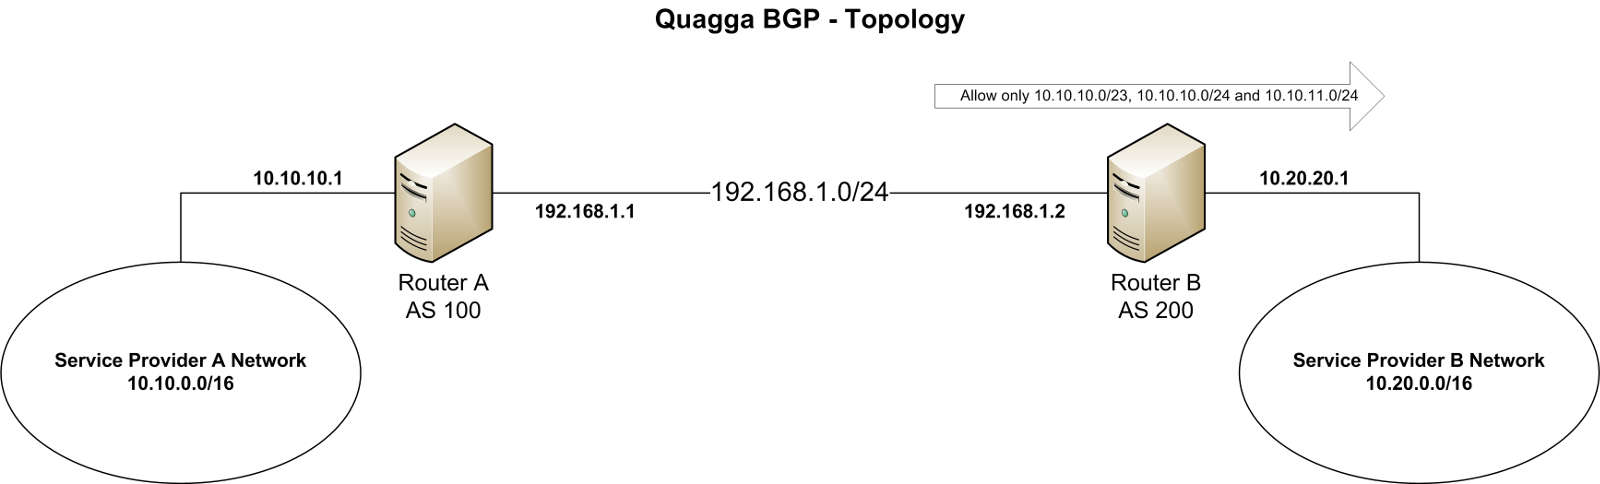
Service provider A has already established an eBGP peering with service provider B, and they are exchanging routing information between them. The AS and prefix details are as stated below.
- Peering block: 192.168.1.0/24
- Service provider A: AS 100, prefix 10.10.0.0/16
- Service provider B: AS 200, prefix 10.20.0.0/16
In this scenario, service provider B wants to receive only prefixes 10.10.10.0/23, 10.10.10.0/24 and 10.10.11.0/24 from provider A.
Quagga Installation and BGP Peering
In the previous tutorial, we have already covered the method of installing Quagga and setting up BGP peering. So we will not go through the details here. Nonetheless, I am providing a summary of BGP configuration and prefix advertisements:
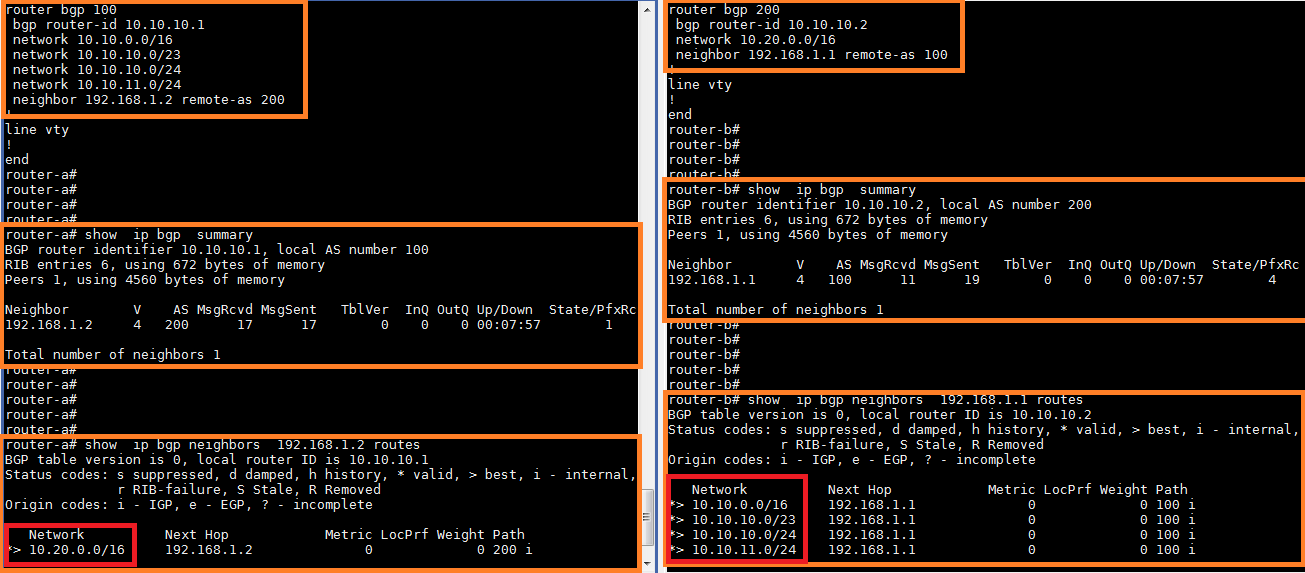
The above output indicates that the BGP peering is up. Router-A is advertising multiple prefixes towards router-B. Router-B, on the other hand, is advertising a single prefix 10.20.0.0/16 to router-A. Both routers are receiving the prefixes without any problems.
Creating Prefix-List
In a router, a prefix can be blocked with either an ACL or prefix-list. Using prefix-list is often preferred to ACLs since prefix-list is less processor intensive than ACLs. Also, prefix-list is easier to create and maintain.
ip prefix-list DEMO-PRFX permit 192.168.0.0/23
The above command creates prefix-list called DEMO-FRFX that allows only 192.168.0.0/23.
Another great feature of prefix-list is that we can specify a range of subnet mask(s). Take a look at the following example:
ip prefix-list DEMO-PRFX permit 192.168.0.0/23 le 24
The above command creates prefix-list called DEMO-PRFX that permits prefixes between 192.168.0.0/23 and /24, which are 192.168.0.0/23, 192.168.0.0/24 and 192.168.1.0/24. The le operator means less than or equal to. You can also use ge operator for greater than or equal to.
A single prefix-list statement can have multiple permit/deny actions. Each statement is assigned a sequence number which can be determined automatically or specified manually.
Multiple prefix-list statements are parsed one by one in the increasing order of sequence numbers. When configuring prefix-list, we should keep in mind that there is always an implicit deny at the end of all prefix-list statements. This means that anything that is not explicitly allowed will be denied.
To allow everything, we can use the following prefix-list statement which allows any prefix starting from 0.0.0.0/0 up to anything with subnet mask /32.
ip prefix-list DEMO-PRFX permit 0.0.0.0/0 le 32
Now that we know how to create prefix-list statements, we will create prefix-list called PRFX-LST that will allow prefixes required in our scenario.
router-b# conf t
router-b(config)# ip prefix-list PRFX-LST permit 10.10.10.0/23 le 24
Creating Route-Map
Besides prefix-list and ACLs, there is yet another mechanism called route-map, which can control prefixes in a BGP router. In fact, route-map can fine-tune possible actions more flexibly on the prefixes matched with an ACL or prefix-list.
Similar to prefix-list, a route-map statement specifies permit or deny action, followed by a sequence number. Each route-map statement can have multiple permit/deny actions with it. For example:
route-map DEMO-RMAP permit 10
The above statement creates route-map called DEMO-RMAP, and adds permit action with sequence 10. Now we will use match command under sequence 10.
router-a(config-route-map)# match (press ? in the keyboard)
  as-path       Match BGP AS path list
  community     Match BGP community list
  extcommunity  Match BGP/VPN extended community list
  interface     match first hop interface of route
  ip            IP information
  ipv6          IPv6 information
  metric        Match metric of route
  origin        BGP origin code
  peer          Match peer address
  probability   Match portion of routes defined by percentage value
  tag           Match tag of route
As we can see, route-map can match many attributes. We will match a prefix in this tutorial.
route-map DEMO-RMAP permit 10
 match ip address prefix-list DEMO-PRFX
The match command will match the IP addresses permitted by the prefix-list DEMO-PRFX created earlier (i.e., prefixes 192.168.0.0/23, 192.168.0.0/24 and 192.168.1.0/24).
Next, we can modify the attributes by using the set command. The following example shows possible use cases of set.
route-map DEMO-RMAP permit 10
 match ip address prefix-list DEMO-PRFX
 set (press ? in keyboard)
  aggregator          BGP aggregator attribute
  as-path             Transform BGP AS-path attribute
  atomic-aggregate    BGP atomic aggregate attribute
  comm-list           set BGP community list (for deletion)
  community           BGP community attribute
  extcommunity        BGP extended community attribute
  forwarding-address  Forwarding Address
  ip                  IP information
  ipv6                IPv6 information
  local-preference    BGP local preference path attribute
  metric              Metric value for destination routing protocol
  metric-type         Type of metric
  origin              BGP origin code
  originator-id       BGP originator ID attribute
  src                 src address for route
  tag                 Tag value for routing protocol
  vpnv4               VPNv4 information
  weight              BGP weight for routing table
As we can see, the set command can be used to change many attributes. For a demonstration purpose, we will set BGP local preference.
route-map DEMO-RMAP permit 10
 match ip address prefix-list DEMO-PRFX
 set local-preference 500
Just like prefix-list, there is an implicit deny at the end of all route-map statements. So we will add another permit statement in sequence number 20 to permit everything.
route-map DEMO-RMAP permit 10
 match ip address prefix-list DEMO-PRFX
 set local-preference 500
!
route-map DEMO-RMAP permit 20
The sequence number 20 does not have a specific match command, so it will, by default, match everything. Since the decision is permit, everything will be permitted by this route-map statement.
If you recall, our requirement is to only allow/deny some prefixes. So in our scenario, the set command is not necessary. We will just use one permit statement as follows.
router-b# conf t
router-b(config)# route-map RMAP permit 10
router-b(config-route-map)# match ip address prefix-list PRFX-LST
This route-map statement should do the trick.
Applying Route-Map
Keep in mind that ACLs, prefix-list and route-map are not effective unless they are applied to an interface or a BGP neighbor. Just like ACLs or prefix-list, a single route-map statement can be used with any number of interfaces or neighbors. However, any one interface or a neighbor can support only one route-map statement for inbound, and one for outbound traffic.
We will apply the created route-map to the BGP configuration of router-B for neighbor 192.168.1.1 with incoming prefix advertisement.
router-b# conf terminal
router-b(config)# router bgp 200
router-b(config-router)# neighbor 192.168.1.1 route-map RMAP in
Now, we check the routes advertised and received by using the following commands.
For advertised routes:
show ip bgp neighbor-IP advertised-routes
For received routes:
show ip bgp neighbor-IP routes

You can see that while router-A is advertising four prefixes towards router-B, router-B is accepting only three prefixes. If we check the range, we can see that only the prefixes that are allowed by route-map are visible on router-B. All other prefixes are discarded.
Tip: If there is no change in the received prefixes, try resetting the BGP session using the command: clear ip bgp neighbor-IP. In our case:
clear ip bgp 192.168.1.1
As we can see, the requirement has been met. We can create similar prefix-list and route-map statements in routers A and B to further control inbound and outbound prefixes.
I am summarizing the configuration in one place so you can see it all at a glance.
router bgp 200
network 10.20.0.0/16
 neighbor 192.168.1.1 remote-as 100
 neighbor 192.168.1.1 route-map RMAP in
!
ip prefix-list PRFX-LST seq 5 permit 10.10.10.0/23 le 24
!
route-map RMAP permit 10
 match ip address prefix-list PRFX-LST
Summary
In this tutorial, we showed how we can filter BGP routes in Quagga by defining prefix-list and route-map. We also demonstrated how we can combine prefix-list with route-map to fine-control incoming prefixes. You can create your own prefix-list and route-map in a similar way to match your network requirements. These tools are one of the most effective ways to protect the production network from route poisoning and advertisement of bogon routes. This tutorial focuses on IPv4-based BGP prefix filtering, but Quagga also allows you to set up BGP peering and filtering for IPv6. The basic filtering technique covered in this tutorial can be used in more advanced traffic engineering.
Hope this helps.
Support Xmodulo
This website is made possible by minimal ads and your gracious donation via PayPal or credit card
Please note that this article is published by Xmodulo.com under a Creative Commons Attribution-ShareAlike 3.0 Unported License. If you would like to use the whole or any part of this article, you need to cite this web page at Xmodulo.com as the original source.

Xmodulo © 2021 ‒ About ‒ Write for Us ‒ Feed ‒ Powered by DigitalOcean