How to configure a host intrusion detection system on CentOS
Last updated on September 20, 2020 by Gabriel Cánepa
One of the first safety measures that any sysadmin may want to implement in their production servers is a mechanism to detect file tampering - not only the content of files, but also their attributes.
AIDE (short for "Advanced Intrusion Detection Environment") is an open source host-based intrusion detection system. AIDE checks the integrity of system binaries and essential configuration files by checking for inconsistencies in a number of file attributes, including permissions, file type, inode, number of links, link name, user, group, file size, block count, mtime, atime, ctime, acl, SELinux security context, xattrs, and md5/sha checksums.
AIDE builds a database of file attributes by scanning the file system of a (untampered) Linux server. It then checks the server's file attributes against the database, and alerts of any changes made to the indexed files while the server is running. For this very reason, AIDE must reindex protected files every time the system is updated or configuration files are changed for legitimate reasons.
For some clients, their security policies may mandate some sort of IDS installed on their servers. But whether a client requires it or not, it's a good sysadmin practice to have IDS in place.
Installing AIDE on CentOS or RHEL
An initial installation (along with the first run) of AIDE is best performed in a system where the operating system has just been installed, and none of the services is exposed to the Internet or even to a local area network. At this early stage, we can minimize the risk of any break-ins and tampering attempts coming from outside. In fact, it is the only way to ensure that the system is clean at the time AIDE builds its initial database.
For that reason, after we install AIDE using:
# yum install aide
we need to unplug our machine from the network, and perform some basic configuration tasks as described next.
Configuring AIDE
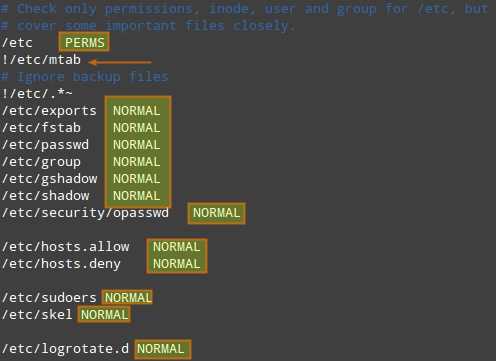
The default configuration file can be found in /etc/aide.conf. This file presents several example protection rules (e.g., FIPSR, NORMAL, DIR, DATAONLY), each of which is followed by an equal sign and a list of file attributes to check for, or any predefined rules (delimited by a plus sign). You can also define any custom rules using this format.

FIPSR = p+i+n+u+g+s+m+c+acl+selinux+xattrs+sha256
NORMAL = FIPSR+sha512
For example, the above means that NORMAL rule will check for inconsistencies in the following attributes: permissions (p), inode (i), number of links (n), user (u), group (g), size (s), mtime (m), ctime (c), ACL (acl), SELinux (selinux), xattrs (xattr), SHA256/SHA512 checksums (sha256 and sha512).
The defined rules can be used for different directories and files (denoted with regular expressions) flexibly.

An exclamation sign (!) preceding an entry tells AIDE to ignore a subdirectory (or files inside a directory) for which another rule can be defined.
In the above example, PERMS is the default rule for /etc and its subdirectories and files. However, no rule will be applied to backup files in /etc (i.e., /etc/.*~) nor to /etc/mtab file. For some selective subdirectories or files in /etc, NORMAL rule is applied instead, overriding the default rule PERMS.
Defining and applying the right rules to the right locations in your system is perhaps the most difficult part of using AIDE, but using a good judgement is a nice start. As a rule of thumb, do not check for more attributes than necessary. For example, checking mtime for files inside /var/log or /var/spool will certainly result in a lot of false positives because there are many applications and daemons often writing to these locations, which is perfectly fine. In addition, checking for multiple checksums may enhance security at the expense of AIDE's increased running time.
Optionally, you can have the results of the check mailed to you if you specify your email address with the MAILTO variable. Place the following line anywhere in /etc/aide.conf.
MAILTO=root@localhost
Running AIDE for the First Time
Run the following command to initialize the AIDE database:
# aide --init

The /var/lib/aide/aide.db.new.gz file, as per /etc/aide.conf, needs to be renamed to /var/lib/aide/aide.db.gz, so as to enable AIDE to read it:
# mv /var/lib/aide/aide.db.new.gz /var/lib/aide.db.gz
Now it's time to perform our first system check against the database. For that, simply run:
# aide
When called with no options, AIDE assumes --check.
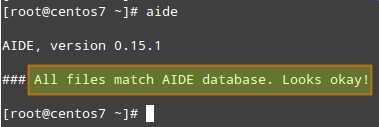
If no change was made since the database had been created, AIDE will finish with an OK message.

Managing AIDE in a Production Environment
After constructing an initial AIDE database, you often need to update a protected server for various legitimate reasons as part of ongoing system administration activities. Every time your server has been updated, you must re-build the AIDE database to incorporate the change in the database. For that, use this command:
# aide --update
To protect a production system with AIDE, it is probably best to schedule a cron job for checking for any inconsistencies with AIDE periodically. For example, to schedule AIDE to run and have the result mailed to an email address on a daily basis:
# crontab -e
0 0 * * * /usr/sbin/aide --check | /usr/bin/mail -s "AIDE run for $HOSTNAME" [email protected]
Testing AIDE for File Tampering
The following test scenarios will demonstrate how AIDE check the integrity of our files.
Test Scenario #1
Let's add a new file (e.g., /etc/fake).
# cat /dev/null > /etc/fake

Test Scenario #2
Let's change file permissions, and see if it can be detected.
# chmod 644 /etc/aide.conf
Test Scenario #3
Finally, let's change file content (e.g., adding a comment line to /etc/aide.conf)
echo "#This is a comment" >> /etc/aide.conf

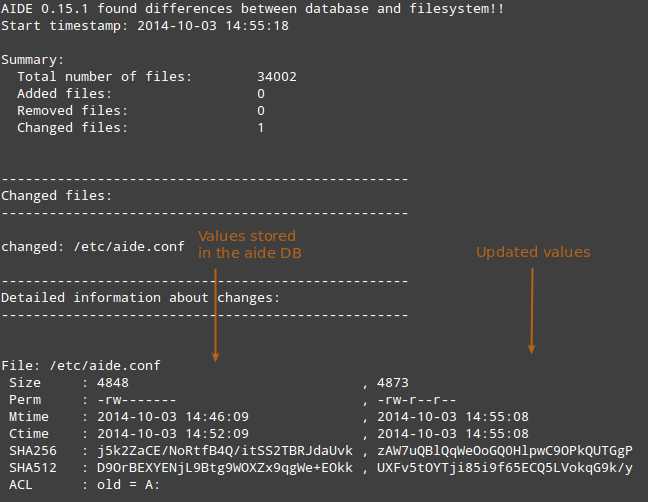
In the screenshot above, the first column shows the file attributes, the second column the values present in the AIDE database, and the third column the updated values for those attributes. An empty space in the third columns indicates that the attribute has not changed (ACL in this example).
Conclusion
If you ever find yourself in a situation where you have good reasons to think that a system has been tampered with, but are unable to determine what might have been changed at first sight, a host-based intrusion detection system like AIDE can be very helpful in that it can help you quickly identify what has changed instead of guessing and wasting valuable time.
Support Xmodulo
This website is made possible by minimal ads and your gracious donation via PayPal or credit card
Please note that this article is published by Xmodulo.com under a Creative Commons Attribution-ShareAlike 3.0 Unported License. If you would like to use the whole or any part of this article, you need to cite this web page at Xmodulo.com as the original source.
Xmodulo © 2021 ‒ About ‒ Write for Us ‒ Feed ‒ Powered by DigitalOcean

