How to convert between VirtualBox VDI and VMware VMDK
Last updated on September 24, 2020 by Dan Nanni
There are several disk image formats used by virtualization software; VDI for Oracle VirtualBox, and VMDK for VMware vSphere, to name a few. If you want to convert VirtulBox VDI image to VMware VMDK image, or vice versa, there are two command-line utilities available to use.
The first tool is VBoxManage, which is a command-line utility that comes with VirtualBox. If you already installed VirtualBox on your system, VBoxManage is ready for use right away without installing any other software.
The second Linux tool is qemu-img command which is part of qemu hardware virtualization package.
To use qemu-img on Ubuntu or Debian:
$ sudo apt-get install qemu-utils
To use qemu-img on CentOS, Fedora or RHEL:
$ sudo yum install qemu
Assuming that you have either of these two command-line tools available on your system, I will show how to convert between VirtualBox VDI and VMware VMDK formats, and how to import a converted standalone disk image in a VM. Before conversion, make sure to power off the VM whose disk image is being converted.
Convert VMware VMDK to VirtualBox VDI
To convert VMDK to VDI with VboxManage:
$ VBoxManage clonehd --format VDI input.vmdk output.vdi
To convert VMDK to VDI with qemu-img:
$ qemu-img convert input.vmdk -O vdi output.vdi
Import VDI disk image in VirtualBox VM
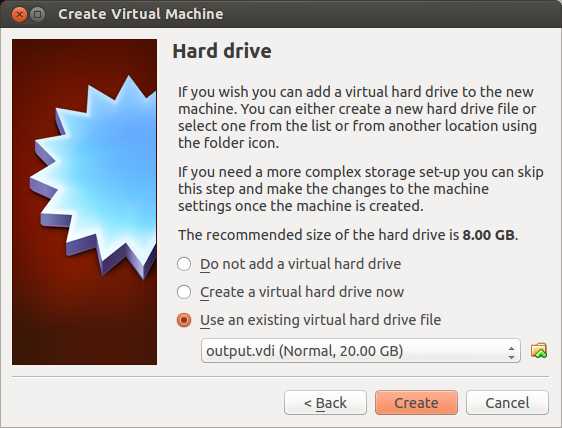
Once you create a VDI-formatted disk image from a VMDK counterpart, you can create a new VM on VirtualBox, and attach the VDI image to the VM. While creating a VM, just choose Use an existing virtual hard drive file option, and use the existing VDI image file.
Convert VirtualBox VDI to VMware VMDK
To convert VDI to VMDK with VboxManage:
$ VBoxManage clonehd --format VMDK input.vdi output.vmdk
To convert VDI to VMDK with qemu-img:
$ qemu-img convert input.vdi -O vmdk output.vmdk
Import VMDK disk image in VMware VM
Once you obtained a VMDK disk image from a VDI image, you can attach the standalone VMDK disk image to a VMware VM as follows.
First, create a new VM by using VM creation wizard. When asked to choose an OS installation option, choose I will install operating system later option, as shown in the following. That way, it will skip disk image creation.

Once .vmx file is created, edit the .vmx file to specify the existing VMDK image file as follows.
scsi0:0.fileName = "/path/to/vmdk/output.vmdk"
Support Xmodulo
This website is made possible by minimal ads and your gracious donation via PayPal or credit card
Please note that this article is published by Xmodulo.com under a Creative Commons Attribution-ShareAlike 3.0 Unported License. If you would like to use the whole or any part of this article, you need to cite this web page at Xmodulo.com as the original source.

Xmodulo © 2021 ‒ About ‒ Write for Us ‒ Feed ‒ Powered by DigitalOcean