How to install Apache Tomcat on CentOS
Last updated on September 7, 2020 by Dan Nanni
Apache Tomcat is one of the most popular and powerful web application servers on Linux. You can use Tomcat to host Java servlets or JSP web applications. As with any other Apache-licensed software, Tomcat is available free of charge under liberal Apache license. If you would like to install Apache Tomcat on CentOS, here is a guide for you. For Tomcat installation on Debian or Ubuntu. refer to this guide instead.
Install JDK
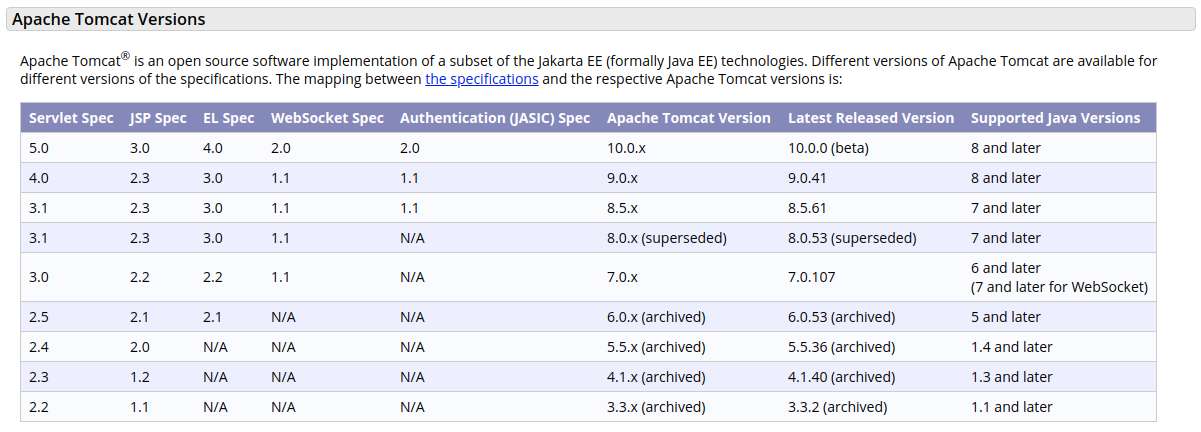
First, you need to install Java Development Kit (JDK). To do that, first identify compatable Java version as shown below. In this tutorial, I install Apache tomcat 9, which support Java 8 or later.
Once you decide on Java version, go ahead and install the corresponding JDK by first enabling Repoforge repository on your CentOS system and running the following.
$ sudo yum install java-1.8.0-openjdk-devel -y
After this, set up JAVA_HOME environment variable.
$ sudo sh -c 'echo export JAVA_HOME=/usr/lib/jvm/java-1.8.0-openjdk > /etc/profile.d/java.sh'
$ source /etc/profile.d/java.sh
Install Apache Tomcat
Now download Apache Tomcat, and install it. Since Apache Tomcat is distributed as binaries, all you have to do is to copy it somewhere in your CentOS.
$ wget https://mirrors.gigenet.com/apache/tomcat/tomcat-9/v9.0.41/bin/apache-tomcat-9.0.41.tar.gz
$ sudo tar -xf apache-tomcat-9.0.41.tar.gz -C /opt
$ sudo ln -s /opt/apache-tomcat-9.0.41 /opt/tomcat
Update Permissions
For security, create a dedicated user/group called tomcat which Tomcat will be executed as, and grant access permissions on the user/group.
$ sudo groupadd tomcat
$ sudo useradd -s /bin/false -g tomcat -d /opt/tomcat tomcat
$ sudo chown -R tomcat:tomcat /opt/apache-tomcat-9.0.41
$ sudo chmod -R g+r /opt/apache-tomcat-9.0.41/conf
$ sudo chmod -R g+w /opt/apache-tomcat-9.0.41/logs
$ sudo chmod -R g+w /opt/apache-tomcat-9.0.41/temp
$ sudo chmod -R g+w /opt/apache-tomcat-9.0.41/webapps
$ sudo chmod -R g+w /opt/apache-tomcat-9.0.41/work
Set up systemd for Apache Tomcat
Finally, prepare a systemd configuration for Apache tomcat as follows.
$ sudo vi /etc/systemd/system/tomcat.service
[Unit]
Description=Apache Tomcat Web Application Container
After=network.target
[Service]
Type=forking
Environment=JAVA_HOME=/usr/lib/jvm/java-1.8.0-openjdk
Environment=CATALINA_PID=/opt/tomcat/temp/tomcat.pid
Environment=CATALINA_HOME=/opt/tomcat
Environment=CATALINA_BASE=/opt/tomcat
Environment='CATALINA_OPTS=-Xms512M -Xmx1024M -server -XX:+UseParallelGC'
Environment='JAVA_OPTS=-Djava.awt.headless=true -Djava.security.egd=file:/dev/./urandom'
ExecStart=/opt/tomcat/bin/startup.sh
ExecStop=/opt/tomcat/bin/shutdown.sh
User=tomcat
Group=tomcat
UMask=0007
RestartSec=10
Restart=always
[Install]
WantedBy=multi-user.target
Reload systemd and start Tomcat:
$ sudo systemctl daemon-reload
$ sudo systemctl start tomcat
To verify that Apache Tomcat is installed successfully, go to http://your_centos_ip:8080 in your browser. If everything is okay, you will see the following in your browser window.

If you cannot access the above Tomcat page, make sure to adjust firewall rules to open TCP/8080 since CentOS has iptables on by default, blocking the Tomcat's default listening port 8080.
Alternatively, you can temporarily stop the firewall, just for quick testing, as follows.
On CentOS 6 or earlier:
$ sudo service iptables stop
$ sudo chkconfig iptables off
On CentOS 7 or later:
$ sudo systemctl stop firewalld
Once you confirm Tomcat is accessible, make sure to re-enable the firewall.
Support Xmodulo
This website is made possible by minimal ads and your gracious donation via PayPal or credit card
Please note that this article is published by Xmodulo.com under a Creative Commons Attribution-ShareAlike 3.0 Unported License. If you would like to use the whole or any part of this article, you need to cite this web page at Xmodulo.com as the original source.

Xmodulo © 2021 ‒ About ‒ Write for Us ‒ Feed ‒ Powered by DigitalOcean