How to install LAMP stack on Ubuntu server
Last updated on August 20, 2020 by Dan Nanni
LAMP stack is a popular open source software platform for powering database-driven web applications on Linux. LAMP itself is an acronym for Linux, Apache web server, MariaDB database, and PHP dynamic server-side programming language. This tutorial will present a step by step procedure on installing LAMP stack on Ubuntu server, and also guide you to install phpMyAdmin - a frontend web panel for administering MariaDB databases. If you are looking to install LAMP stack on CentOS platform, this tutorial might help.
Prerequisites
Before installing any software, make sure that your freshly installed Ubuntu system is assigned a correct hostname, which must be a FQDN (Fully Qualified Domain Name) (e.g., ubuntuserver.mydomain.com). To change hostname, issue the following command:
$ sudo hostnamectl set-hostname ubuntuserver.mydomain.com
After you have set up FQDN for your system, query and verify it using the following commands, which must return the system's FQDN:
$ hostnamectl
   Static hostname: ubuntuserver.mydomain.com
         Icon name: ubuntuserver
           Chassis: server
           Boot ID: b7f7601160e34c74a8e6c5cca3b1b3bb
  Operating System: Ubuntu 14.04 LTS
            Kernel: Linux 3.13.0-24-generic
      Architecture: x86_64
$ hostname -f
ubunuserver.mydomain.com
Optionally, update your system by running the commands below:
$ sudo apt-get update
$ sudo apt-get upgrade
Step One: Install Apache
Apache web server is at this time one of the most commonly used web servers for Internet facing web sites due to its open source nature, highly modular design and a wide range of supported extensions and programming languages.
To install Apache on your system, issue the following command:
$ sudo apt-get install apache2
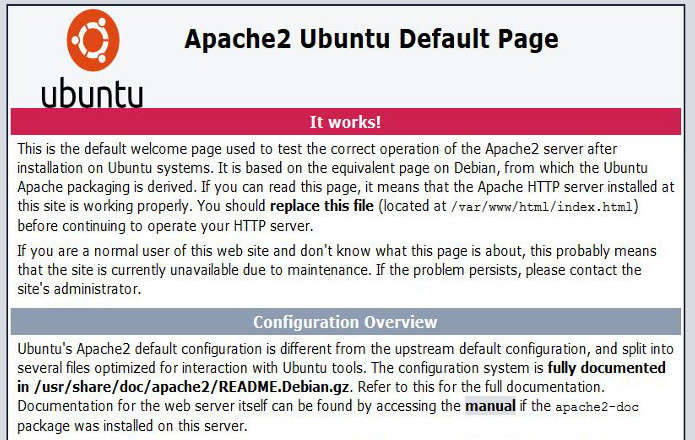
After Apache package is installed, direct your browser to http://<your-server-IP-address>. The default Apache webpage should appear as shown in the screenshot.

Step Two: Install MariaDB
Any reasonably complex web applications and services will need persistent storage to store structured data. As a database component of the LAMP stack, MariaDB is a drop-in replacement for MySQL relational database forked by the community, which uses the same API and commands as MySQL.
To install MariaDB server and client on Ubuntu, run the following command:
$ sudo apt-get install mariadb-server mariadb-client
During the installation process, you will be prompted twice by the installer to enter the root password for MariaDB server. Choose a strong password for database root user. Note that the MariaDB's root account is different from system root account.

On the next step, secure the MariaDB server by disabling some features such as removing anonymous users, block root login from outside connections, and delete test database. All of these can be done by running the following script which comes with MariaDB server. Answer with yes on all asked questions, except for the question that asks you to change the root password, which you already did.
$ sudo mysql_secure_installation
To verify MariaDB server login with the root account, issue the following command. Check if you can log in after typing MariaDB root password.
$ mysql -u root -p
Use exit or quit statement to exit database interface.
Step Three: Install PHP
PHP is a server-side dynamic scripting language commonly used to develop web applications which interact with relational databases. PHP allows developers to organize and display dynamically generated information in a web browser.
Before proceeding with PHP installation, use the command below to search for available PHP libraries and modules best suited for your needs:
$ apt-cache search php5-
php5-cgi - server-side, HTML-embedded scripting language (CGI binary)
php5-cli - command-line interpreter for the php5 scripting language
php5-common - Common files for packages built from the php5 source
php5-curl - CURL module for php5
php5-dbg - Debug symbols for PHP5
php5-dev - Files for PHP5 module development
php5-gd - GD module for php5
php5-gmp - GMP module for php5
php5-json - JSON module for php5
php5-ldap - LDAP module for php5
php5-mysql - MySQL module for php5
php5-odbc - ODBC module for php5
. . . .
To get detailed information about a specific PHP module, use apt-cache command.
$ apt-cache show php5-<module_name>
After you decided on what PHP module(s) to use, install them using this command:
$ sudo apt-get install php5-<module_name>
Below are some required PHP modules that you need to install to configure Apache web server in a LAMP stack environment. php5-mysql adds MariaDB support to PHP, and php5-mcrypt provides PHP encryption functions. php5-gd is needed to use phpMyAdmin web panel.
$ sudo apt-get install php5 php5-mysql php5-mcrypt php5-gd
Step Four: Configure PHP
Before testing PHP configuration, you need to configure timezone for PHP because the default php.ini configuration file has no timezone set for date functions used by many web applications. To configure PHP timezone, edit /etc/php5/apache2/php.ini with a text editor, and set date.timezone variable according to your server's physical timezone.
date.timezone = Europe/London
To find out your time zone, refer to this guideline.
After you have configured PHP with an appropriate timezone setting, restart Apache web server to reload PHP configuration and PHP modules.
$ sudo service apache2 restart
Now use a command-line text editor to create a new file called info.php on Apache web server's default webroot, which is located in /var/www/html/ system path.
$ sudo nano /var/www/html/info.php
Once this file is open for editing, add the following line and save it using CTRL+o keys.
<?php phpinfo(); ?>
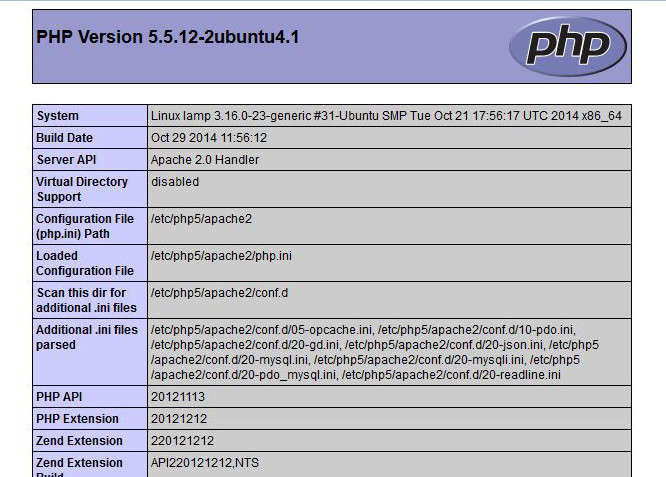
Finally, open a browser and acess http://<your-server-IP-address>/info.php to check PHP configuration.


Step Five: Install phpMyAdmin
phpMyAdmin is an open source frontend tool designed to administer MySQL/MariaDB databases via a web interface.
To install phpMyAdmin on your Linux server, issue the following command:
$ sudo apt-get install phpmyadmin
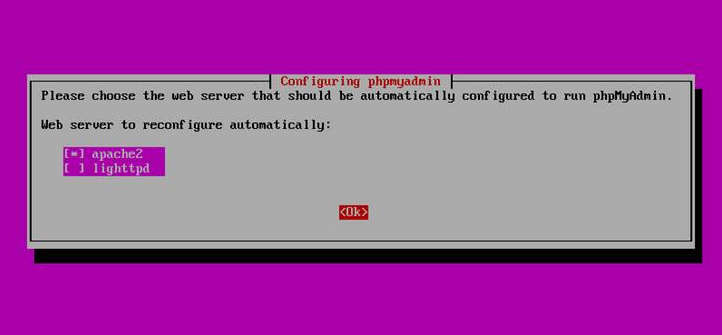
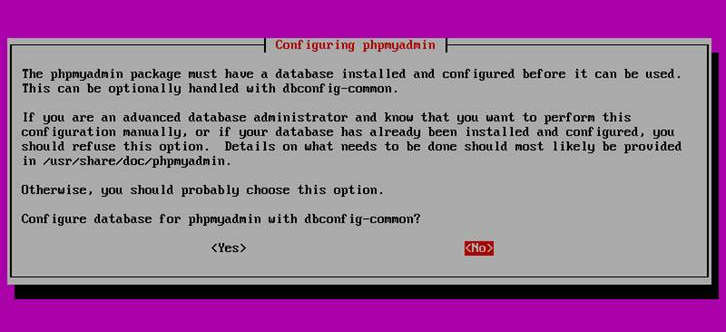
During the installation, you will be asked how to configure phpMyAdmin. When asked to choose a web server, select apache2, and when asked to configure database with dbconfig-common, choose No since we already configured MariaDB earlier.


After phpMyAdmin package has been installed, direct a browser to http://<your-server-IP-address>/phpmyadmin. It will allow you to log in to and access MariaDB server via web interface.
That is all the basic software set up required for the LAMP stack. Apache web server and MariaDB server should be up and running automatically upon boot. On top of LAMP stack, you can now deploy many PHP/MariaDB-based e-commerce and content management systems (CMS) applications such as WordPress, Drupal, Joomla, Opencart, Prestashop, you name it.
Support Xmodulo
This website is made possible by minimal ads and your gracious donation via PayPal or credit card
Please note that this article is published by Xmodulo.com under a Creative Commons Attribution-ShareAlike 3.0 Unported License. If you would like to use the whole or any part of this article, you need to cite this web page at Xmodulo.com as the original source.
Xmodulo © 2021 ‒ About ‒ Write for Us ‒ Feed ‒ Powered by DigitalOcean

