How to install Xen hypervisor on unused old hardware
Last updated on September 20, 2020 by Dan Nanni
Xen is a bare metal hypervisor, meaning that you must prepare a bare machine to install and run Xen. KVM is a little different - you can add it to any machine already running Linux. This tutorial describes how to install and configure Xen hypervisor on unused hardware.
This procedure uses Debian Jessie (their testing distribution) as the host OS (also known as Dom0). Jessie is not the only choice - Xen support is built into the Linux kernel, and plenty of Linux distributions include one of these Xen-enabled kernels.
Find Unused Hardware
As a start, find a suitable workstation which can be wiped out, such as an old laptop or desktop. Older hardware may not be good for gaming, but it is good enough for a host OS and a couple of guests. A PC with these specifications works fine.
- 1 CPU with 2 cores (64-bit)
- 4GB memory
- 80GB hard disk
- ability to boot from CD, DVD or USB
- a network interface
Note that the CPU must be a 64-bit processor since Debian dropped support for 32-bit Xen packages. If you don't have spare hardware, you could invest in an old machine. 2010's $1000 flagship laptop is today's $100 bargain. A second-hand laptop from eBay and a memory upgrade will do fine.
Burn a Bootable CD/USB
Download the ISO image for Debian Jessie. The small netinst image available from the official Debian website works fine.
$ wget http://cdimage.debian.org/cdimage/jessie_di_beta_2/amd64/iso-cd/debian-jessie-DI-b2-amd64-netinst.iso
Next, identify the device name assigned to your CD/DVD or USB drive (e.g., /dev/sdc).
Burn the downloaded ISO image into a bootable CD or a USB using dd command. Replace /dev/sdc with the device name you identified above.
$ sudo dd if=debian-jessie-DI-b2-amd64-netinst.iso of=/dev/sdc
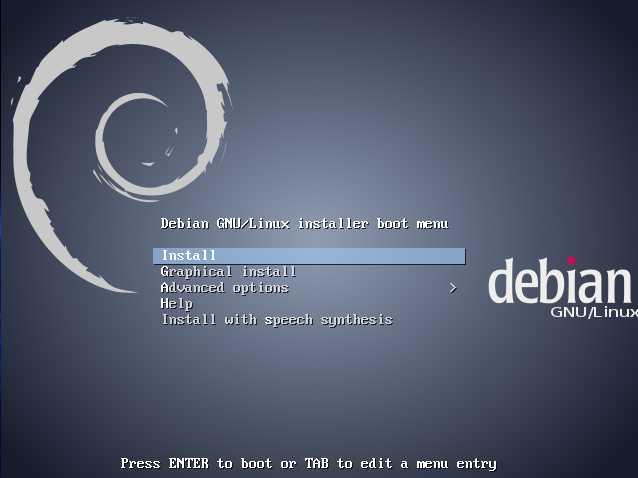
Start the Installation
To start the installation, boot with the Debian installer CD/USB.
It's a good idea to use a wired connection, not WiFi. If the WiFi won't connect because firmware or driver software is missing, you won't get very far.
Partition the Disk
This setup uses four primary disk partitions. Automatic OS installers usually set up an extended partition that contains logical partitions. Set up the four partitions like this.
sda1: mount on /boot, 200MBsda2: mount on /, 20GB, Ubuntu uses 4GBsda3: swap, 6GB (4GB of memory x 1.5 = 6)sda4: reserved for LVM, not mounted, all the rest of the disk space
Install the Base System
It's a good idea to make the install as simple and short as possible. A basic working system can always be added to later. Debian's APT (Advanced Package Tool) makes adding software easy. Installing Debian on a workstation can cause pretty obscure time-wasting issues. Perhaps a graphics driver does not agree with the kernel or maybe the old CD-ROM drive only works intermittently.
When it comes to choosing what to install, do install an SSH server and don't install a desktop like Gnome.

A graphical desktop requires hundreds of package installs - it's a lot of extra work that can be done later. If you run into problems, waiting for that desktop install is a waste of time. Also, without desktop component, the system boot will be much quicker - seconds rather than minutes. This procedure requires a few reboots, so that's a handy time-saver.
An SSH server lets you configure the workstation from another computer. This allows you to avoid some of the problems with old hardware - perhaps the old machine's keyboard is missing keys, the LCD screen has dead pixels or the trackpad is unresponsive etc.
Add LVM (Logical Volume Manager)
Install the LVM tools as the root.
# apt-get update
# apt-get install lvm2
Pick a physical volume to work with.
# pvcreate /dev/sda4
Create a volume group.
# vgcreate vg0 /dev/sda4
You don't need to create a logical volume. If you want to test LVM works, create a volume then delete it.
# lvcreate -nmytempvol -L10G vg0
# lvremove /dev/vg0/mytempvol
Check LVM status.
# pvs (to view information about physical volumes)
# vgs (to view information about volume groups)
# lvs (to view information about logical volumes)
Add a Linux Ethernet Bridge
We are going to set up a Linux bridge so that all Xen's guest domains can be connected to, and communicate through the bridge.
Install the bridge tools.
# apt-get install bridge-utils
See what interfaces are configured.
# ip addr

In this example, we have one primary interface assigned eth0. We are going to add eth0 to the Linux bridge by editing the network configuration file (/etc/network/interfaces).
Before making any change, back up the network configuration file to keep the original working configuration safe.
# cd /etc/network/
# cp interfaces interfaces.backup
# vi /etc/network/interfaces
The file contents look something like this.
auto lo
iface lo inet loopback

allow-hotplug eth0
iface eth0 inet dhcp
Change the file to this.
auto lo
iface lo inet loopback

auto eth0
iface eth0 inet manual

auto xenbr0
iface xenbr0 inet dhcp
bridge_ports eth0
Activate the network configuration change:
# systemctl restart networking
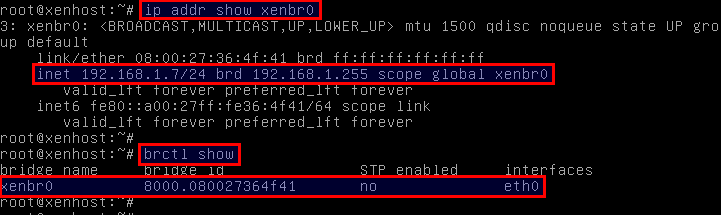
Verify Networking Settings
Verify that a Linux bridge xenbr0 is created successfully.
# ip addr show xenbr0
Also check that the primary interface eth0 is successfully added to the bridge.
# brctl show
You now have a working machine with Jessie installed. Xen is not yet installed at this point. Let's proceed to install Xen next.
Install the Xen Hypervisor
Install Xen and QEMU packages, and update the GRUB bootloader.
# apt-get install xen-linux-system
Reboot.
When the GRUB screen appears, you can see extra booting options listed.
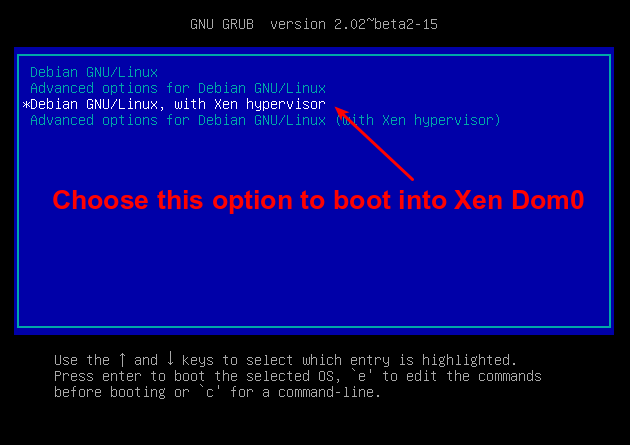
The first option will boot automatically in five seconds (see the GRUB_TIMEOUT line in /etc/default/grub), so this is not the time to get a coffee.
Press the down arrow to highlight the option Debian GNU/Linux, with Xen hypervisor, and press RETURN. Many lines of information appear, followed by the usual login screen.
Check Xen Works
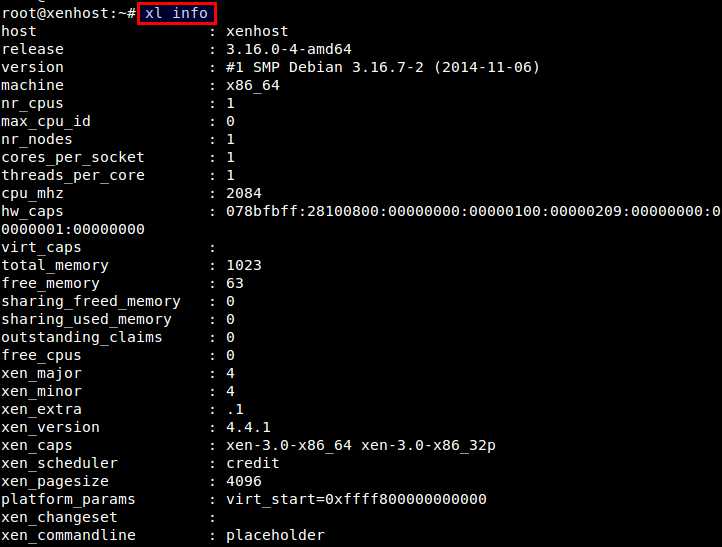
Xen hypervisor comes with Xen management command-line tool called xl, which can be used to create and manage Xen guest domains. Let's use xl command to check if Xen is successfully installed.
Log in as root, and run:
# xl info
which will display various information about Xen host.
To see a list of existing Xen domains:
# xl list

A little table of domains appears. Without any Xen guest domain created, the only entry should be Domain-0, your Debian installation.
Change the Boot Order
When you reach this point, the Xen install is complete. There is one more thing to fix - the default boot will not load Xen. GRUB chooses the first item in the boot menu (Debian GNU/Linux), not the third (Debian GNU/Linux, with Xen hypervisor).
The default option in the boot menu is defined in the GRUB configuration file /boot/grub/grub.cfg. To change the default option, don't edit that file, but edit /etc/default/grub instead. A little helper program called grub-mkconfig reads in this default configuration file and all the templates in /etc/grub.d/, then writes the grub.cfg file.
Edit Debian's configuration file for grub-mkconfig.
# vi /etc/default/grub
Change the line:
GRUB_DEFAULT=0
to:
GRUB_DEFAULT='Debian GNU/Linux, with Xen hypervisor'
Then update the GRUB configuration file.
# grub-mkconfig -o /boot/grub/grub.cfg
Finally reboot. After a few seconds, the grub boot menu appears. Check that the third option Debian GNU/Linux, with Xen hypervisor is highlighted automatically.
Final Note
If you use this machine as your hands-on workstation, install a graphical desktop. The Debian library includes a few desktop environments. If you want a graphical desktop that includes everything and the kitchen sink, go for Gnome. If graphics just get in your way, try Awesome.
Note that the Debian Jessie default environment Gnome comes with a huge amount of extra applications including the productivity suite LibreOffice, the Iceweasel web browser and the Rhythmbox music player. The install command apt-get install gnome adds 1,000 packages and takes up nearly 2GB of disk space. Running this heavyweight desktop takes up 1GB of memory.
Support Xmodulo
This website is made possible by minimal ads and your gracious donation via PayPal or credit card
Please note that this article is published by Xmodulo.com under a Creative Commons Attribution-ShareAlike 3.0 Unported License. If you would like to use the whole or any part of this article, you need to cite this web page at Xmodulo.com as the original source.

Xmodulo © 2021 ‒ About ‒ Write for Us ‒ Feed ‒ Powered by DigitalOcean