How to secure your Linux environment with Nitrokey USB smart card
Last updated on December 18, 2020 by Dan Nanni
With the mounting online security risks, simple one-step security no longer suffices, and people resort to multiple layers of security to thwart increasingly sophisticated attacks on their digital assets and online privacy. An advanced form of security defense often employed in financial sectors and other corporate environments is hardware-based protection, where a tamper-proof physical security key (also known as security token or hardware token) acts as a protection layer for secret software keys or login credentials. The hardware based security can be useful in various contexts, for example to implement things like two-factor authentication, VPN access control, secure password vault, and so on.
If you are a DIY type of guy, you might be tempted to create your own USB-based security key using an off-the-shelf USB thumbdrive. However, commodity USB drives are intrinsically vulnerable to viruses or malware specifically targeting the repgrammable nature of stock USB firmware. Personally I would not trust my private key with a $5 USB thumbdrive.
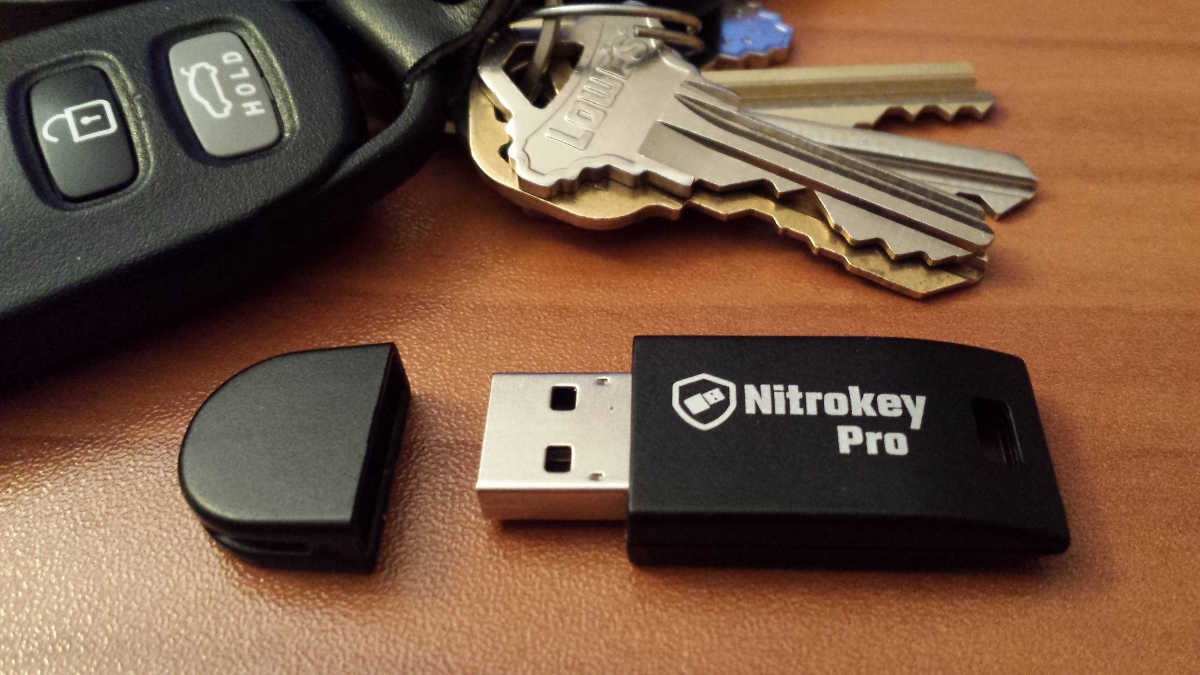
Recently I stumbled across USB-based security key hardware called Nitrokey (formerly known as "Crypto Stick"), and really liked it. Nitrokey is not a cheap USB memory stick, but its price range (20-50 USD) is still affordable, and given its all-in-one versatile security capabilities, I don't think it is overpriced. In this post, I will specifically talk about Nitrokey Pro model and present its real-world use cases.
What is Nitrokey Pro?
In a nutshell, Nitrokey Pro is a tamper-proof, PIN-protected, secure key storage hardware with a USB interface. It has an embedded smart card which implements various open security standards such as the OpenPGP protocol, S/MIME, HOTP (HMAC-based one time password) and TOTP (time-based one time password). Thus once you store your secret keys on Nitrokey Pro, it is able to sign, encrypt, decrypt and authenticate on the hardware itself, and thus your secret keys will never be exposed to the computer the smart card is connected to. This gives you a peace of mind when you need to run various security tasks on an untrusted (potentially malware-ridden) third-party computer. OATH one-time passwords generated by Nitrokey Pro are compatible with Gmail, Dropbox, AWS and many other websites. Nitrokey Pro also has a secure password vault built-in, allowing you to store your hard-to-remember login credentials on the tamper-proof hardware should you not trust any software password manager.
All these goodies aside, what I like the most about Nitrokey is its openness. As they say, proprietary security is not secure, and that motivates folks at Nitrokey to open up both hardware and software of their products to the open-source community, so they can be audited and vetted for any security flaws. You can access 100%-open PCB hardware design, firmware and software source code of all Nitrokey smart card lineup at their official Github repository.
In the rest of this article, I will show you how to set up Nitrokey Pro on Linux computer, and demonstrate how to use it in several real-world scenarios.
Set up Nitrokey Pro on Linux
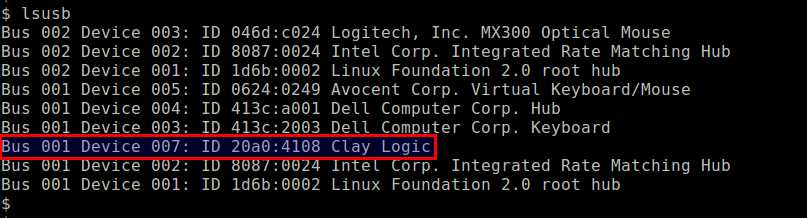
To set up Nitrokey Pro on Linux, first plug the card into your computer's USB port. If you are running the latest Linux distribution, it should have no problem finding the necessary USB device driver for the card. Use the lsusb command to verify that Nitrokey Pro is visible on your system, in which case the card will show up as Clay Logic.
$ lsusb
Once you verify the USB device is recognized, you need to set up udev rule for Nitrokey Pro USB device, and restart udev service as follows.
$ wget https://www.nitrokey.com/sites/default/files/40-nitrokey.rules
$ sudo cp 40-nitrokey.rules /etc/udev/rules.d/
$ sudo service udev restart
Next, download and install Nitrokey App. This dedicated GUI app is needed if you want to use Nitrokey Pro to generate one-time passwords or use it as a password manager. In most other cases, however, Nitrokey App is not required to operate Nitrokey USB key.
To install Nitrokey app on Linux desktop:
On Debian-based system:
$ sudo apt-get install gdebi-core
$ sudo gdebi nitrokey-XXXXXX.deb
On Red Hat-based system:
$ sudo rpm -ivh nitrokey-XXXXXX.rpm
After installing Nitrokey App, launch the app as follows.
$ nitrokey-app
If the app is successfully hooked up with the Nitrokey USB hardware, it will show Nitrokey connected desktop notification.

Nitrokey Pro smart card is protected with two PINs: user PIN (default: 123456) and admin PIN (default: 12345678). Be careful with those PINs as more than three incorrect typing of the user PIN will lock you out of the card (unless the admin PIN overrides it), and more than three incorrect typing of the admin PIN will destroy the USB key hardware irreparably. Such stringent PIN-based hardware protection is vital in case the smart card falls into the wrong hands.
Once the Nitrokey Pro becomes accessible on your system, the first thing to do is to change the default user/admin PINs. For this, right-click on Nitrokey icon at the top of the desktop, and go to Configure menu. There you will be able to change both user and admin PINs.

Note that PIN management can also be done with gpg command as I will demonstrate later.
Manage Nitrokey Pro with GnuPG
As a standard-compatible OpenPGP card, Nitrokey Pro can in fact be managed with GnuPG. The majority of its security functions (e.g., generating/storing GPG keys, encrypting/decrypting a file, signing a message, etc.) performed on the hardware can be controlled by the gpg command. So even if it is connected to a desktop-less server, you should be able to manage Nitrokey Pro without any issue.
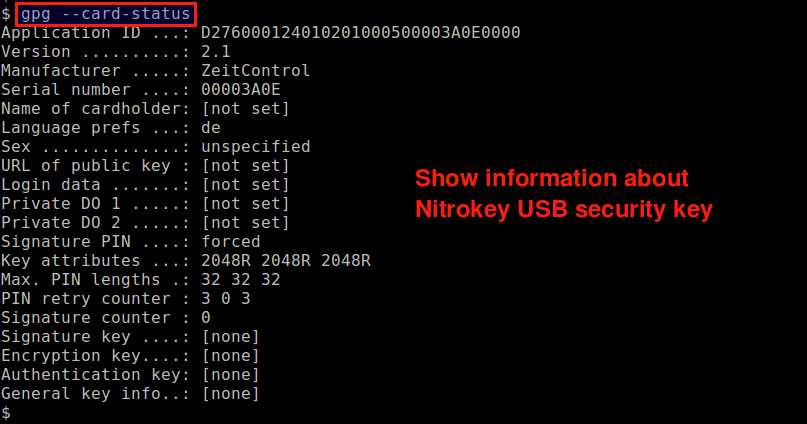
For example, type the following gpg command to view information about the connected USB security key.
$ gpg --card-status
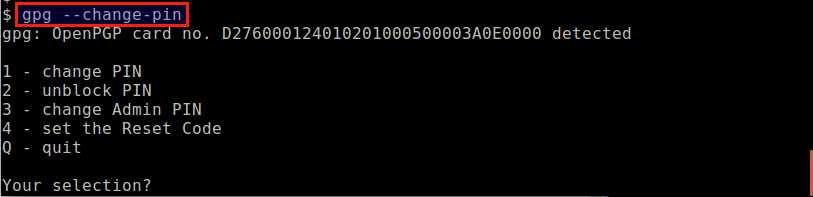
Similar to how you changed user/admin PIN on Nitrokey app, you can also change the PINs using gpg command:
$ gpg --change-pin
Now to test its security functionality, let's start by storing your GPG keys on the Nitrokey USB hardware. Note that you can move your existing GPG keys to Nitrokey card. Here let's create new GPG keys from scratch.
For that, type the command:
$ gpg --card-edit
At the gpg/card> prompt, type admin and press ENTER. You will then enter the admin mode, where you can perform various administrative tasks including key generation. Typing help will show all available admin commands.
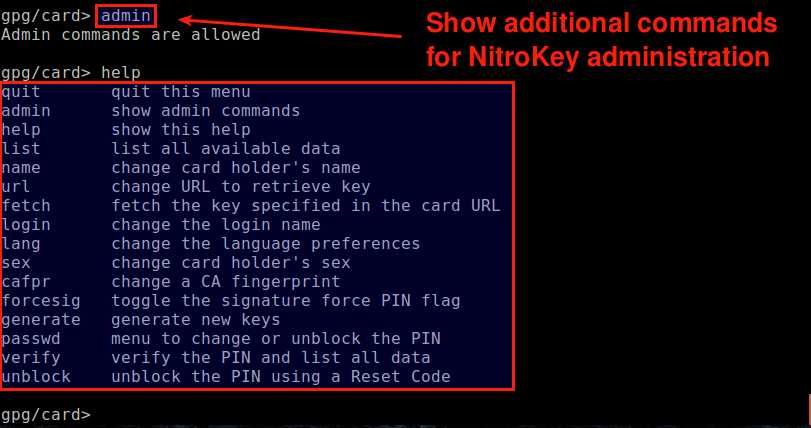
To generate new GPG keys, type generate command. This will take you through a series of standard steps to generate the master key and sub-keys for signing, encryption and authentication.
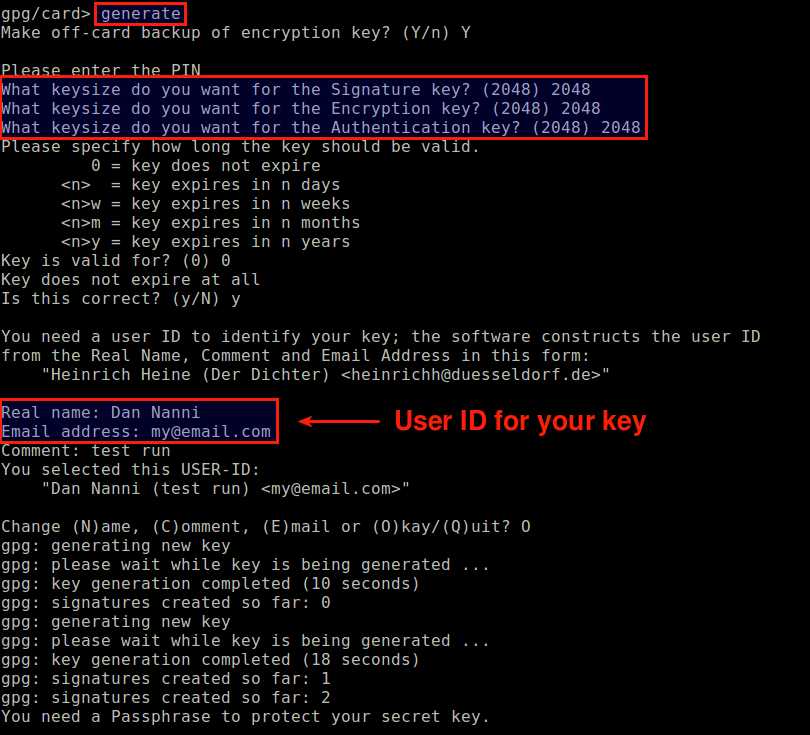
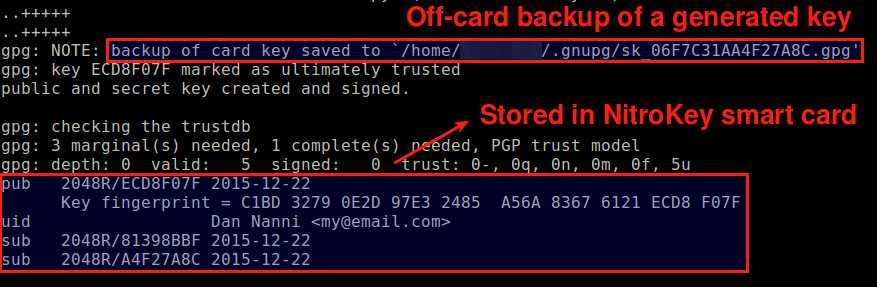
After key generation is completed, type list command to view generated keys. You can also view the same information by running gpg command:
$ gpg --card-status

You will see three different subkeys generated above. The signature key is a signing-only subkey used as the master key. The encryption key is a subkey used for encryption. Finally, the authentication key is not directly used by GnuPG, but used for other authentication purposes such as PAM authentication and SSH login.
Once you generated GPG keys, it is recommended to publish your public key at existing PGP key servers, so that others can download your key using your email address or key ID should they want to securely communicate with you. The following command will upload your public key to a key server. D7F6C175 is the key ID for your public key which is found in the above key information. Replace the key ID with your own.
$ gpg --keyserver keys.gnupg.net --send-keys D7F6C175
Now we are ready to use GPG keys stored on Nitrokey Pro. In the rest of this article, I am going to go over several examples of how to use Nitrokey Pro smart card.
Nitrokey Pro Use Case #1: File Encryption and Decryption
The simplest use case is to encrypt and decrypt a file using the encryption key stored on the USB hardware.
Someone sent you an encrypted file after encrypting the file using your GPG user ID (e.g., [email protected]) as follows.
$ gpg -r [email protected] -e secure.txt
Once you receive the file, you can decrypt it using -d option as long as the Nitrokey card where your secret key is stored is plugged into your computer.
$ gpg -d secure.txt.gpg
Note that you will be asked to enter your Nitrokey user PIN (not GPG key passphrase) for decryption. Without Nitrokey card, you will encounter the following error.
gpg: sending command `SCD PKDECRYPT' to agent failed: ec=5.99
gpg: encrypted with 2048-bit RSA key, ID E04A33F0, created 2015-12-21
      "Dan Nanni "
gpg: public key decryption failed: general error
gpg: decryption failed: secret key not available
Nitrokey Pro Use Case #2: SSH Authentication
You can use Nitrokey Pro smart card for SSH authentication. In this case, you use an OpenPGP key stored on Nitrokey card as an SSH key, and rely on gpg-agent to retrieve an OpenPGP key from Nitrokey card for SSH login. By default, however, OpenSSH client would try to obtain a private key from ssh-agent which cannot access smart card hardware directly. Thus we need to configure gpg-agent as a drop-in replacement for ssh-agent during key-based SSH authentication.
For this, we first need to enable SSH support in gpg-agent. Add the following line in ~/.gnupg/gpg-agent.conf.
enable-ssh-support
Then add the following lines to ~/.bashrc.
envfile="$HOME/.gnupg/gpg-agent.env"
if [[ -e "$envfile" ]] && kill -0 $(grep SSH_AGENT_PID "$envfile" | cut -d= -f 2) 2>/dev/null; then
    eval "$(cat "$envfile")"
else
    eval "$(gpg-agent --daemon --write-env-file "$envfile")"
fi
export SSH_AUTH_SOCK
It is also recommended to disable GNOME Keyring (if you are using it), since it can interfere with gpg-agent.
Now open a new terminal (or reload ~/.bashrc), and try typing the following command as a test.
$ gpg-agent
If gpg-agent is set up properly, you should see the output that says gpg-agent: gpg-agent running and available.
Next, find out the encryption subkey ID with the following command. ECD8F07F is your own GPG key ID, which can be found in the output of gpg --card-status command. Replace it with your own.
$ gpg --edit-key ECD8F07F
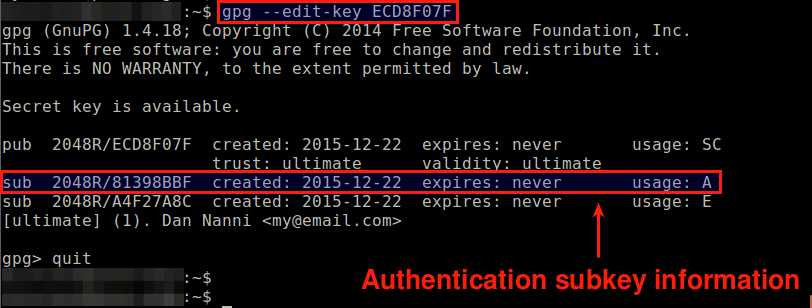
The output lists all available subkeys associated with your key ID. The last column labeled usage indicates the role of each subkey: S for signature, C for certificate, A for authentication and E for encryption.
In this example, the subkey ID for authentication is 81398BBF.
Using gpgkey2ssh command, generate compatible authorized_key string from the authentication subkey ID:
$ gpgkey2ssh 81398BBF > authorized_keys
Verify that the content of authorized_keys is the same as the output of the following command.
$ ssh-add -L
Once this is confirmed, move authorized_keys to ~/.ssh/authorized_keys at the remote host that you want to SSH to. Make sure that the permission of ~/.ssh/authorized_keys is set to 0600.
To test key-based SSH authentication, you should disable password authentication at the remote host's SSH server.
Finally, check that you can SSH to the remote host while Nitrokey smart card is plugged in to the local computer. You will be asked to enter the Nitrokey user PIN if gpg-agent has not yet cached your private key from the card. If you attempt to SSH without Nitrokey card, you will see the following error.
Permission denied (publickey).
Nitrokey Pro Use Case #3: Two-Factor Authentication for Dropbox Website Login
Another use case of the Nitrokey Pro smart card is one-time password (OTP) generation. In particular, Nitrokey Pro is capable of generating time-based OTP or HMAC-based OTP which are compatible with two-factor authentication supported by many commercial websites nowadays. One-time security codes will be generated by the Nitrokey app you installed earlier.
As an example, let me show you how to set up two-factor authentication with Nitrokey Pro on Dropbox website.
First, log in to your Dropbox account, and enable two-step verification. Choose mobile app option (not SMS option) to receive security codes. Eventually you will be using Nitrokey app, not a mobile app.

Dropbox website will then enable time-based authentication and generate a secret key in base32 format.

Open Configure setting of Nitrokey app, and go to OTP and Password Safe menu. Under OTP Slot Configuration tab, enable TOTP mode, choose an available TOTP slot (e.g., slot 1), and copy the above secret key into Secret Key blank.

As a final step, Dropbox will ask you to enter the code generated by authenticator app. Simply right-click on Nitrokey app icon, and choose Dropbox under Passwords menu.

Then one-time password will be generated and automatically copied to clipboard.

Now paste the OTP stored in clipboard into the security code blank at Dropbox page, and that completes two-step verification set up. Now whenever you need a one-time security code for Dropbox login, use Nitrokey app to get one.
Conclusion
In this tutorial, I presented a USB-based smart card called Nitrokey Pro, and its several use cases. Besides the three examples I covered, there are great many other use cases of Nitrokey Pro (e.g., PAM authentication, email encryption, hard disk encryption, VPN access, PKI certificate, and password manager). Nitrokey website maintains pretty good documentation of these use cases for Linux, Windows and MacOS X platforms, so I encourage you to check them out if you are interested.
As I mentioned at the beginning, a strong selling point of USB Nitrokey is its transparent development process. 100% open hardware and 100% open-source software allow their products to be vetted by community-driven code review and penetration tests, which makes them more trustworthy, leads to fast discovery and security update of any vulnerabilities, and foster integration with other apps. What do you think of their product? Share your thought on comment section.
Support Xmodulo
This website is made possible by minimal ads and your gracious donation via PayPal or credit card
Please note that this article is published by Xmodulo.com under a Creative Commons Attribution-ShareAlike 3.0 Unported License. If you would like to use the whole or any part of this article, you need to cite this web page at Xmodulo.com as the original source.

Xmodulo © 2021 ‒ About ‒ Write for Us ‒ Feed ‒ Powered by DigitalOcean