How to manage DigitalOcean VPS droplets from the command line on Linux
Last updated on November 13, 2020 by Dan Nanni
DigitalOcean is one of the hottest new kids in the block in the cloud VPS hosting market. While not offering as comprehensive service portfolio as Amazon Web Services and the likes, DigitalOcean is already a strong contender for the best Linux-based cloud VPS service targeted at small businesses and developers, thanks to their competitive pricing and user-friendly management interface.
Whenever you need a web-facing server for your personal project, you can quickly spin up a droplet (nickname for a VPS instance at DigitalOcean). And kill it when it's not needed. No need to burn a hole in your pocket as you are charged for its up time. While DigitalOcean's web-based management interface is streamlined already, for those of you who are die-hard fans of command-line interface (CLI), there is a CLI-based droplet management tool called tugboat. Thanks to this CLI tool, any complex droplet management task can easily be turned into a script.
In this tutorial, I am going to describe how to use tugboat to manage DigitalOcean dropets from the command line.
Install tugboat on Linux
To install tugboat on Ubuntu, Debian or Linux Mint:
$ sudo apt-get install ruby-dev
$ sudo gem install tugboat
To install tugboat on Fedora:
$ sudo yum install ruby-devel
$ sudo gem install tugboat
To install tugboat on CentOS, first install or upgrade to the latest Ruby, because on CentOS 6.5 and earlier, the default Ruby does not meet the minimum version requirement (1.9 and higher) for tugboat. Once you install Ruby 1.9 and higher, install tugboat as follows.
$ sudo gem install tugboat
Configure tugboat for the First Time
After installation, it's time to go through one-time configuration, which involves authorizing Tugboat to access your DigitalOcean account.
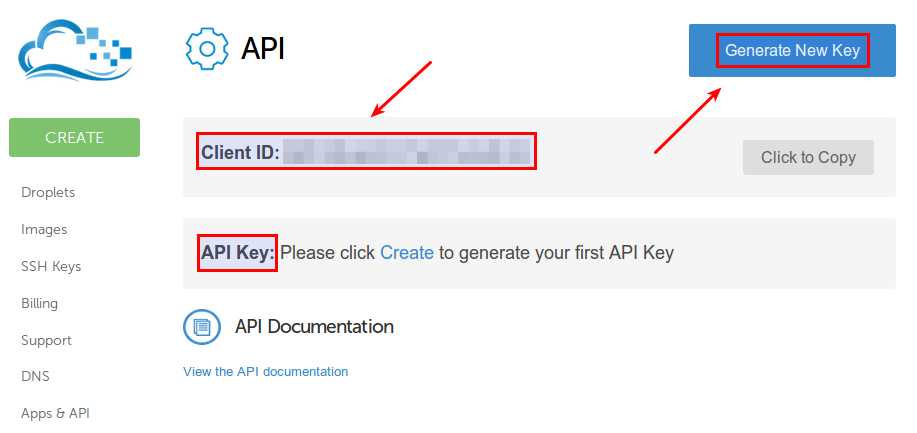
Go to https://cloud.digitalocean.com/api_access, and create a new API key. Make a note of client ID and API key.
Start authorization process by running:
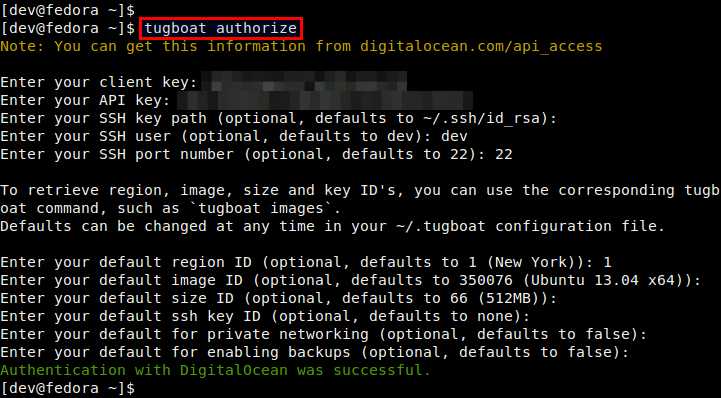
$ tugboat authorize
When prompted, enter your client ID and API key. It will ask you several other questions. You can accept default answers for now. We are going to customize the default settings later anyway.
Now let's customize default droplet settings to reflect your typical use cases. For that, first check available droplet offerings (e.g., available images, regions, sizes).
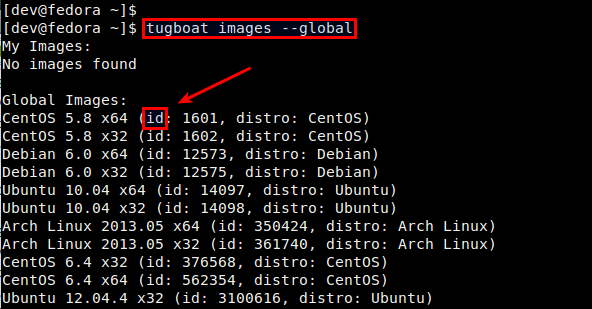
Running the command below will show you a list of available droplet images. Pick a default image to use, and make a note of the corresponding ID.
$ tugboat images --global
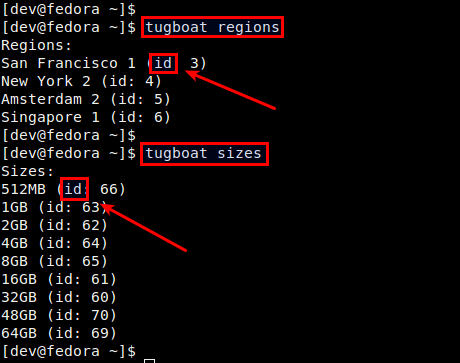
Similarly, pick a default geographic location from available regions:
$ tugboat regions
Also, choose a default droplet size from available RAM sizes:
$ tugboat sizes
Now put your default choices in ~/.tugboat. For example, here I customize my default settings to 512MB Ubuntu 14.04 x64 to be created in New York region. Set ssh_user to root if you want to enable SSH via key authentication, which will be described shortly.
$ vi ~/.tugboat
---
authentication:
  client_key: XXXXXXXXXXXXXXXXXXX
  api_key: XXXXXXXXXXXXXXXXXXXX
ssh:
  ssh_user: root
  ssh_key_path: /home/dev/.ssh/id_rsa
  ssh_port: '22'
defaults:
  region: '4'
  image: '3240036'
  size: '66'
  ssh_key: ''
  private_networking: 'false'
  backups_enabled: 'false'
Create and Add SSH Key to DigitalOcean
A secure way to access your droplet instance is to SSH to the instance via key authentication.
In fact, you can automatically enable key authentication for your droplets by registering your SSH public key with DigitalOcean. Here is how to do it.
First, generate a private/public SSH key pair (if you don't have one).
$ ssh-keygen -t rsa -C "[email protected]"
Assuming that the generated key pair consists of: ~/.ssh/id_rsa (private key) and ~/.ssh/id_rsa.pub (public key), go ahead and upload your public key by running:
$ tugboat add-key [name-of-your-key]
You can give your key any name you like (e.g., my-default-key). When prompted, enter the path to your public key (e.g., /home/user/.ssh/id_rsa.pub). After key uploading is completed, verify the key is successfully added by running:
$ tugboat keys

The key should also appear in DigitalOcean's SSH key page. If you want the key to be automatically used for your droplets, add the ID of your key to ~/.tugboat.
ssh_key: '182710'
Basic Usage of tugboat
Here are a few basic use cases of tugboat command line.
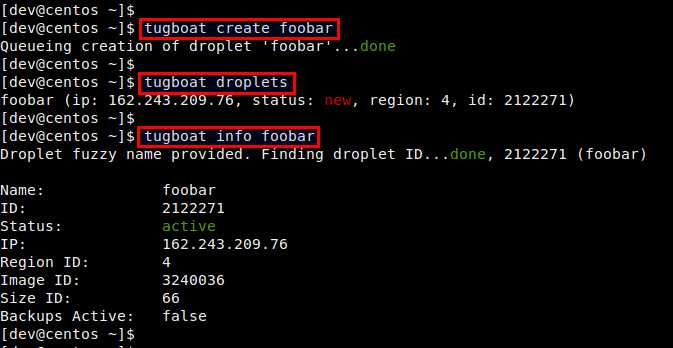
1. Create a new droplet with default settings.
$ tugboat create <name-of-droplet>
2. Show a list of all active droplets.
$ tugboat droplets
3. Display information about a droplet.
$ tugboat info <name-of-droplet>
4. Shutdown a droplet, and remove its image.
$ tugboat destroy <name-of-droplet>
5. Shutdown a droplet, but keep its image.
$ tugboat halt <name-of-droplet>
6. Take a snapshot of a droplet. The droplet must be turned off first.
$ tugboat snapshot <snapshot-name> <name-of-droplet>
7. Resize (increase or decrease the RAM size of) a droplet. The droplet must be shutdown first.
$ tugboat resize <name-of-droplet> -s <image-id>
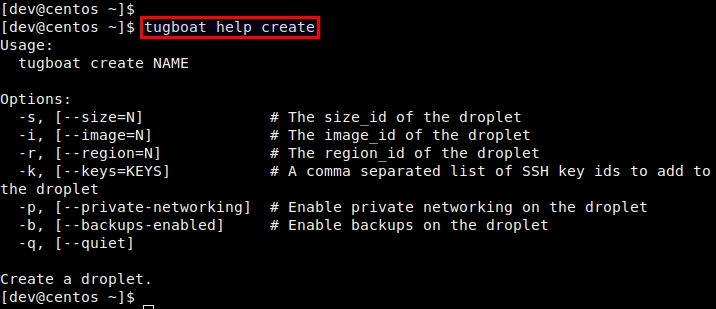
If you want to know more about a particular command option, run:
$ tugboat help <command>
Troubleshooting
1. When I run tugboat command, it fails with the following error.
/usr/lib/ruby/site_ruby/1.8/rubygems/custom_require.rb:31:in `gem_original_require': /usr/lib/ruby/gems/1.8/gems/tugboat-0.2.0/lib/tugboat/cli.rb:12: syntax error, unexpected ':', expecting kEND (SyntaxError)
tugboat requires Ruby 1.9 and higher. You need to upgrade Ruby to solve this problem. For CentOS, refer to this tutorial.
2. When I try to install tugboat with gem, I get the following error.
/usr/local/share/ruby/site_ruby/rubygems/core_ext/kernel_require.rb:55:in `require': cannot load such file -- json/pure (LoadError)
Install the following gem to fix the problem.
$ sudo gem install json_pure
Support Xmodulo
This website is made possible by minimal ads and your gracious donation via PayPal or credit card
Please note that this article is published by Xmodulo.com under a Creative Commons Attribution-ShareAlike 3.0 Unported License. If you would like to use the whole or any part of this article, you need to cite this web page at Xmodulo.com as the original source.

Xmodulo © 2021 ‒ About ‒ Write for Us ‒ Feed ‒ Powered by DigitalOcean