How to manage LVM volumes on CentOS / RHEL 7 with System Storage Manager
Last updated on November 9, 2020 by Dan Nanni
Logical Volume Manager (LVM) is an extremely flexible disk management scheme, allowing you to create and resize logical disk volumes off of multiple physical hard drives with no downtime. However, its powerful features come with the price of somewhat steep learning curves, with more involved steps to set up LVM using multiple command line tools, compared to managing traditional disk partitions.
Here is good news for CentOS/RHEL users. The latest CentOS/RHEL 7 now comes with System Storage Manager (aka ssm) which is a unified command line interface developed by Red Hat for managing all kinds of storage devices. Currently there are three kinds of volume management backends available for ssm: LVM, Btrfs, and Crypt.
In this tutorial, I will demonstrate how to manage LVM volumes with ssm. You will be blown away how simple it is to create and manage LVM volumes now. :-)
Preparing SSM
On fresh CentOS/RHEL 7, you need to install System Storage Manager first.
$ sudo yum install system-storage-manager
First, let's check information about available hard drives and LVM volumes. The following command will show information about existing disk storage devices, storage pools, LVM volumes and storage snapshots. The output is from fresh CentOS 7 installation which uses LVM and XFS file system by default.
$ sudo ssm list
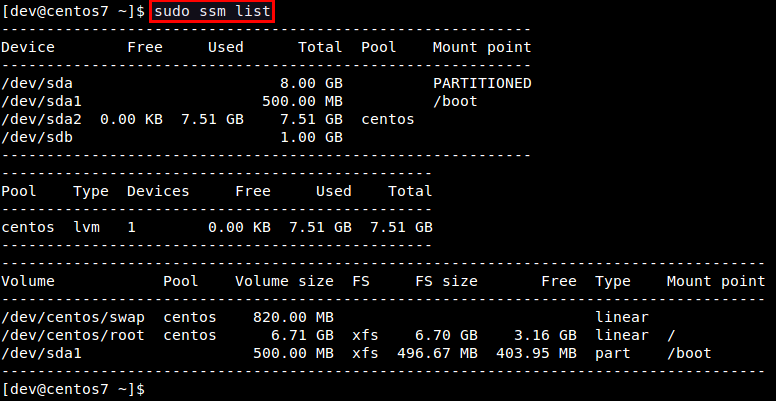
In this example, there are two physical devices (/dev/sda and /dev/sdb), one storage pool (centos), and two LVM volumes (/dev/centos/root and /dev/centos/swap) created in the pool.
Add a Physical Disk to an LVM Pool
Let's add a new physical disk (e.g., /dev/sdb) to an existing storage pool (e.g., centos). The command to add a new physical storage device to an existing pool is as follows.
$ sudo ssm add -p <pool-name> <device>

After a new device is added to a pool, the pool will automatically be enlarged by the size of the device. Check the size of the storage pool named centos as follows.
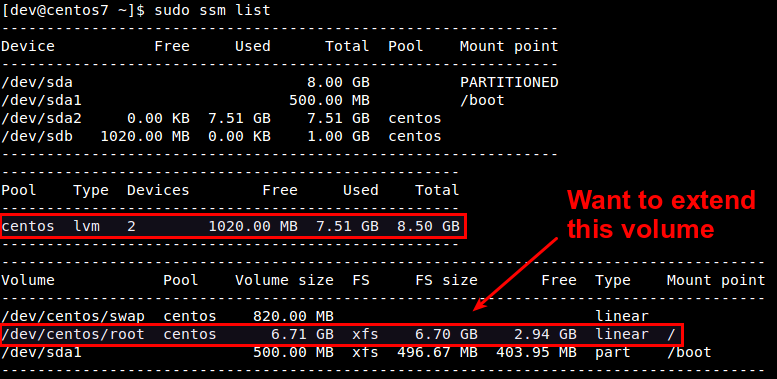
As you can see, the centos pool has been successfully expanded from 7.5GB to 8.5GB. At this point, however, disk volumes (e.g., /dev/centos/root and /dev/centos/swap) that exist in the pool are not utilizing the added space. For that, we need to expand existing LVM volumes.
Expand an LVM Volume
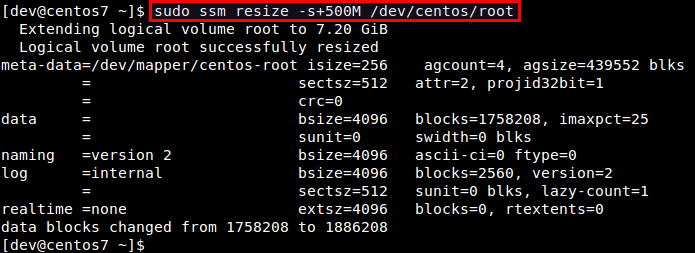
If you have extra space in a storage pool, you can enlarge existing disk volumes in the pool. For that, use resize option with ssm command.
$ sudo ssm resize -s [size] [volume]
Let's increase the size of /dev/centos/root volume by 500MB.
$ sudo ssm resize -s+500M /dev/centos/root
Verify the updated size of existing volumes.
$ sudo ssm list volumes
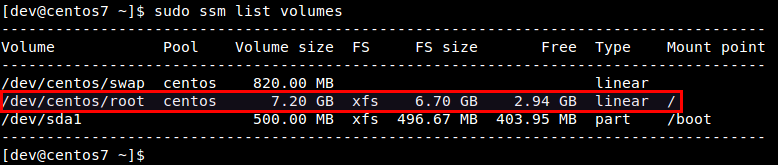
We can confirm that the size of /dev/centos/root volume has increased from 6.7GB to 7.2GB. However, this does not mean that you can immediately utilize the extra space within the file system created inside the volume. You can see that the file system size (FS size) still remains as 6.7GB.
To make the file system recognize the increased volume size, you need to "expand an existing file system itself. Depending on which file system you are using, there are different tools to expand an existing filesystem. For example, use resize2fs for EXT2/EXT3/EXT4, xfs_growfs for XFS, btrfs for Btrfs, etc.
In this example, we are using CentOS 7, where XFS file system is created by default. Thus, we use xfs_growfs to expand an existing XFS file system.
After expanding an XFS file system, verify that file system fully occupies the entire disk volume 7.2GB.


Create a New LVM Pool/Volume
In this experiment, let's see how we can create a new storage pool and a new LVM volume on top of a physical disk drive. With traditional LVM tools, the entire procedure is quite involved; preparing partitions, creating physical volumes, volume groups, and logical volumes, and finally building a file system. However, with ssm, the entire procedure can be completed at one shot!
What the following command does is to create a storage pool named mypool, create a 500MB LVM volume named disk0 in the pool, format the volume with XFS file system, and mount it under /mnt/test. You can immediately see the power of ssm.
$ sudo ssm create -s 500M -n disk0 --fstype xfs -p mypool /dev/sdc /mnt/test
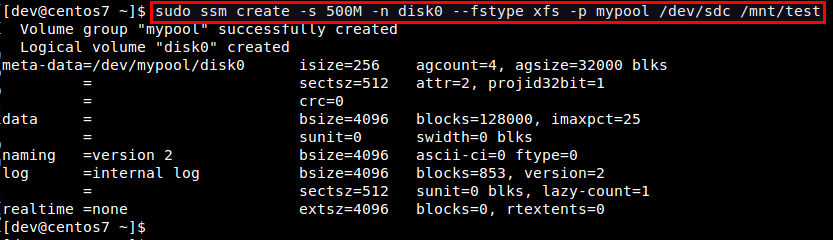
Let's verify the created disk volume.


Take a Snapshot of an LVM Volume
Using ssm tool, you can also take a snapshot of existing disk volumes. Note that snapshot works only if the back-end that the volumes belong to support snapshotting. The LVM backend supports online snapshotting, which means we do not have to take the volume being snapshotted offline. Also, since the LVM backend of ssm supports LVM2, the snapshots are read/write enabled.
Let's take a snapshot of an existing LVM volume (e.g., /dev/mypool/disk0).
$ sudo ssm snapshot /dev/mypool/disk0
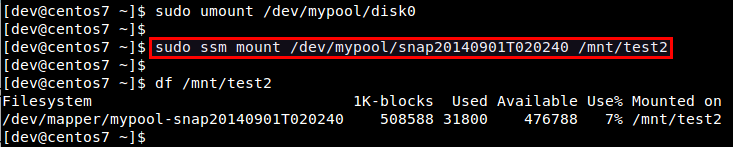
Once a snapshot is taken, it is stored as a special snapshot volume which stores all the data in the original volume at the time of snapshotting.

After a snapshot is stored, you can remove the original volume, and mount the snapshot volume to access the data in the snapshot.
Note that when you attempt to mount the snapshot volume while the original volume is mounted, you will get the following error message.
kernel: XFS (dm-3): Filesystem has duplicate UUID 27564026-faf7-46b2-9c2c-0eee80045b5b - can't mount
Remove an LVM Volume
Removing an existing disk volume or storage pool is as easy as creating one. If you attempt to remove a mounted volume, ssm will automatically unmount it first. No hassle there.
To remove an LVM volume:
$ sudo ssm remove <volume>
To remove a storage pool:
$ sudo ssm remove <pool-name>

Conclusion
Hopefully by now you see the power of ssm. In enterprise storage environments, it is quite common to deal with a wide array of storage devices, disk volumes and file systems. Instead of struggling with a number of different tools to manage a complex mix of storage configurations, you can master the single command-line tool ssm, and have its backends get the job done for you. ssm is definitely a must-have tool for any system administrators working in a complex storage management environment.
Support Xmodulo
This website is made possible by minimal ads and your gracious donation via PayPal or credit card
Please note that this article is published by Xmodulo.com under a Creative Commons Attribution-ShareAlike 3.0 Unported License. If you would like to use the whole or any part of this article, you need to cite this web page at Xmodulo.com as the original source.

Xmodulo © 2021 ‒ About ‒ Write for Us ‒ Feed ‒ Powered by DigitalOcean