How to set up networking between Docker containers
Last updated on September 6, 2020 by Dan Nanni
As you may be well aware, Docker container technology has emerged as a viable lightweight alternative to full-blown virtualization. There are a growing number of use cases of Docker that the industry adopted in different contexts, for example, enabling rapid build environment, simplifying configuration of your infrastructure, isolating applications in multi-tenant environment, and so on. While you can certainly deploy an application sandbox in a standalone Docker container, many real-world use cases of Docker in production environments may involve deploying a complex multi-tier application in an ensemble of multiple containers, where each container plays a specific role (e.g., load balancer, LAMP stack, database, UI).
There comes the problem of Docker container networking: How can we interconnect different Docker containers spawned potentially across different hosts when we do not know beforehand on which host each container will be created?
One pretty neat open-source solution for this is weave. This tool makes interconnecting multiple Docker containers pretty much hassle-free. When I say this, I really mean it.
In this tutorial, I am going to demonstrate how to set up Docker networking across different hosts using weave.
How Weave Works
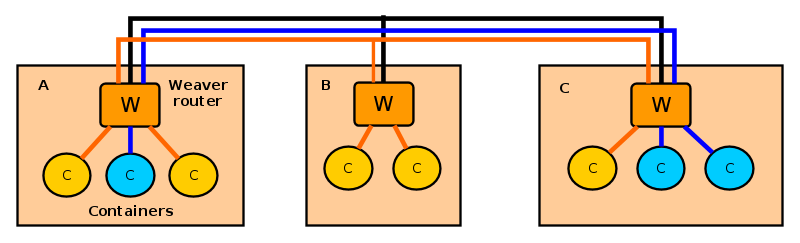
Let's first see how weave works. Weave creates a network of peers, where each peer is a virtual router container called weave router residing on a distinct host. The weave routers on different hosts maintain TCP connections among themselves to exchange topology information. They also establish UDP connections among themselves to carry inter-container traffic. A weave router on each host is then connected via a bridge to all other Docker containers created on the host. When two containers on different hosts want to exchange traffic, a weave router on each host captures their traffic via a bridge, encapsulates the traffic with UDP, and forwards it to the other router over a UDP connection.
Each weave router maintains up-to-date weave router topology information, as well as container's MAC address information (similar to switch's MAC learning), so that it can make forwarding decision on container traffic. Weave is able to route traffic between containers created on hosts which are not directly reachable, as long as two hosts are interconnected via an intermediate weave router on weave topology. Optionally, weave routers can be set to encrypt both TCP control data and UDP data traffic based on public key cryptography.
Prerequisite
Before using weave on Linux, of course you need to set up Docker environment on each host where you want to run Docker containers. Check out these tutorials on how to create Docker containers on Ubuntu or CentOS/Fedora.
Once Docker environment is set up, install weave on Linux as follows.
$ wget https://github.com/zettio/weave/releases/download/latest_release/weave
$ chmod a+x weave
$ sudo cp weave /usr/local/bin
Make sure that /usr/local/bin is include in your PATH variable by appending the following in /etc/profile.
export PATH="$PATH:/usr/local/bin"
Repeat weave installation on every host where Docker containers will be deployed.
Weave uses TCP/UDP 6783 port. If you are using firewall, make sure that these port numbers are not blocked by the firewall.
Launch Weave Router on Each Host
When you want to interconnect Docker containers across multiple hosts, the first step is to launch a weave router on every host.
On the first host, run the following command, which will create and start a weave router container.
$ sudo weave launch
The first time you run this command, it will take a couple of minutes to download a weave image before launching a router container. On successful launch, it will print the ID of a launched weave router.
To check the status of the router, use this command:
$ sudo weave status

Since this is the first weave router launched, there will be only one peer in the peer list.
You can also verify the launch of a weave router by using docker command.
$ docker ps

On the second host, run the following command, where we specify the IP address of the first host as a peer to join.
$ sudo weave launch <first-host-IP-address>
When you check the status of the router, you will see two peers: the current host and the first host.

As you launch more routers on subsequent hosts, the peer list will grow accordingly. When launching a router, just make sure that you specify any previously launched peer's IP address.
At this point, you should have a weave network up and running, which consists of multiple weave routers across different hosts.
Interconnect Docker Containers across Multiple Hosts
Now it is time to launch Docker containers on different hosts, and interconnect them on a virtual network.
Let's say we want to create a private network 10.0.0.0/24, to interconnect two Docker containers. We will assign random IP addressses from this subnet to the containers.
When you create a Docker container to deploy on a weave network, you need to use weave command, not docker command. Internally, the weave command uses docker command to create a container, and then sets up Docker networking on it.
Here is how to create a Ubuntu container on hostA, and attach the container to 10.0.0.0/24 subnet with an IP addresss 10.0.0.1.
hostA:~$ sudo weave run 10.0.0.1/24 -t -i ubuntu
On successful run, it will print the ID of a created container. You can use this ID to attach to the running container and access its console as follows.
hostA:~$ docker attach <container-id>
Move to hostB, and let's create another container. Attach it to the same subnet (10.0.0.0/24) with a different IP address 10.0.0.2.
hostB:~$ sudo weave run 10.0.0.2/24 -t -i ubuntu
Let's attach to the second container's console as well:
hostB:~$ docker attach <container-id>
At this point, those two containers should be able to ping each other via the other's IP address. Verify that from each container's console.

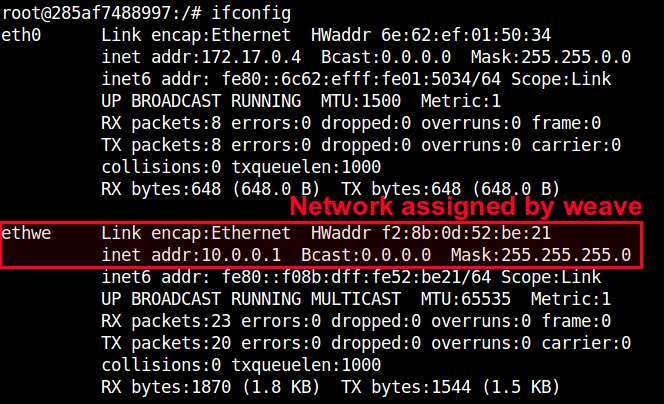
If you check the interfaces of each container, you will see an interface named ethwe which is assigned an IP address (e.g., 10.0.0.1 and 10.0.0.2) you specified.
Other Advanced Usages of Weave
Weave offers a number of pretty neat features. Let me briefly cover a few here.
Application Isolation
Using weave, you can create multiple virtual networks and dedicate each network to a distinct application. For example, create 10.0.0.0/24 for one group of containers, and 10.10.0.0/24 for another group of containers, and so on. Weave automatically takes care of provisioning these networks, and isolating container traffic on each network. Going further, you can flexibly detach a container from one network, and attach it to another network without restarting containers. For example:
First launch a container on 10.0.0.0/24:
$ sudo weave run 10.0.0.2/24 -t -i ubuntu
Detach the container from 10.0.0.0/24:
$ sudo weave detach 10.0.0.2/24 <container-id>
Re-attach the container to another network 10.10.0.0/24:
$ sudo weave attach 10.10.0.2/24 <container-id>
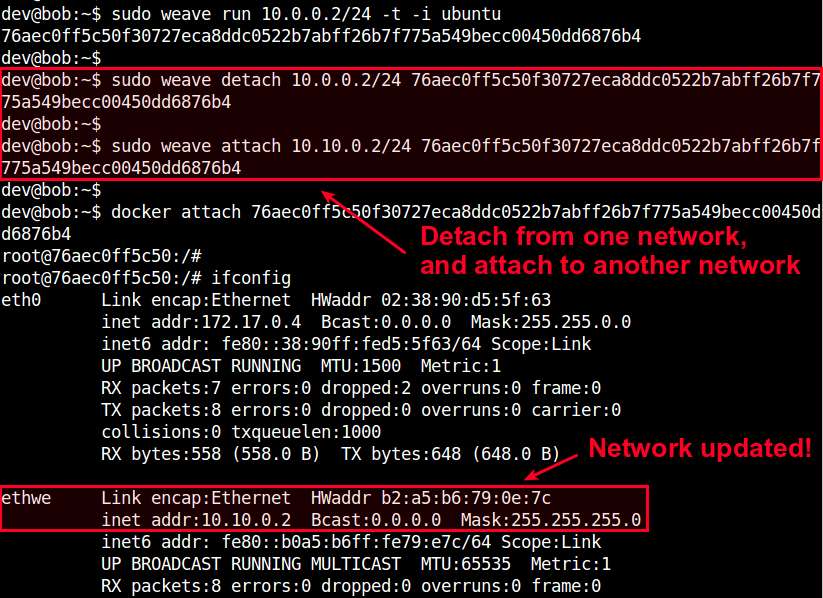
Now this container should be able to communicate with other containers on 10.10.0.0/24. This is a pretty useful feature when network information is not available at the time you create a container.
Integrate Weave Networks with Host Network
Sometimes you may need to allow containers on a virtual weave network to access physical host network. Conversely, hosts may want to access containers on a weave network. To support this requirement, weave allows weave networks to be integrated with host network.
For example, on hostA where a container is running on network 10.0.0.0/24, run the following command.
hostA:~$ sudo weave expose 10.0.0.100/24
This will assign IP address 10.0.0.100 to hostA, so that hostA itself is also connected to 10.0.0.0/24 network. Obviously, you need to choose an IP address which is not used by any other containers on the network.
At this point, hostA should be able to access any containers on 10.0.0.0/24, whether or not the containers are residing on hostA. Pretty neat!
Conclusion
As you can see, weave is a pretty useful Docker networking tool. This tutorial only covers a glimpse of its powerful features. If you are more ambitious, you can try its multi-hop routing, which can be pretty useful in multi-cloud environment, dynamic re-routing, which is a neat fault-tolerance feature, or even its distributed DNS service which allows you to name containers on weave networks. If you decide to use this gem in your environment, feel free to share your use case!
Support Xmodulo
This website is made possible by minimal ads and your gracious donation via PayPal or credit card
Please note that this article is published by Xmodulo.com under a Creative Commons Attribution-ShareAlike 3.0 Unported License. If you would like to use the whole or any part of this article, you need to cite this web page at Xmodulo.com as the original source.

Xmodulo © 2021 ‒ About ‒ Write for Us ‒ Feed ‒ Powered by DigitalOcean