How to share a directory with Samba on Fedora or CentOS
Last updated on August 16, 2020 by Kristophorus Hadiono
Nowadays sharing data across different computers is not something new at home or many work places. Riding on this trend, modern operating systems make it easy to share and exchange data transparently across computers via network file systems. If your work environment involves a mix of Microsoft Windows and Linux computers, one way to share files and folders among them is via SMB/CIFS, a cross-platform network file sharing protocol. Windows Microsoft natively supports SMB/CIFS, while Linux offers free software implementation of SMB/CIFS network protocol in Samba.
In this article, we will demonstrate how to share a directory using Samba. The Linux platform we will use is Fedora or CentOS. This article is dividied into four parts. First, we will install Samba under Fedora/CentOS environment. Next, we discuss how to adjust SELinux and firewall configurations to allow file sharing with Samba. Finally, we cover how to enable Samba to share a directory.
Step One: Install Samba on Fedora or CentOS
First thing first. Let's install Samba and configure basic settings.
Check whether Samba application is already installed on your system by running:
$ rpm -q samba samba-common samba-client
If the above command doesn't show anything at all, it means that Samba is not installed. In that case, install Samba using the command below.
$ sudo yum install samba samba-common samba-client
Next, creates a local directory which will share data over network. This directory will be exported to remote users as a Samba share. In this tutorial, we will create this directory in the top-level directory /shared, so make sure that you have the privileges to do it.
$ sudo mkdir /shared
If you want to create a shared directory inside your home directory (e.g., $HOME/shared), you must activate Samba home directory sharing in the SELinux options, which will be described below in more detail.
After creating /shared directory, set the privileges of the directory so other users can access it.
$ sudo chmod o+rw /shared
If you don't want other users to be able to have write to the directory, just remove the w option in chmod command as follows.
$ sudo chmod o+r /shared
Next, create one empty file as a test. This file will be used to verify that he Samba share is mounted properly.
$ sudo touch /shared/file1
Step Two: Configure SELinux for Samba
Next, we need to re-configure SELinux which is enabled by default in Fedora and CentOS distributions. SELinux allows Samba to read and modify files or directories only when they have the right security context (e.g., labeled with the samba_share_t attribute).
The following command adds the necessary label to file-context configuration:
$ sudo semanage fcontext -a -t samba_share_t "<directory>(/.*)?"
Replace the <directory> with the local directory we created earlier for Samba share (e.g., /shared):
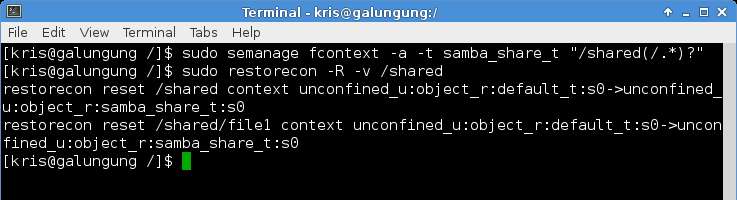
$ sudo semanage fcontext -a -t samba_share_t "/shared(/.*)?"
To activate the label change, we then must run the restorecon command like below.
$ sudo restorecon -R -v /shared
To share a directory inside our home directory via Samba, we must enable sharing home directory option in SELinux because it is disabled by default. The following command achieves the desired effect. Skip this step if you are not sharing your home directory.
$ sudo setsebool -P samba_enable_home_dirs 1
Step Three: Configure Firewall for Samba
The next step is to open necessary TCP/UDP ports in the firewall settings for Samba to operate.
If you are using firewalld (e.g., on Fedora or CentOS 7 or later), the following command will take care of permanent firewall rule change for Samba service.
$ sudo firewall-cmd --permanent --add-service=samba
If you are using iptables for your firewall (e.g., CentOS 6 or earlier), use the following commands to open up necessary Samba ports to the world.
$ sudo vi /etc/sysconfig/iptables
-A RH-Firewall-1-INPUT -m state --state NEW -m tcp -p tcp --dport 445 -j ACCEPT
-A RH-Firewall-1-INPUT -m state --state NEW -m udp -p udp --dport 445 -j ACCEPT
-A RH-Firewall-1-INPUT -m state --state NEW -m udp -p udp --dport 137 -j ACCEPT
-A RH-Firewall-1-INPUT -m state --state NEW -m udp -p udp --dport 138 -j ACCEPT
-A RH-Firewall-1-INPUT -m state --state NEW -m tcp -p tcp --dport 139 -j ACCEPT
Then restart iptables service:
$ sudo service iptables restart
Step Four: Change Samba Configuration
The last step is to configure Samba to export a created local directory as a Samba-share.
Open the Samba configuration file with a text editor, and add the following lines at the bottom of the file.
$ sudo nano /etc/samba/smb.conf
[myshare]
comment=my shared files
path=/shared
public=yes
writeable=yes
In the above the text inside a pair of brackets (e.g., myshare) is the name of the Samba-shared resource, which will be used to access the Samba share from a remote host.
Create a Samba user account which is required to mount and export the Samba file system. To create a Samba user, use the smbpasswd tool. Note that the Samba user account must be the same as any existing Linux user. If you try to add a non-existing user with smbpasswd, it will give an error message.
If you don't want to use any existing Linux user as a Samba user, you can create a new dedicated user in your system. For safety, set the new user's login shell to /sbin/nologin, and do not create its home directory.
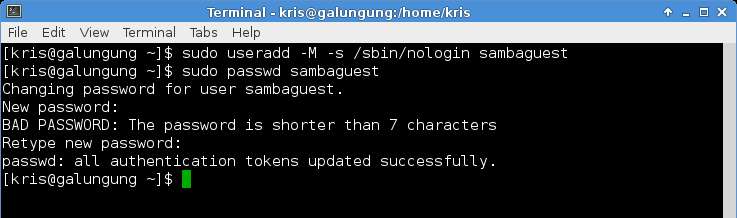
In this example, we are creating a new user named sambaguest as follows.
$ sudo useradd -M -s /sbin/nologin sambaguest
$ sudo passwd sambaguest
After creating a new user, add the user as a Samba user using smbpasswd command. When this command asks a password, you can type a different password than the user's password.
$ sudo smbpasswd -a sambaguest
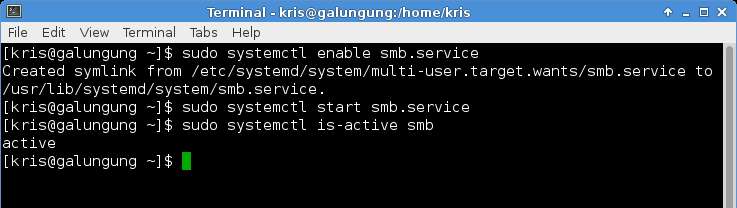
4. Activate the Samba service, and check whether the Samba service is running or not.
$ sudo systemctl enable smb.service
$ sudo systemctl start smb.service
$ sudo systemctl is-active smb
To see the list of shared directories in Samba, type the following command.
$ smbclient -U sambaguest -L localhost

The following is a screenshot of accessing the Samba-shared directory on Thunar file manager, and doing copy-paste of file1. Note that the Samba share is accessible via smb://<samba-server-IP-address>/myshare address on Thunar.

Support Xmodulo
This website is made possible by minimal ads and your gracious donation via PayPal or credit card
Please note that this article is published by Xmodulo.com under a Creative Commons Attribution-ShareAlike 3.0 Unported License. If you would like to use the whole or any part of this article, you need to cite this web page at Xmodulo.com as the original source.

Xmodulo © 2021 ‒ About ‒ Write for Us ‒ Feed ‒ Powered by DigitalOcean