How to verify the authenticity and integrity of a downloaded file on Linux
Last updated on December 3, 2020 by Dan Nanni
'When you download a file (e.g., an installer, an ISO image, or a compressed archive) from the web, the file can be corrupted under a variety of error conditions, e.g., due to transmission errors on the wire, interrupted download, faulty storage hardware, file system errors, etc. Such failure cases aside, a file can also be deliberately tampered with by determined attackers during or before download. For example, an attacker with a compromised certificate authority could mount a man-in-the-middle (MITM) attack, tricking you into downloading a malware-ridden file from a bogus HTTPS website.
To protect yourself against these kinds of problems, it is often recommended that you verify the authenticity and integrity of a file when you download it from the web. Especially when you downloaded rather sensitive files (e.g., OS images, application binaries, executable installers, etc), blindly trusting downloaded files is not a good habit.
One quick and easy way to verify the integrity of a downloaded file is to use various checksum tools (e.g., md5sum, sha256sum, cksum) to compute and compare checksums (e.g., MD5, SHA or CRC). However, checksums are vulnerable to collision attacks, and also cannot be used to verify the authenticity (i.e., owner) of a file.
If you would like to verify both authenticity (owner) and integrity (content) of a downloaded file, you need to rely on cryptographic signatures instead. In this tutorial, I am going to describe how to check file authenticity and integrity by using GnuPG (GNU Privacy Guard).
In this example, I am going to verify a disk image file available for download from https://onionshare.org. In this website, the publisher offers their official public key, as well as its fingerprint for key verification purpose.

As for a file to download, the publisher offers its corresponding PGP signature as well.

Install GnuPG and Generate a Key Pair
Let's start by installing GnuPG on your Linux system.
On Ubuntu, Debian or any other Debian-derivatives:
$ sudo apt-get install gnupg
On Fedora, CentOS or RHEL:
$ sudo yum install gnupg
After installation, generate a key pair which you will be using in this tutorial.
$ gpg --gen-key

During key generation, you will be asked to provide your name and email address, as well as a passphrase to protect your private key. You can also choose when the key pair will expire (no expiration by default). Depending on keysize you choose (between 1024 to 4096 bits), the key generation process can take a couple of minutes or more, as it requires collecting a sufficient amount of random data, which come from your desktop activities (e.g., keyboard typing, mouse movement, disk access).
After key generation is finished, a public and a private key will be stored in ~/.gnupg directory for use.
Import the Public Key of a File Owner
The first step in verifying a downloaded file is to import the public key of a file owner, and (optionally) establish trust with the owner.
First, download the public key of a file owner:
$ wget https://onionshare.org/signing-key.asc
Then go ahead and import the public key into your keyring with gpg command:
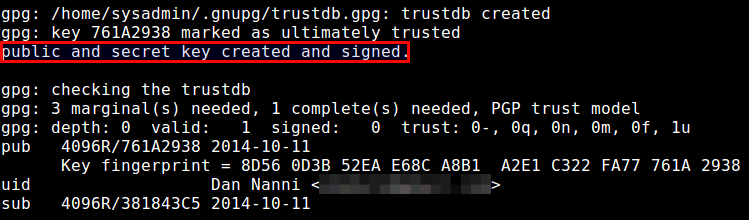
$ gpg --import signing-key.asc

Once the public key of the owner is imported, it will print out a key ID (e.g., EBA34B1C) as shown above. Make a note of this key ID.
Now, check the fingerprint of the imported public key by running:
$ gpg --fingerprint EBA34B1C
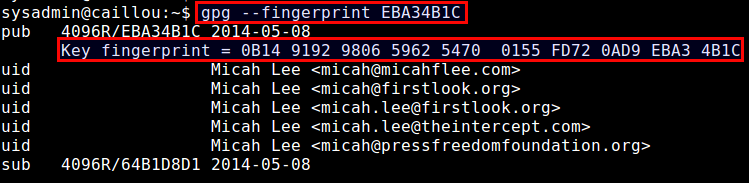
You will see the fingerprint string of the public key. Compare this string with the fingerprint displayed in the website to see if they match.
In general, verifying that the owner of the public key is who he or she claims to be must go through a more stringent process than simple fingerprint comparison, as the website could have been forged to match a fingerprint. You trust a someone's public key only when the key has been fully vetted to indeed belong to that person (e.g., you met that person, talked over the phone to confirm his/her identity, etc).
Once you have verified the validity of the public key in some other means, and decided to trust the public key, you can explicitly assign your trust to the key as follows. Note that this step is optional, and you are not required to assign explicit trust before using it.
$ gpg --edit-key EBA34B1C
This command will show you GPG prompt:
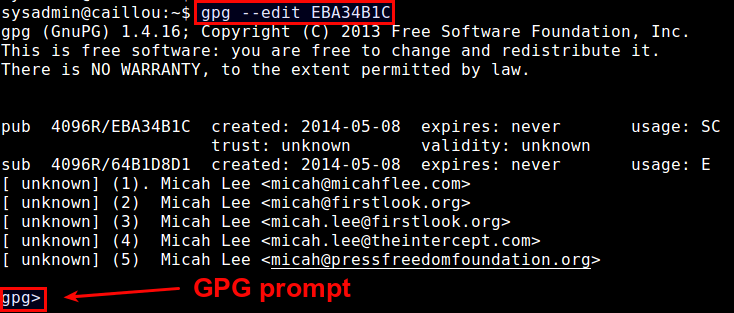
Type trust at GPG prompt, which will allow you to choose the trust level of this key from 1 to 5.
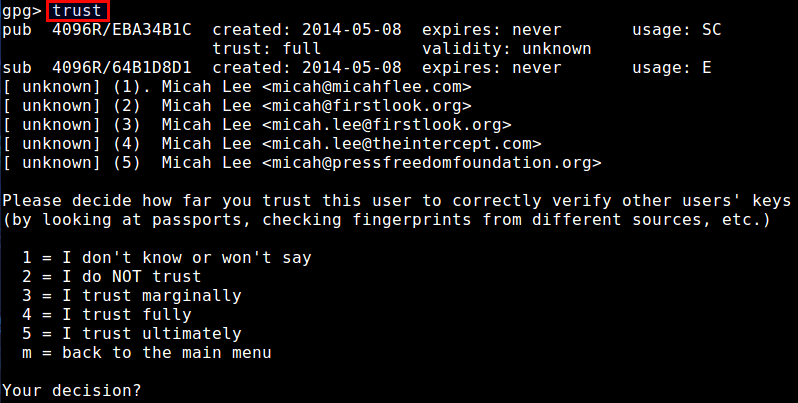
In this case, I decided to assign trust 4. After that, sign it with your own private key by typing sign, and then finalize by typing save at GPG prompt:

Again, this way of explicitly assigning a trust to a public key is not required, and implicit trust by simply importing the key is often sufficient.
The implication of assigning full trust to the key is that if another key X is signed with this fully trusted key, the key X will be also considered valid by you. In general, key validation relies on a sophisticated mechanism known as "web of trust".
Coming back to the tutorial, now let's check a list of imported keys.
$ gpg --list-keys
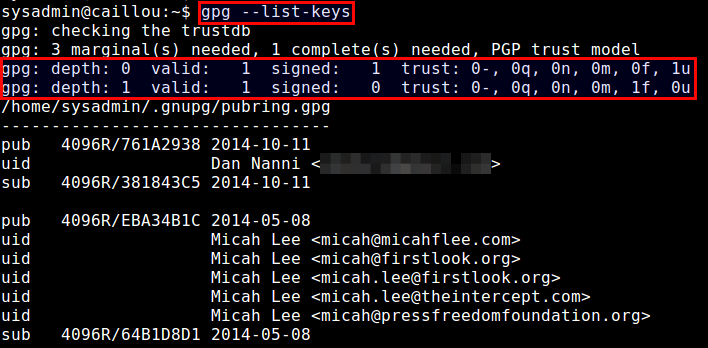
You should see at least two keys: one key with depth 0 and ultimate trust (1u), which is your own key, and the other key with depth 1 and full trust (1f), which is the key signed by yourself earlier.
Verify the Authenticity/Integrity of a File
Once you have established a trust relationship with a file owner using his/her public key, we are now ready to verify the authenticity and integrity of a file that you downloaded from the owner.
In our example, the file owner publishes a file and a corresponding PGP signature (*.asc) separately. The role of the signature is to certify and put a timestamp on the file.
A typical signature (*.asc) looks like the following.
-----BEGIN PGP SIGNATURE-----

iQIcBAABCgAGBQJUJGhsAAoJEP1yCtnro0sc1jUP/ixNY/lKdrcMIAUoqlWKNE8f
sj4SFiwREMew76w66GASDF03fa5zPX6EsS2kucgx8ZsfEiSmN5T0y2P/aSaXwZqF
kywZVEzirKtca5AJ4DBzu6qrt9GgSw6JBJVv1oBJCMNyO+eAj341paR3MudvnyQz
H/N5tc4Qcilzy6M184opGIzy4ipEmMXfLHsd7WJpAyn+tO/z3uhh9NkNuygZpaFr
olpSWPE8revdDJyfMfSmb3ZrFmhLn7FCEltOi+a7SluvrMclizfnbec9rgLJtjo0
CPDZY7tsWmmL0DA3VvpMVqGvkg/Dyhpn2IIDrNaLAlvGQ5aovf+4tjad5IHvyaWx
4Gds93G6Hqvv5RwGx7OR3hgt2o0Y+qFsVDxVnPxerGhXeJXHzSDwLQMpdj9IoSU
Ae/53XXnxqSN6POZcwHiHvbsv0pdlg0Ea0dDAAN0ZeINNyZf1R0tLjWkcgpvGCtv
qkJuYFF9W9cWHraPY2ov5Hs/JZzPcG0eVpnDdzfOOH1gDKADq9A5D2X5QJCulsh9
WwU3X+E43OqIsoRzBucItD9HhZbEH7t8Q0xAqnAkgU3hriZp3dN4cnMfhM6I9hli
EmpSpLKCceMexu2o9QgzGXVm+AGZJe4QkuwAhRIccp5JDMVny61UlKTasjy6co8h
5GBhhYybPEFM+G1BODMd
=c9wo
-----END PGP SIGNATURE-----
Let's download both the file and its signature:
$ wget https://onionshare.org/files/0.6/OnionShare.dmg
$ wget https://onionshare.org/files/0.6/OnionShare.dmg.asc
Now verify the PGP signature of the downloaded file.
$ gpg --verify OnionShare.dmg.asc OnionShare.dmg
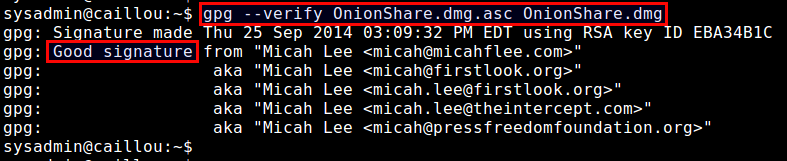
If the output of the command contains Good signature from <file owner>, the downloaded .dmg file has been successfully authenticated and verified. If the downloaded file were tampered with in any way after the signature has been generated, the verification would fail.
At this point you can be rest assured and trust the downloaded file.
Support Xmodulo
This website is made possible by minimal ads and your gracious donation via PayPal or credit card
Please note that this article is published by Xmodulo.com under a Creative Commons Attribution-ShareAlike 3.0 Unported License. If you would like to use the whole or any part of this article, you need to cite this web page at Xmodulo.com as the original source.

Xmodulo © 2021 ‒ About ‒ Write for Us ‒ Feed ‒ Powered by DigitalOcean