How to set up WireGuard VPN server on Ubuntu 20.04
Last updated on January 18, 2021 by Dan Nanni
Traditionally, VPN implementation has existed in two forms. In-kernel VPN implementation such as IPsec performs heavy-duty per-packet crypto processing in the kernel in a "bump-in-the-stack" fashion (i.e., between IP stack and the network drivers). This gives speed as there is no context switch between kernel and userspace during packet processing. But it comes with high management complexity in separate userspace control plane (e.g., IKE). An alternative form of VPN implementation is userspace TUN/TAP-based solutions such as OpenVPN, Tinc, n2n, where crypto processing is performed by a userspace VPN daemon. Naturally, these TUN/TAP-based VPN solutions have poor performance compared to IPsec mainly because network packets traverse the kernel and userspace boundary multiple times, resulting in frequent context switches and packet copies. Despite their performance disadvantage, userspace VPN solutions enjoy more popularity than the in-kernel counterpart due to their ease of use and configuration.
What is WireGuard?
WireGuard is a relatively new entrant in the VPN software scene, with a bold promise to dethrone OpenVPN from the top in terms of speed, ease of use, and auditability. To be competitive with in-kernel IPsec in terms of performance, WireGuard implements its data path in the kernel. But to avoid the pitfalls of IPsec's complex stateful control plane, WireGuard allows it to be configured and administered via a stateless virtual interface using the standard ip and ifconfig tools. WireGuard kernel module is implemented with less than 4,000 lines of code (which amounts to only 1% of OpenVPN or IPsec implementations) and uses state-of-the-art proven cryptography. Such minimal codebase facilitates rigorous and timely security audits from the community as it goes through ongoing updates.
Whether or not WireGuard will fullfill its promise will remain to be seen, but so far, it has demonstrated a strong track record of success in growing its popularity. The fact that WireGuard has made it into the Linux kernel 5.6 is a solid testament to its credibility. As Linus once put it, it's simply a work of art.
Use Cases of WireGuard VPN Server
While the title of this tutorial is setting up WireGuard VPN server, technically it is not correct. Unlike OpenVPN, there is no notion of server and client in WireGuard. Rather, the network endpoints connected by WireGuard are called peers, and they talk to each other directly via pairwise WireGuard tunnels. Similar concepts are already available in existing peer-to-peer VPNs such as Tinc or n2n. Even in such peer-to-peer VPN design, one designated peer can play the role of a VPN server for all the other peers. This is a traditional VPN service use case, where the goal is to hide your digital footprint, circumvent geofencing, protect yourself from snooping on public WiFi, etc. In this use case, you set up a designated WireGuard peer on a virtual private server (VPS), and have it route all your traffic as a default gateway. Since the WireGuard peer is running on VPS, completely under your control, you don't have to worry about your online activities on VPN secretly being logged, which is always a possibility for existing free VPN hosting. It's also possible for the WireGuard VPN server to be configured to relay traffic among connected users (in case they want to, but cannot directly exchange traffic behind NATs).
With such VPN use case in mind, I describe in this tutorial how to set up Wireguard VPN server on Ubuntu environment. The tested platform is Ubuntu server 20.04.1 LTS (Focal Fossa) with kernel 5.8.0-38. However, most of this tutorial (except for distro-specific WireGuard installation and firewall setup) is applicable to all Linux distributions including Debian, Fedora and Arch Linux.
Install WireGuard on Ubuntu
Not surprisingly, WireGuard has already been incorporated into the default repositories of all modern Linux distributions including Ubuntu 20.04. This makes WireGuard installation pretty straightforward:$ sudo apt install wireguard
Configure WireGuard as a VPN Server
Most manual WireGuard configuration can be done with standard ip or ifconfig tools, except for crypto configuration. For crypto setup and others, WireGuard comes with command-line tools called wg and wg-quick.
WireGuard configuration can best be done with the root as it involves privileged operations. So first switch to the root:
$ sudo -i
The rest of the precedure will be performed as the root.
In WireGuard, each connected peer (including server and clients) needs to generate its own cryptographic (public/private) key pair for authentication and encryption. So the first step in WireGuard server configuration is to generate a key pair for the server as follows.
# cd /etc/wireguard
# umask 077
# wg genkey | tee /etc/wireguard/privatekey | wg pubkey | tee /etc/wireguard/publickey

In the above, the umask command makes sure that only the root has read, write and execute permissions on /etc/wireguard. The key pair generated by wg will be found in /etc/wireguard. Every client who wants to connect to the server also needs to generate his or her own key pair. Client-side configuration is covered in another tutorial.
Next, go ahead and create a WireGuard server configuration file in /etc/wireguard/wg0.conf. A WireGuard configuration file is named as the WireGuard interface name follwed by .conf. So when activated, wg0.conf will create a virtual interface named wg0. In the configuration file, we define among other things a server's listening port, private key, and a private IP address to be assigned to the server, etc.
# vi /etc/wireguard/wg0.conf
[Interface]
PrivateKey = SMV0DW6G04+EQDgK5NMzlIEicD0qQ0ORb7njXp4atko=
Address = 10.0.0.1/24
SaveConfig = true
ListenPort = 51820
PostUp = iptables -A FORWARD -i %i -j ACCEPT; iptables -t nat -A POSTROUTING -o ens3 -j MASQUERADE
PostDown = iptables -D FORWARD -i %i -j ACCEPT; iptables -t nat -D POSTROUTING -o ens3 -j MASQUERADE
PrivateKey: You need to fill this field with the content of/etc/wireguard/privatekey.Address: This is a private IP address to be assigned to this peer's WireGuard virtual interface. It can be either IPv4 or IPv6 address.SaveConfig: If true, this configuration file will automatically be updated when a new peer is connected.ListenPort: This is the UDP listening port for incoming connections from other peers. A standard WireGuard port is UDP/51820.PostUp/PostDown: The commands specified here are supposed to be triggered automatically after this server peer is up (PostUp) or down (PostDown). Theiptablescommand enables and disables IP masquerade, which is needed to allow peers with private IP addresses to communicate with each other via their public IP addresses. Here, make sure that the interface specified with-o(ens3in this example) is the WAN interface of your Ubuntu server.
Make sure that wg0.conf is not readable to unprivileged users.
# chmod 600 /etc/wireguard/wg0.conf
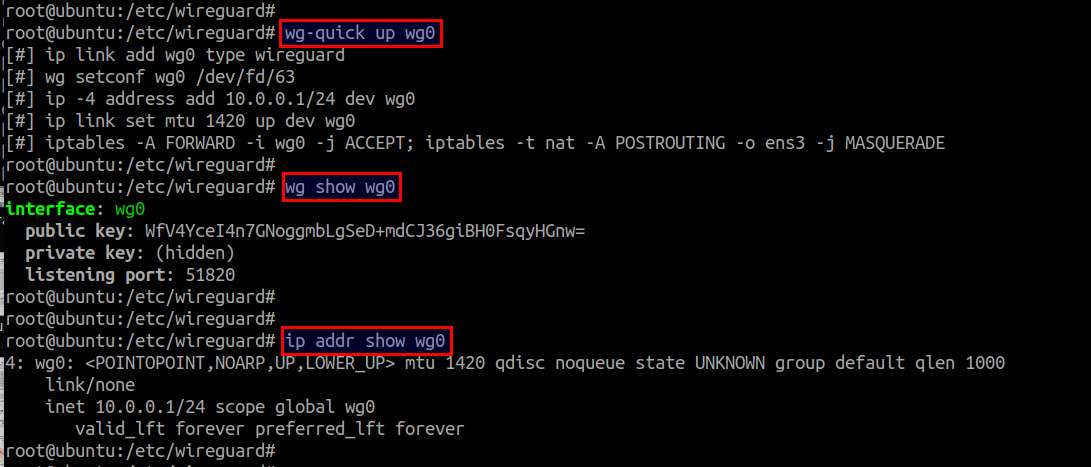
Now go ahead and activate this configuration with:
# wg-quick up wg0
This will activate the wg0 virtual interface, assign a private IP address to it, and enable IP masquerade on the interface. You can verify the state of the interface with:
# wg show wg0
# ip addr show wg0

If you see the wg0 virtual interface, that means a WireGuard peer is successfully up and running on Ubuntu.
WireGuard Post Configuration Steps
In order for this WireGuard peer to successfully admit other peers and act as their VPN server, you need to perform the following steps.
First, you need to allow incoming UDP connections on the WireGuard's listening port (51820) specified in /etc/wireguard/wg0.conf.
The default firewall configuration tool in Ubuntu system is ufw. Let's use ufw to open the WireGuard port in the firewall. If you are configuring your Ubuntu server over SSH remotely, don't forget to enable port TCP/22 as well.
# ufw allow 51820/udp
# ufw allow 22/tcp
# ufw enable
# ufw status verbose

As indicated above, the firewall rules are successfully updated via ufw and will be enabled automatically upon system startup.
Next, you need to enable IP forwarding, so that the WireGuard VPN server can relay traffic between connected peers, as well as route traffic as a default gateway. Open /etc/sysctl.conf and uncomment the following line.
net.ipv4.ip_forward=1
If you are assigning IPv6 addresses to WireGuard peers, uncomment the following line instead.
net.ipv6.conf.all.forwarding=1
Reload updated sysctl.conf with:
# sysctl -p /etc/sysctl.conf
Auto-start WireGuard VPN Service
If you are running WireGuard VPN on a remote VPS instance, you may want to enable WireGuard to auto-start upon VPS boot.
Luckily, WireGuard is already integrated with systemd on Ubuntu 20.04. Thus, you can manage WireGuard service with systemctl command (instead of running wg-quick manually).
If you have already started WireGuard manually with wg-quick, first you need to stop it before using systemctl:
# wg-quick down wg0
Then you can easily start and stop WireGuard with systemctl:
# systemctl start wg-quick@wg0
# systemctl stop wg-quick@wg0
Note that wg0 specified in the command should be the name of your WireGuard virtual interface.
To enable auto-start of WireGuard on boot:
# systemctl enable wg-quick@wg0
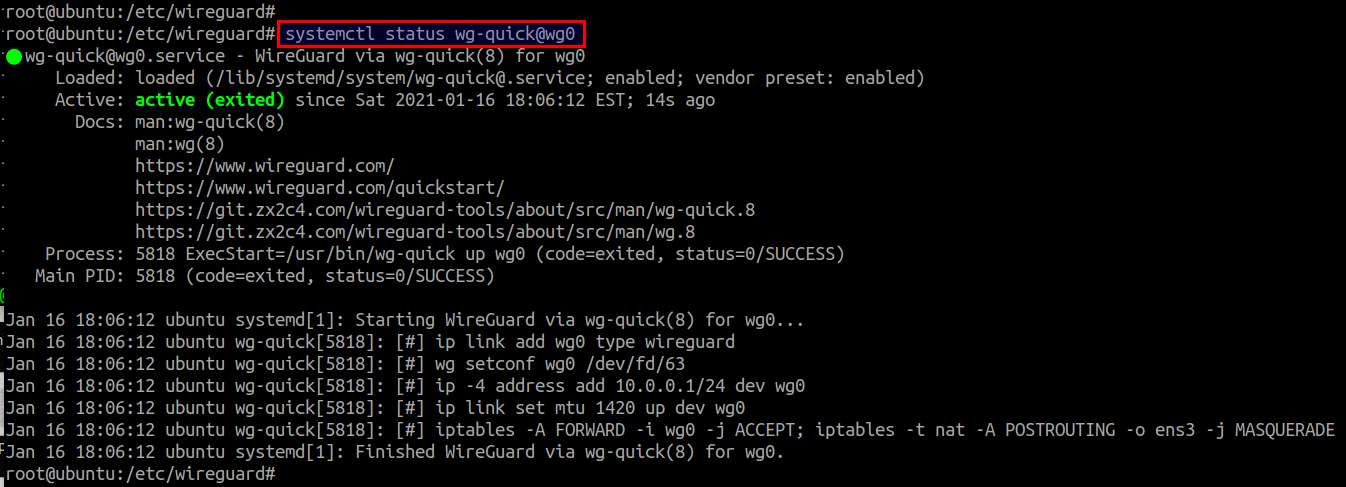
You can monitor the status WireGuard with:
# systemctl status wg-quick@wg0

Now your WireGuard VPN server is ready for use!
Summary
In this tutorial, I describe how to set up WireGuard VPN in Ubuntu Server 20.04 environment. As you can see, WireGuard server-side setup is extremely simple, mainly due to the fact that WireGuard (both the kernel module and userland tools) has already been adopted by mainline Linux distributions. There are various UI frontends for WireGuard in the works, and the recent verion (v1.16) of NetworkManager has started to provide native support for WireGuard as well. This tutorial provides a detailed guide on setting up WireGuard VPN client with NetworkManager GUI.
Support Xmodulo
This website is made possible by minimal ads and your gracious donation via PayPal or credit card
Please note that this article is published by Xmodulo.com under a Creative Commons Attribution-ShareAlike 3.0 Unported License. If you would like to use the whole or any part of this article, you need to cite this web page at Xmodulo.com as the original source.
Xmodulo © 2021 ‒ About ‒ Write for Us ‒ Feed ‒ Powered by DigitalOcean

